The answers come to those who seek them. Especially on the subreddit 'What Is This Thing?'
This online community is home to 2.3 million members who are always ready to help people identify the mysterious objects they found.
The gig is simple: someone uploads a photo of whatever it is they want the name of, and the gang starts commenting under it, offering their input until, inevitably, a person shows up who knows exactly what it is.
However, even if you're not posting anything, scrolling through their solved cases feels like an interesting challenge, where you can test (and expand) your own knowledge. So we invite you to do just that!
#1 This Metal Piece Is Attached To The Wall In A Wc In My Airbnb In France
Answer: It's a magazine rack installed upside down because people decorating Airbnb's don't know what they're doing.
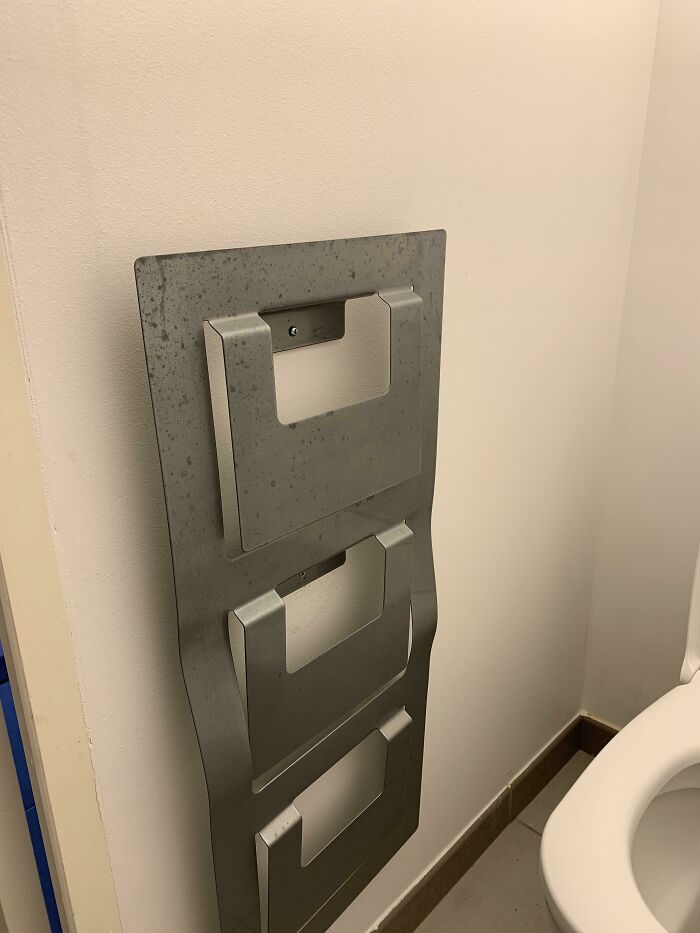
Image credits: mmay_a
#2 Saw This In A Restroom Which Has Faucets And Drain Down Low And A Dryer
Answer: This setup prevents Muslims from having to lift our legs up dangerously high while trying to stick our feet in the sink one at a time. The alternative to that is we have to take a handful of water and pour it onto our feet below the sink causing the floor to get wet. Muslims also have to keep their feet clean before praying, which is obviously problematic in a bathroom where everyone pisses on the floor and walks with their shoes between the stalls and the sink, so you might see them trying to keep one shoe on while washing the other foot and then switching. It’s also why we take our shoes off before praying and use prayer rugs to avoid touching unclean things while praying.
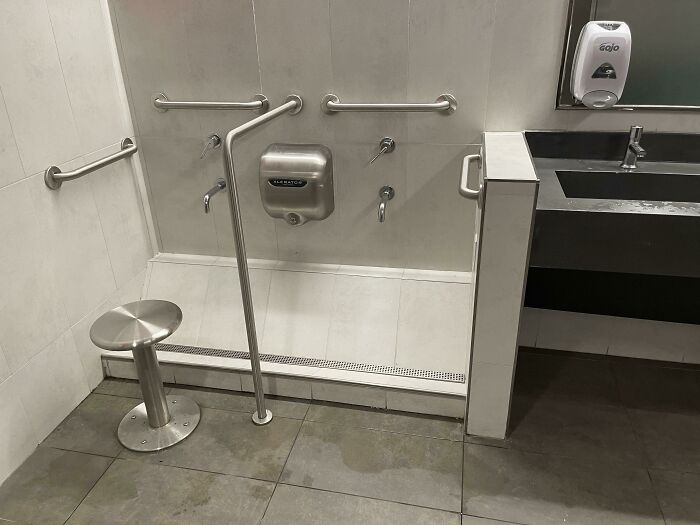
Image credits: atomicdragon136
#3 We Found This On Top Of A Bookcase While Cleaning Our Office. It Appears That The Jar Is Sealed. The White Things Inside Weigh Next To Nothing. We Didn’t Want To Open It Until We Have Some Idea As To What It Is. They Look Pretty Soft. Nothing Identifying On The Jar Itself
Answer: They look like silkworm cocoons.
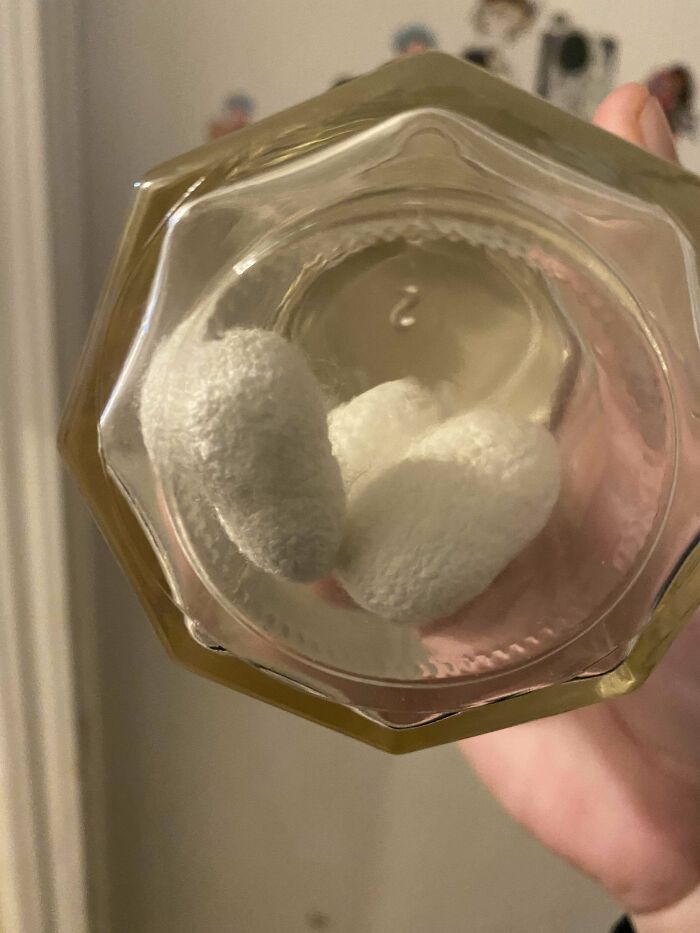
Image credits: loveofGod12345
#4 What Is This Oval Metal Thing In A Plastic Holder Mounted To The Kitchen Wall Next To The Sink?
Answer: Steel "soap" bar. Removes odors like onion from ur hands when u wash with it by just adding a strong steel odor on top.
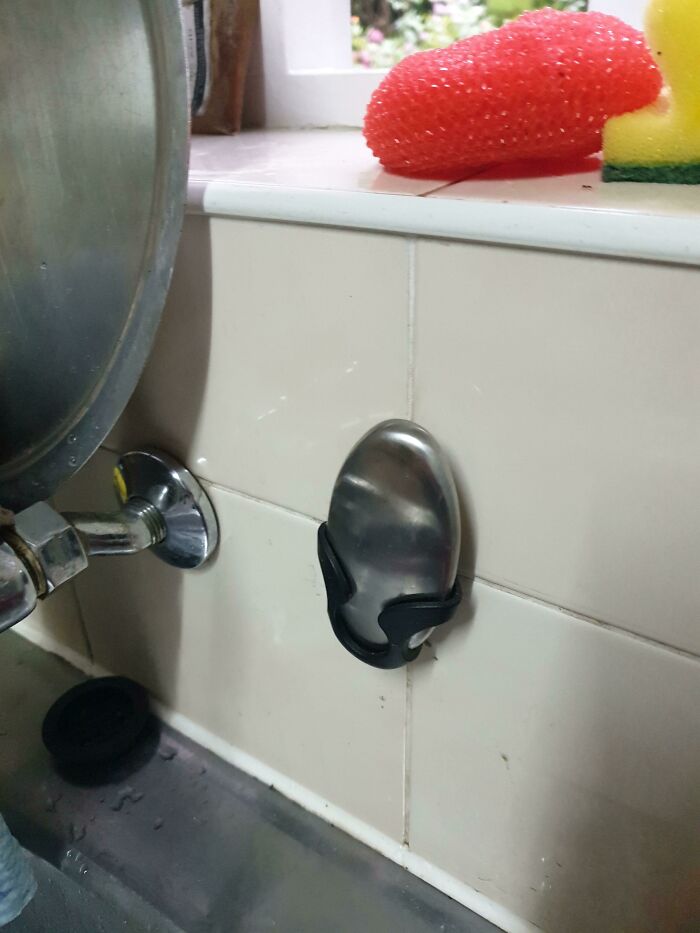
Image credits: inzombiac
#5 Round Shelf Attached By Metal Brackets To Underside Of Table. What Is It For?
Answer: It's a place to rest your beer while you play cards.
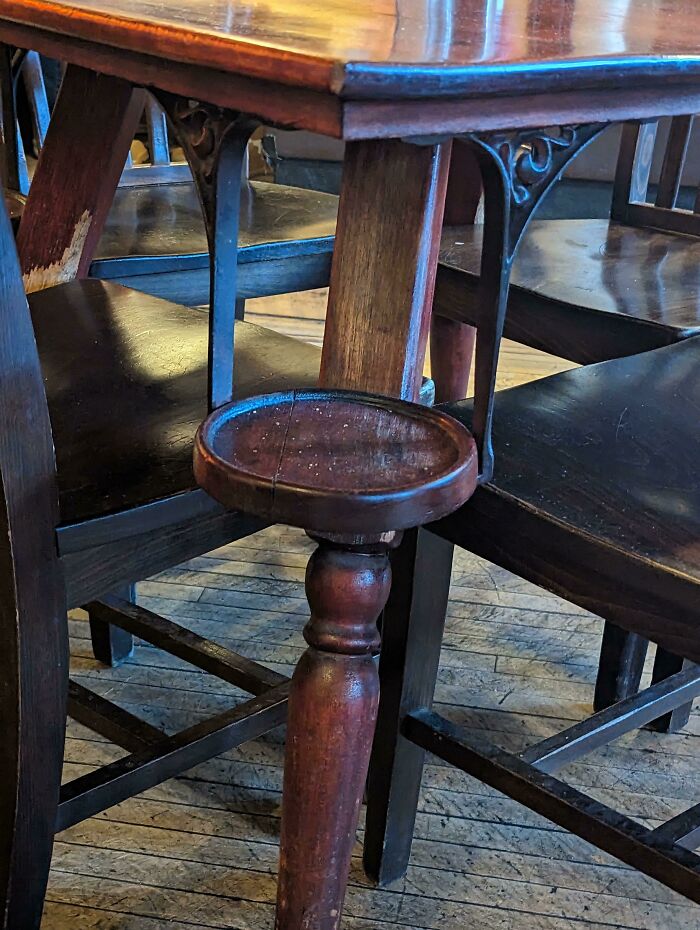
Image credits: One_Has_Lepers
#6 Weird Semi Circle Wires With Various Beads On A Wooden Plank Found In An Older House
Answer: A Himalayan Calendar. The outer ring as 12 balls, each corresponding to a month. The next two rings have a tens and ones digit. The tens has three balls for up to the 31st, and the next has nine balls, for 0 to 9. And then four rings for the year, up to 9999.
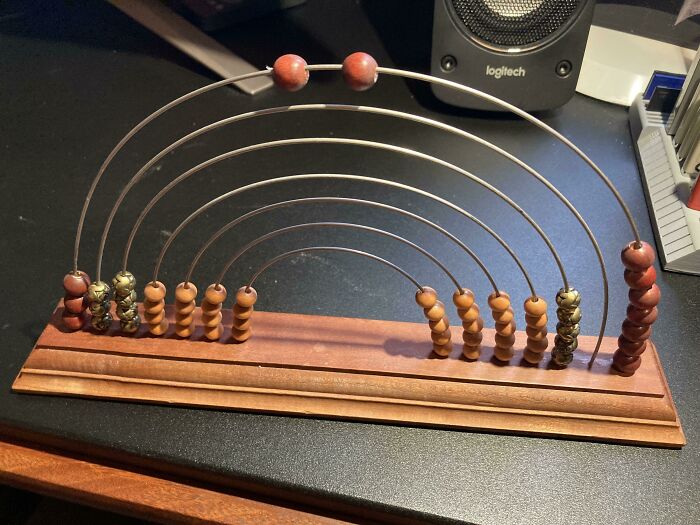
Image credits: Oxfordcommapreacher
#7 Bought A New Pair Of Nike Shoes. Inside The Box Was This Small, Plastic Bubble, Filled With Air, And What Looks Like Tiny, Colorful Micro Plastics. Has A Loophole On The Top And Is About An Inch Long
Answer: Micro plastic particles. Probably to show how Nike helps to clean up our planet. Greenwashing at best.
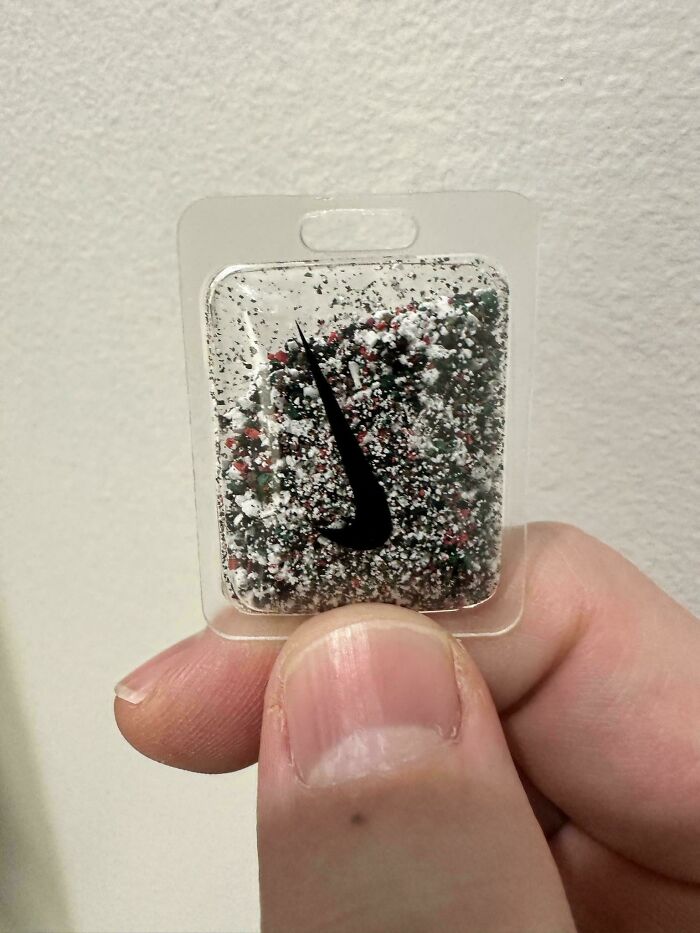
Image credits: tsirs
#8 4 Inches, Plastic, Pointed On One Side. Received As A Xmas Gift?! Witt??
Answer: Looks like a page spreader for reading. Point end goes into the spine and thumb in hole so you can one hand books easy.
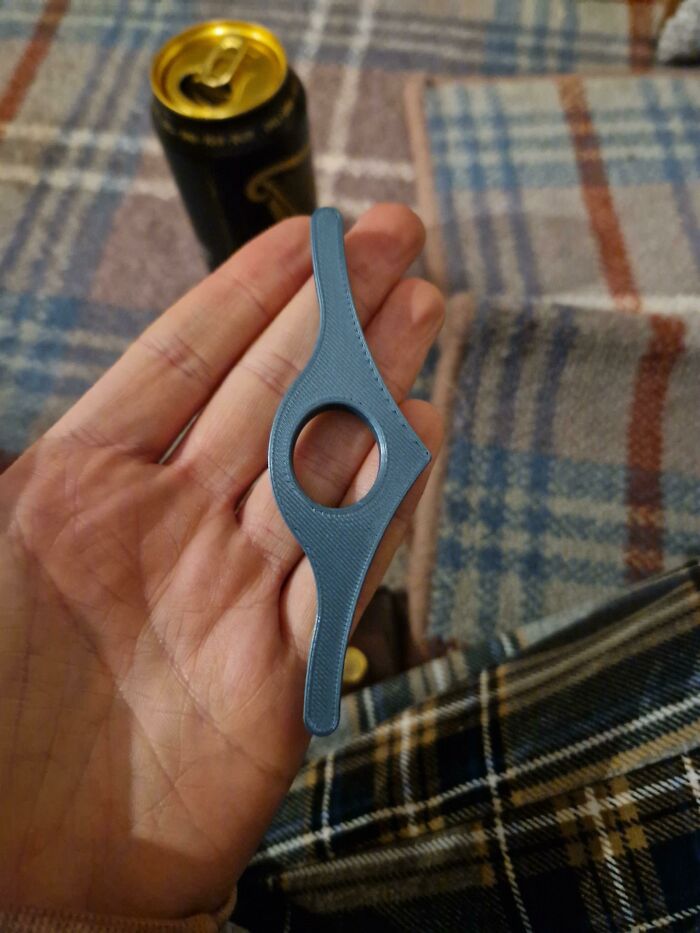
Image credits: Karljoneill
#9 Wooden Block With 6 Metal Fins, Inscribed 'Hemma Patent'
Answer: Cabbage sliced for making sauerkraut.
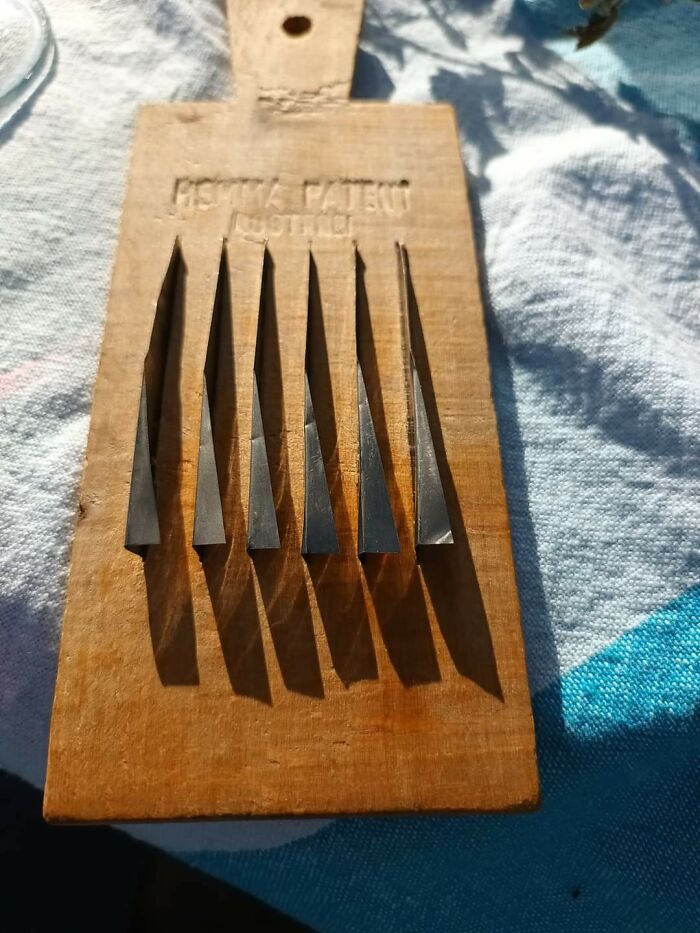
Image credits: Interesting_Usual882
#10 Hard, Waxy, Blob-Looking Thing Found During Low Tide
Answer: It's whale sick get it checked it could be worth thousands a kg. It's an ingredient used in high end perfumes.
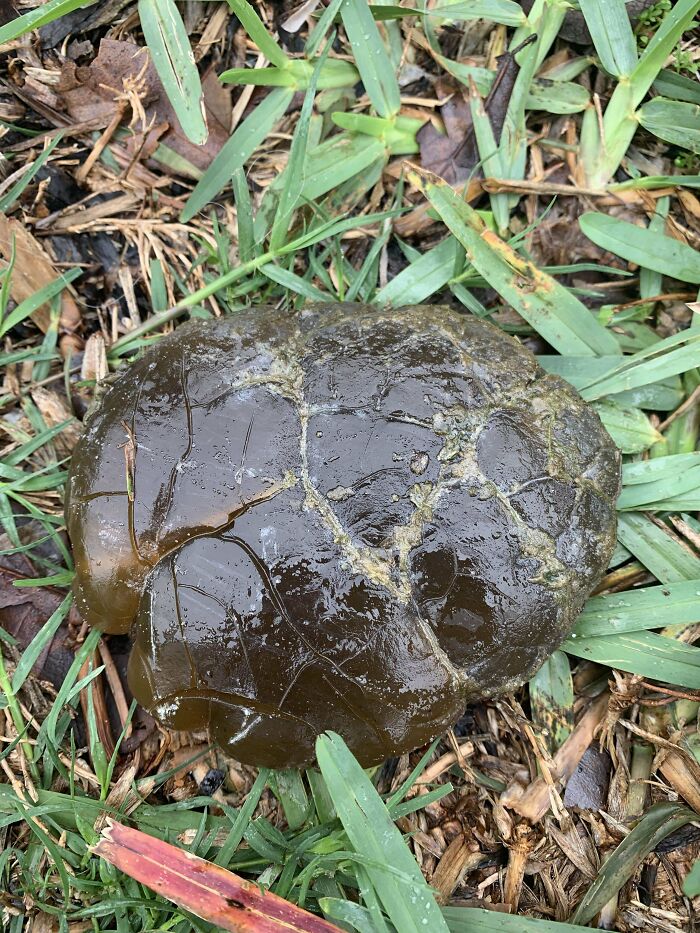
Image credits: Swimming_Sea964
#11 Steel, Engraved, Hooked Tool Hidden In The Foundation Of An Old House
Answer: My wife says horse hoof cleaning tool, and she's a major horse gal. Also, burying an iron object within the foundation of a home was once considered good luck.
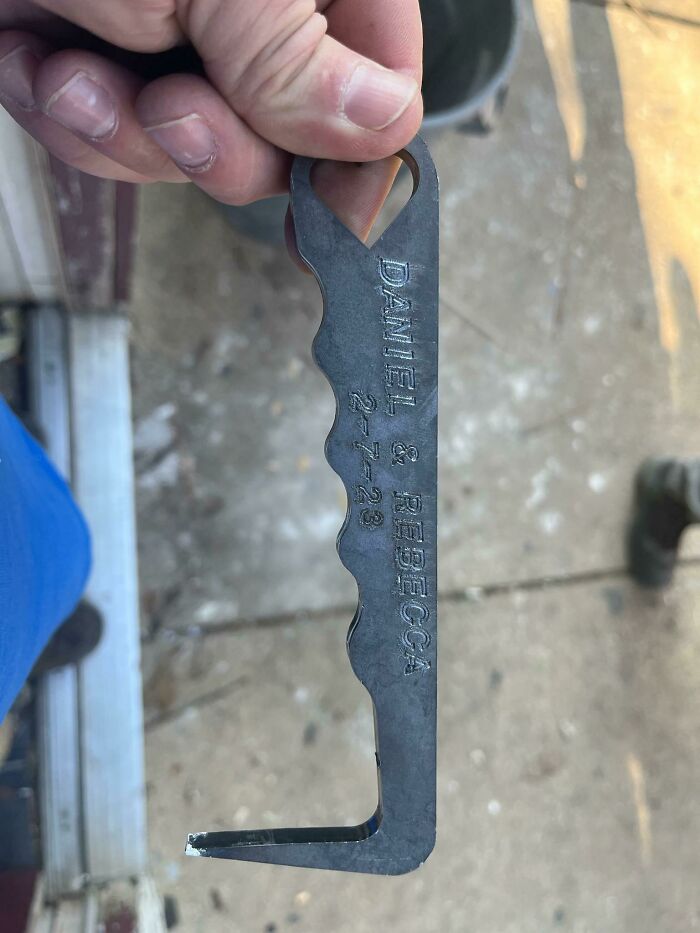
Image credits: StarsSuck
#12 What Are These Little Knit Tubes?
Answer: They can be used to avoid chairs scratching your floors. So they are socks, but for chairs rather than humans.
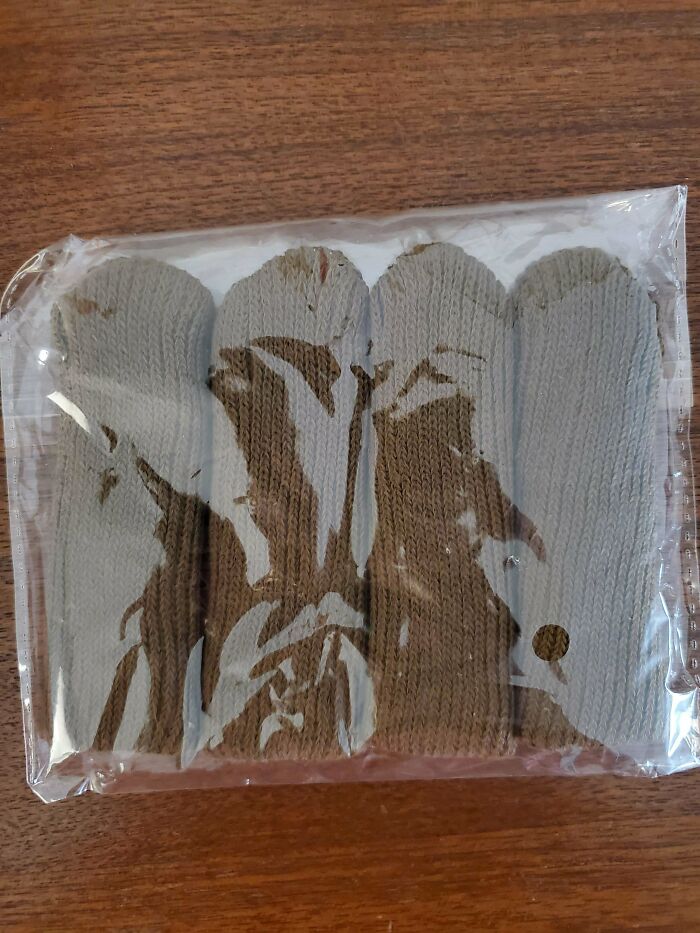
Image credits: InevitableDevice2182
#13 What Are These Heavy Metal Objects I Found In A Thrift Store?
Answer: You hang weights on chains to power mechanical cuckoo clocks. One powers the clock mechanism, and the other powers the cuckoo. The weight turns gears in the mechanism as the chain drops. To wind the clock, you pull on the other end of the chain and bring the weight back up, and the same for the chain that powers the cuckoo.
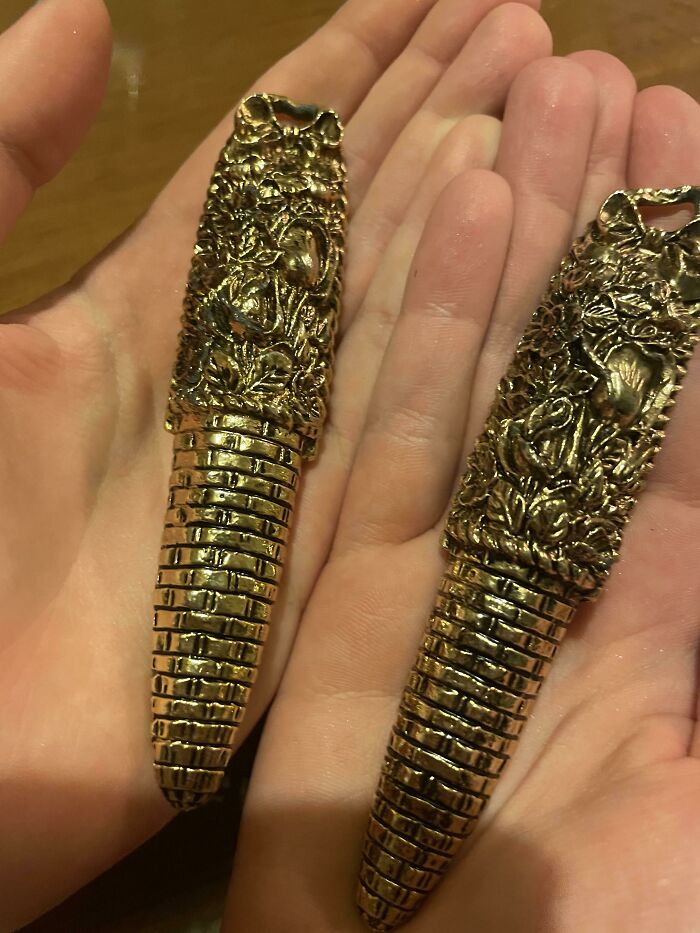
Image credits: reddit.com
#14 This Plaque Came In As As Scrap Metal. Measures Approx 1.5ft X 6in. Made Of Cast Aluminum. Google Turns Up No Results. Witt??
Answer: Probably a horse. The bottom is the sire and dam.
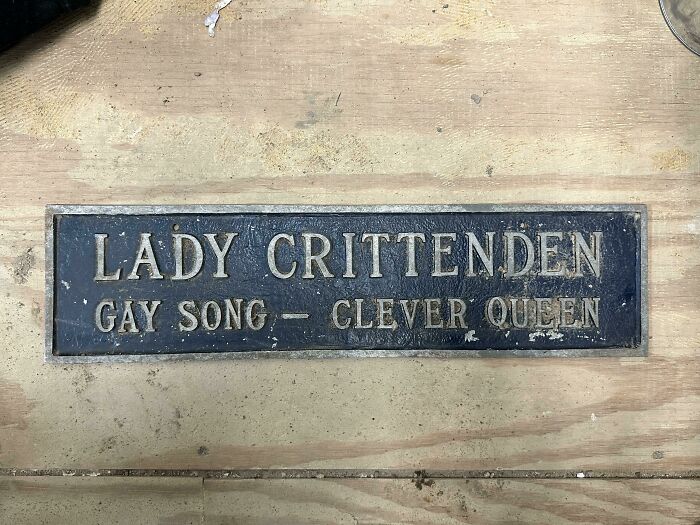
Image credits: Wequiwa
#15 Strange Looking Hook Thing Found Buried In A Hutch. The Inscription On The Hook Side Is In French. Any Ideas?
Answer: It's a butter curler, for making fancy bits of butter.
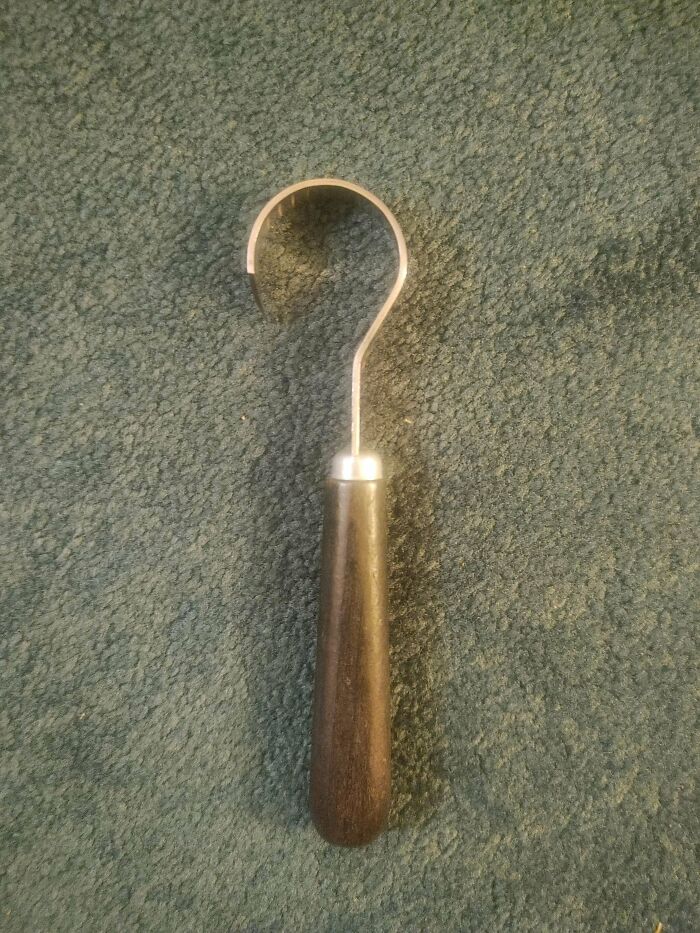
Image credits: Curious-Creation
#16 Made Of Clay/Terra Cotta, Can Fit Inside A Palm. It Came With Something I Bought But Can't Remember What
Answer: Terra cotta sugar saver. You put it in with your brown sugar to keep it from clumping or drying out in storage.
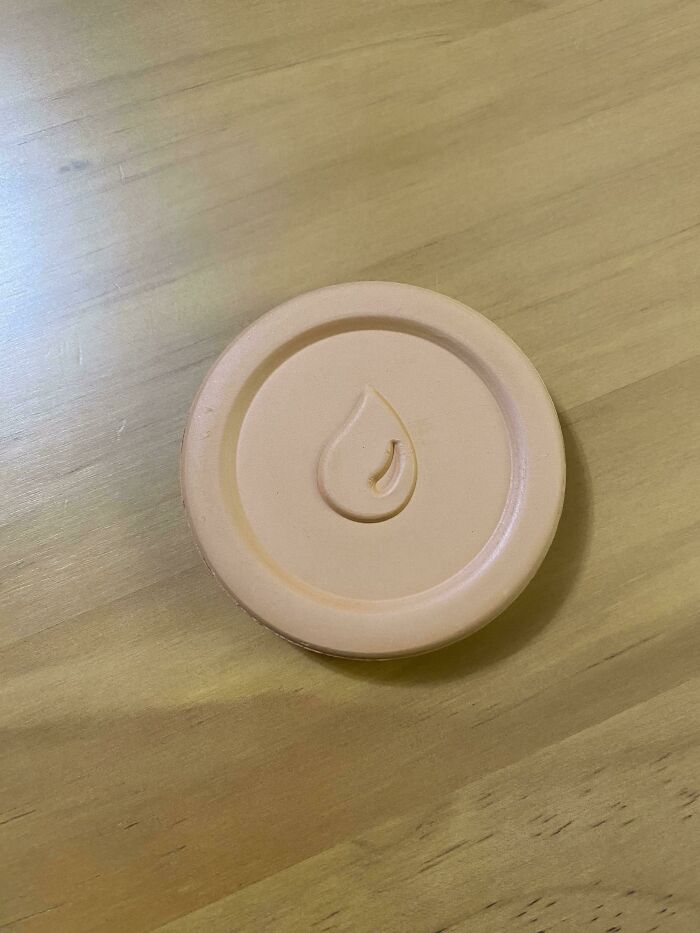
Image credits: potatochild001
#17 What Would This Antique Silver “Locket” Have Been Used For? It Looks Like Possibly Ink Residue On The Two Pads Inside, But No Indication That The Inside Door Would Have Been Sealed Tightly Enough To Be A Reservoir
Answer: It's actually a purse. There's space in there for some coins for bus/cab fare, some powder makeup (behind the little door), and calling cards.
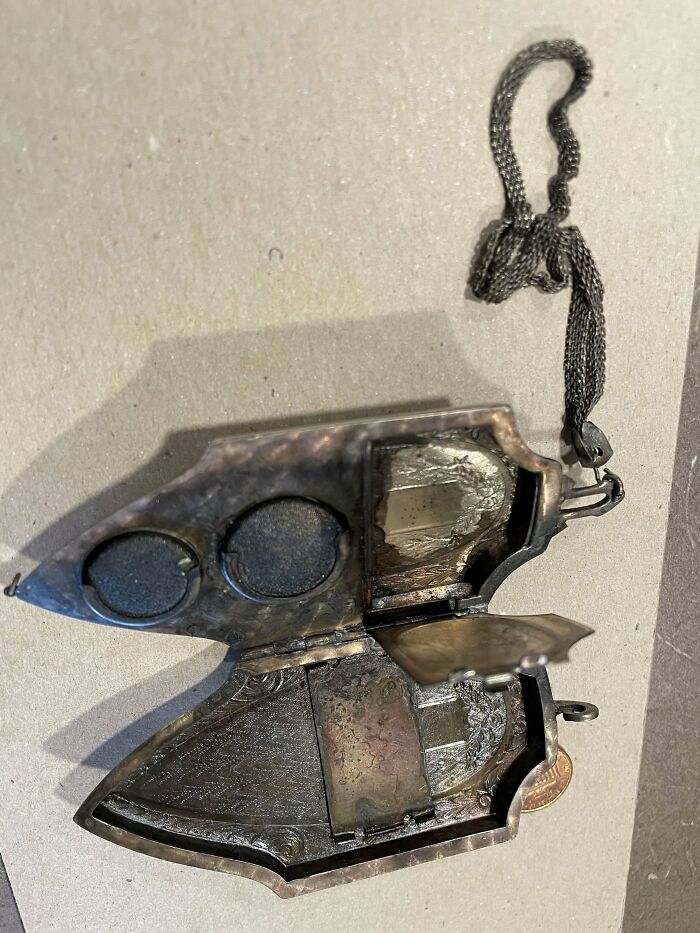
Image credits: didilamour
#18 I Spotted A Few Of These Wrought Iron Poles On A Road In Central London, They Must Have Had Some Historical Usage, But I'm Not Sure What. Perhaps For Lamps? Did The Circle At The Top Used To Hold Something? Was The Arm On The Right For Hanging Something?
Answer: It's an early 19th C Gaslamp. The gas is piped up the pole, and a copper pipe would have extended into the glass lamp house, which fitted into the hoop.
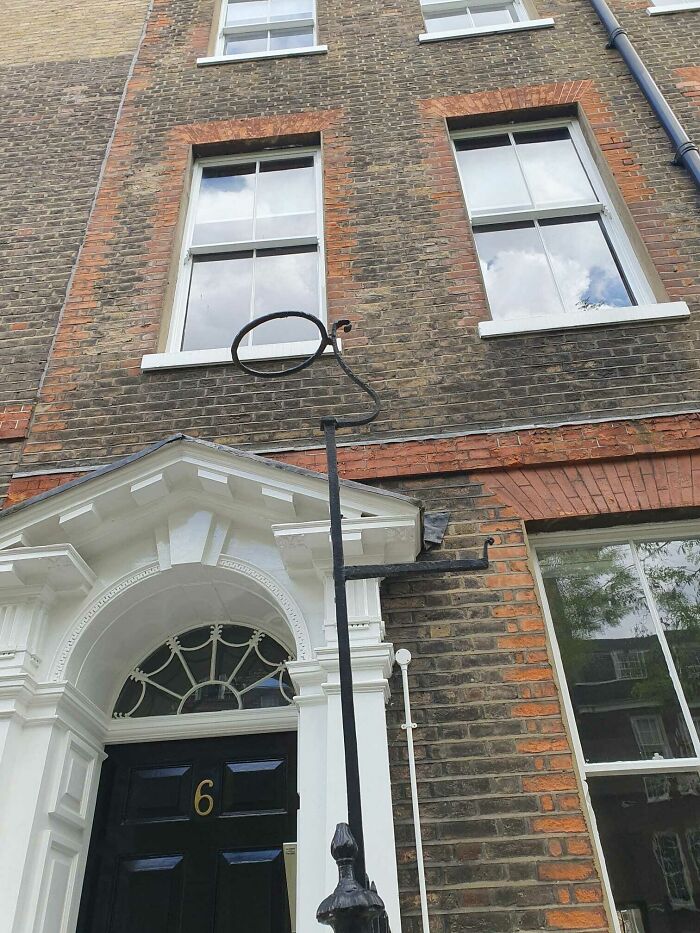
Image credits: scientificdramatist
#19 What Is This Camera Looking Thing My Neighbors Pointed At My Backyard?
Answer: HPDFCU Ultrasonic Animal Deterrent.
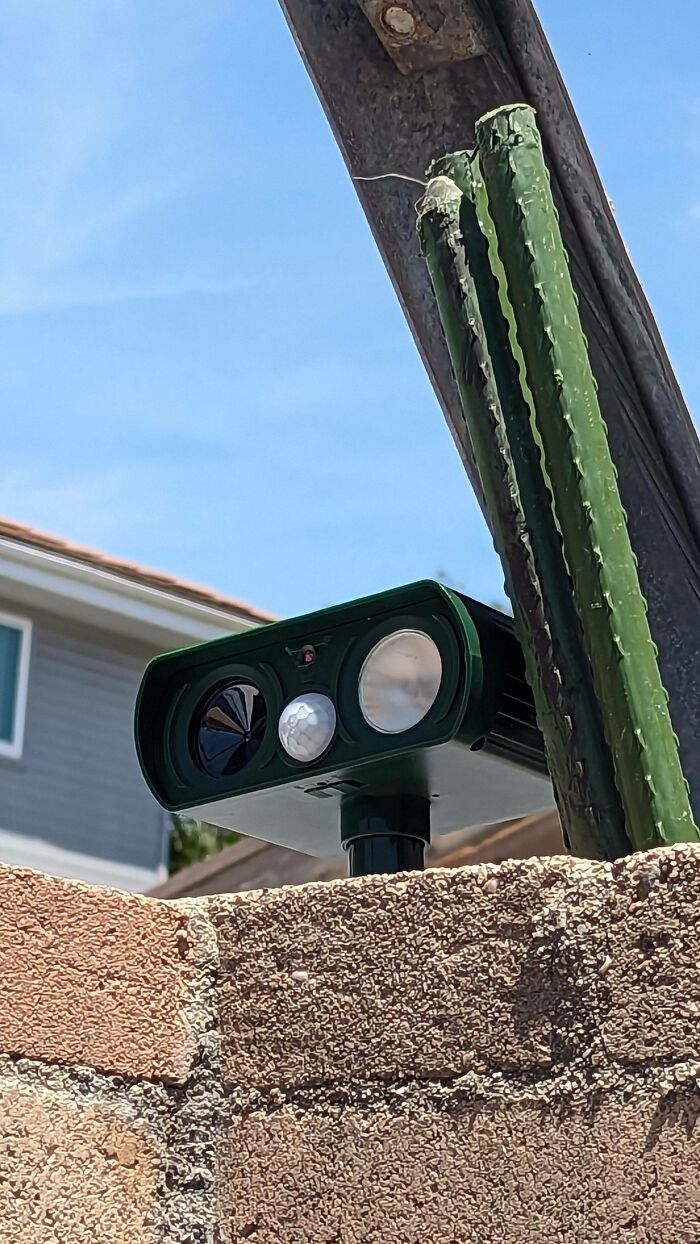
Image credits: BloodyBender
#20 What's This Heavy, Brass, Genie Lamp-Like Object With Both A Weird Cutout Spout And A Narrow Upwards Spout?
Answer: It’s a lamp. It’s literally an oil lamp, to be used to create light. The wick goes in the spout. The oil goes in the belly. You light the wick and a flame will burn on the end of the spout like a little candle, and you can carry your lantern around with you.
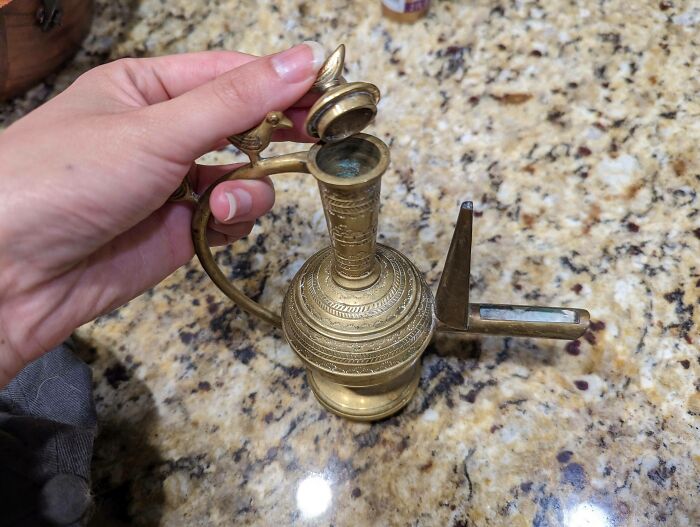
Image credits: FlaxxtotheMaxx
#21 Found In Kitchen Junk Drawer. Heavy, Solid Brass
Answer: Telephone dialer. You put the ball end in the desired number of the phone dial instead of your finger tip and used it to turn the dial.
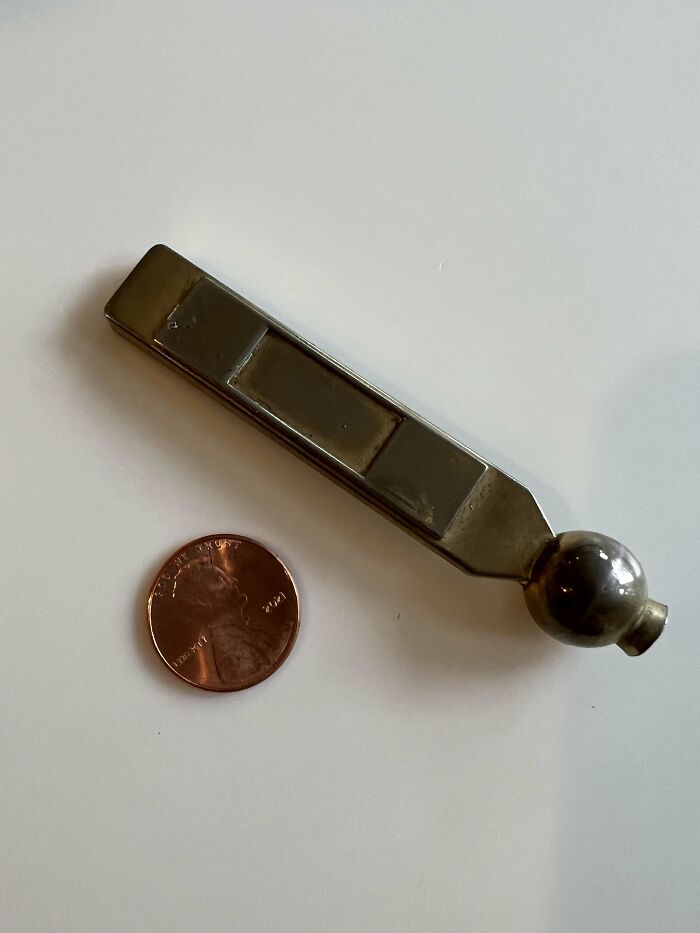
Image credits: boneyheimer
#22 Found This Spiked Metal Collar Hanging In One Of The Upstairs Rooms In The House I Just Bought In Spain
Answer: Anti-wolf collar for sheepdogs.
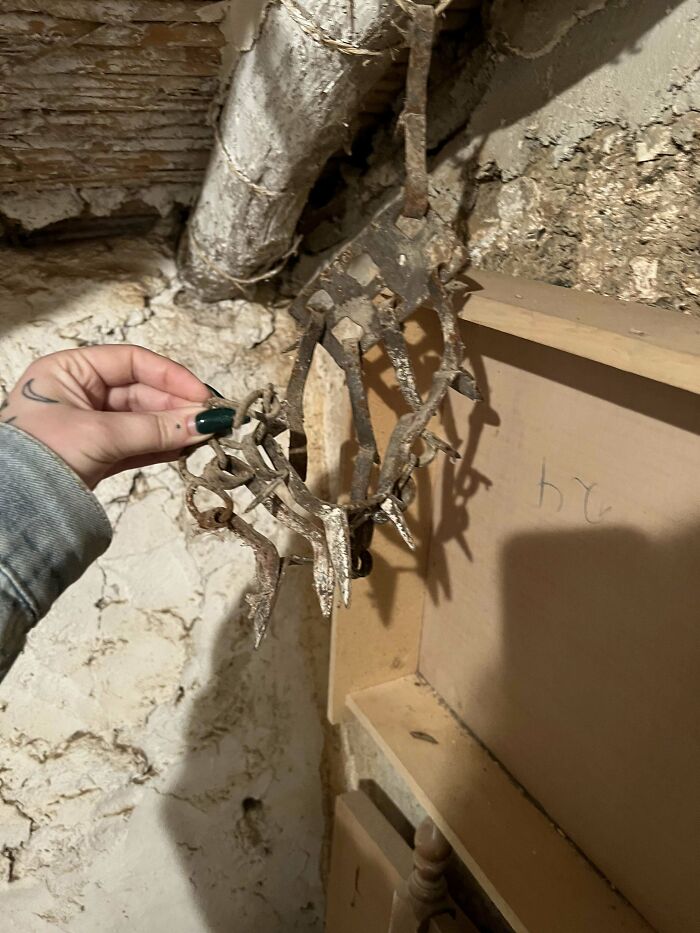
Image credits: delilahgabj
#23 What Is This Wall Mounted Metal Thing That Was Seen In Hohensalzburg Fortress? There Were 3 Or 4 Rooms With One Of These Objects And None Had An Explanation
Answer: These are pretty much radiators that were filled with embers and/or hot stones when needed.
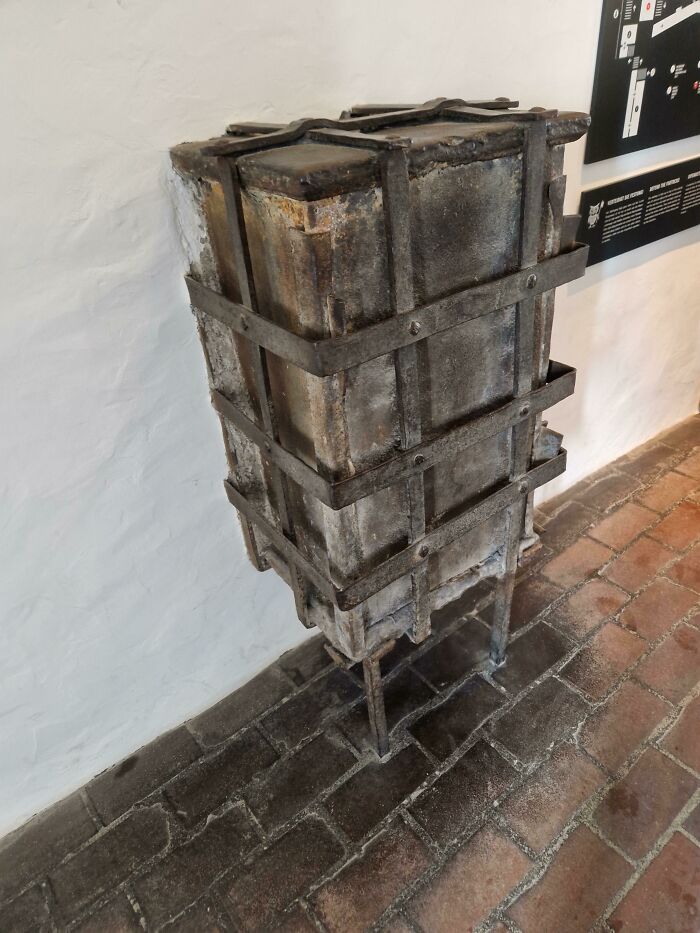
Image credits: Shadow_F3r4L
#24 This Weird Wire Was Pushed Through My Bathroom Ceiling
Answer: This is a mushroom growing in the ceiling and is likely the result of water damage from the floor above.
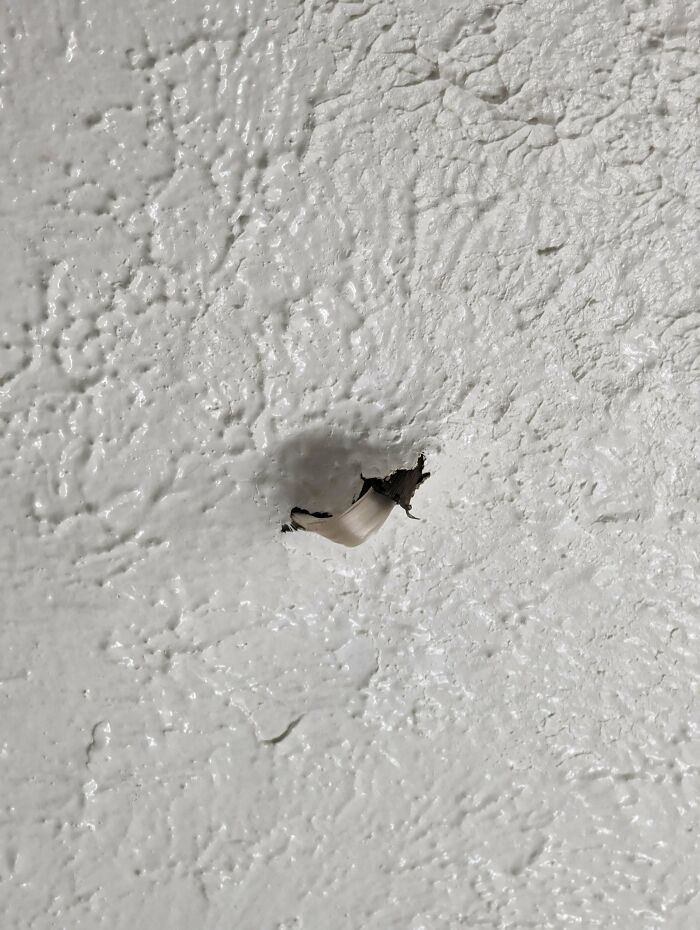
Image credits: AFROSS
#25 Small Vintage Metal Decorative Item That Gets Blazing Hot When Plugged In. (Unplugged Immediately To Avoid Fire)
Answer: A cigarette lighter.
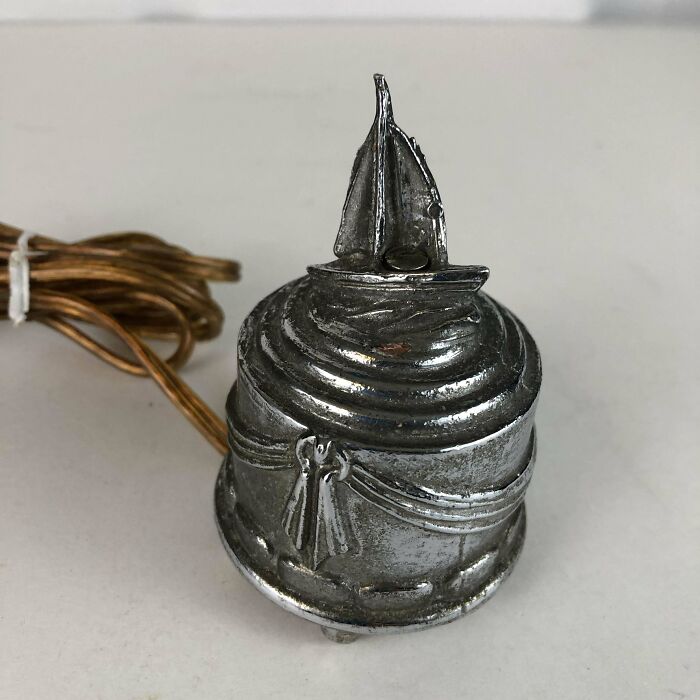
Image credits: junkshopper2000
#26 1940 Mercury Dime Turned Into A Two Sided Spoon Of Some Sort With Fused Ring At The Top. Came With Odds And Ends From Deceased Older Relative From Ohio
Answer: A vintage spoon pendant used for illegal substances.
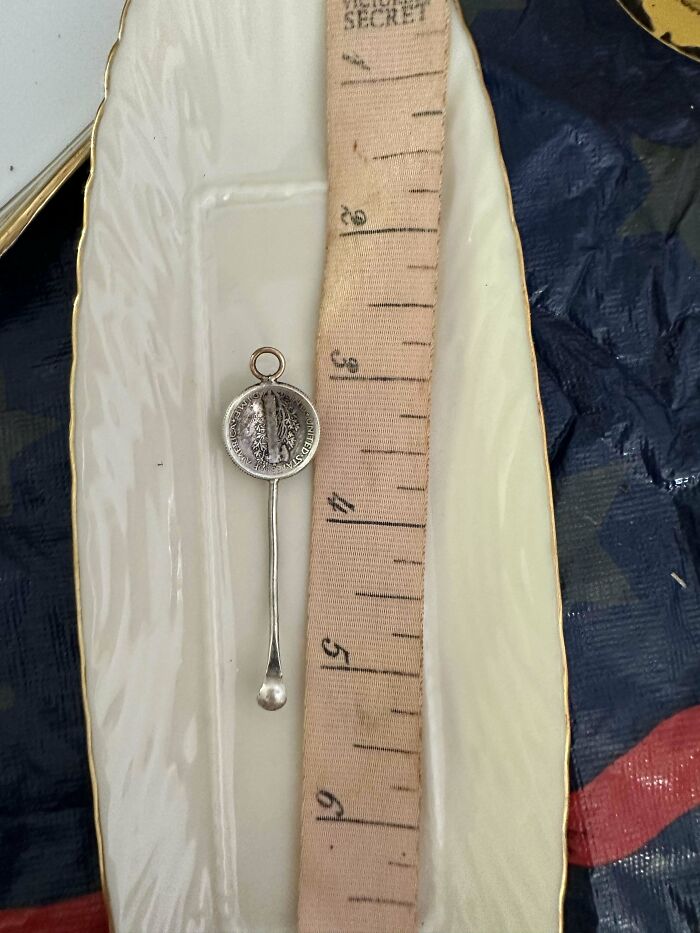
Image credits: tlmsmith
#27 This Tiny Door On My Wall Below The Window? 1926 NYC Apartment Building
Answer: It is a cold box.
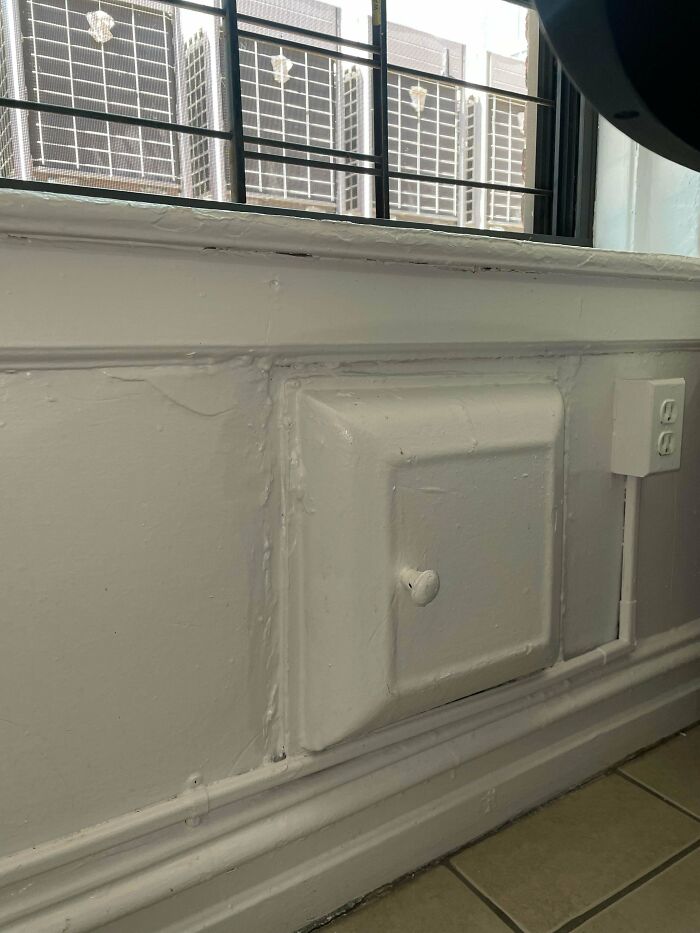
Image credits: reddit.com
#28 What Is This Spoon With A Tong-Like Attachment? Seen In An Antique Store In Lyon, France
Answer: It is a spoon designed to separate the fat from the sauce, called "cuillère dégraisseuse".
Image credits: bazoid
#29 What Are Those Wooden/Plastic Boards In Front Of Doors? Found In A Small Spanish City
Answer: Boards that keep stray dogs from peeing on the door.
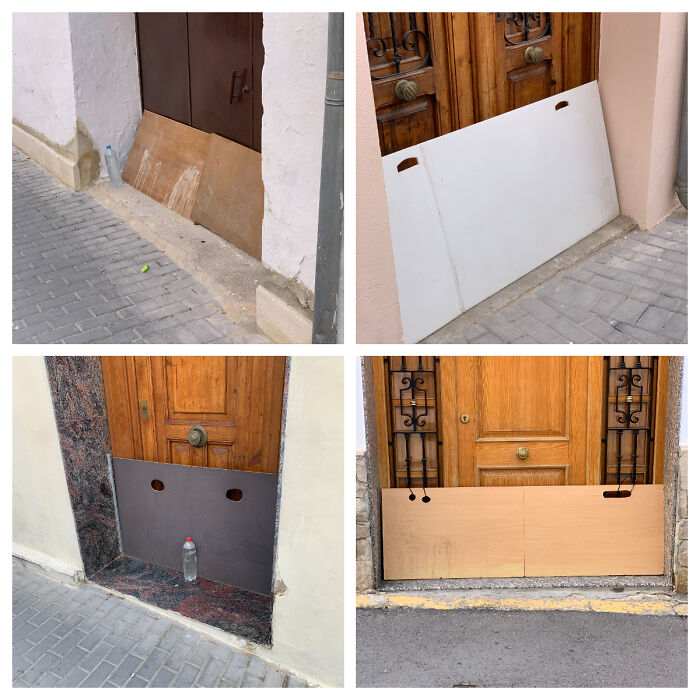
Image credits: GOBLINH8ER
#30 This Little Ramp Thingy On The Bottom Of A Lotion Bottle
Answer: It’s for the manufacturing of the product so that it can be turned while standing up.
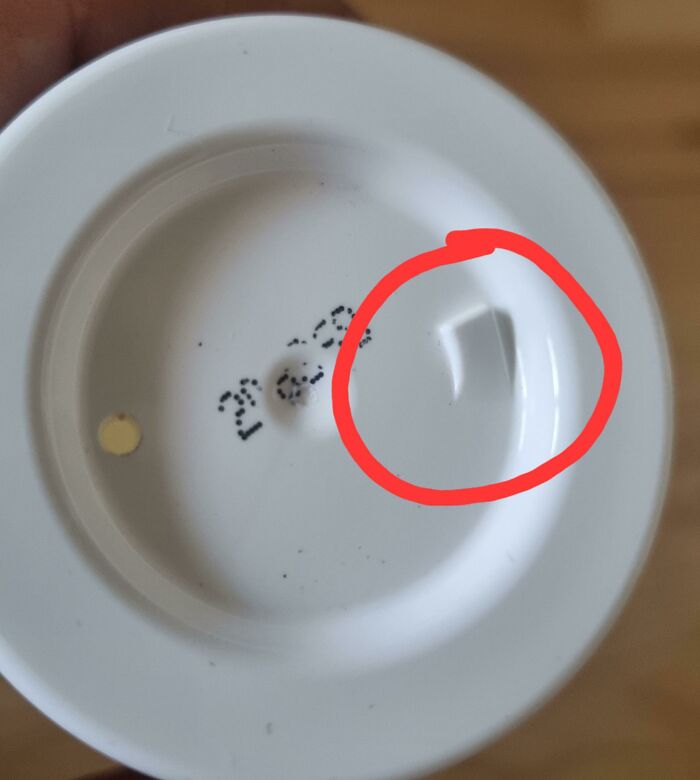
Image credits: Eastern-East1476
#31 Strange Metal Thing On The Bottom Of My Drivers Side
Answer: Your mechanic is gonna want that back. It’s part of a lift.
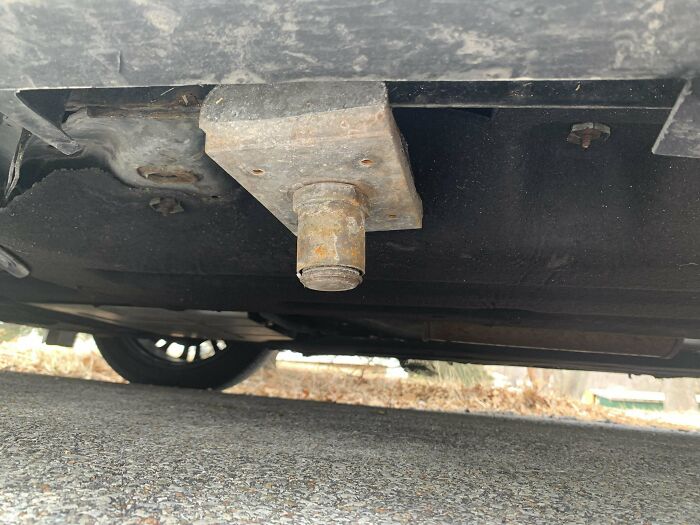
Image credits: BlueFlames1723
#32 Found In A Safe In A Deceased Man's House: 11 Identical Stacks Of Thin Black Paper Strips, Wrapped In Plastic Foil, Covered In Fine White Dust. Measurements Of Each Strip Approximately 16 Cm X 6,5 Cm, Height Of Each Stack Approximately 5 Cm. Other Than That, The Safe Was Empty
Answer: "Black Money Scam". It's construction paper or similar, he was scammed to believe it was currency dyed to be smuggled and could be restored.
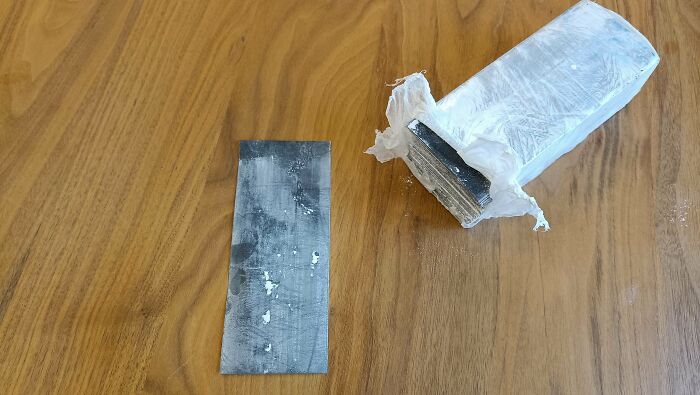
Image credits: sbs_str_9091
#33 What Is This Thing? It's Wooden And About 6ft Tall, Found Inside Goethe House
Answer: Linen press.

Image credits: boredaugust
#34 Container That Opens Sideways Seen At Homegoods. No Luck With Image Search On Google
Answer: It's a container for keeping herbs fresh in your refrigerator.
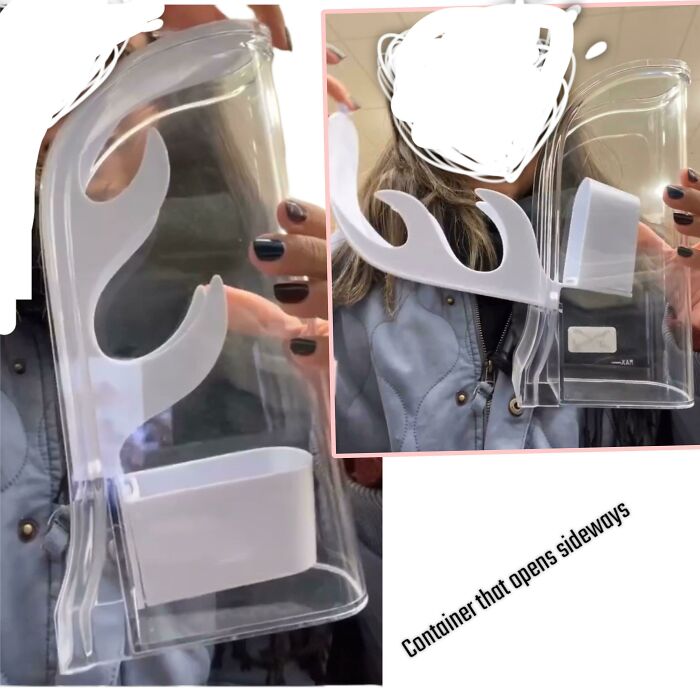
Image credits: Jahstar7
#35 What Is This? It’s Made Like A Barrel But Looks Like A Carrier Of Some Kind?
Answer: It is a Vasculum, a sturdy collection container used by botanists on field excursions in which plant specimens can be collected without damaging them.
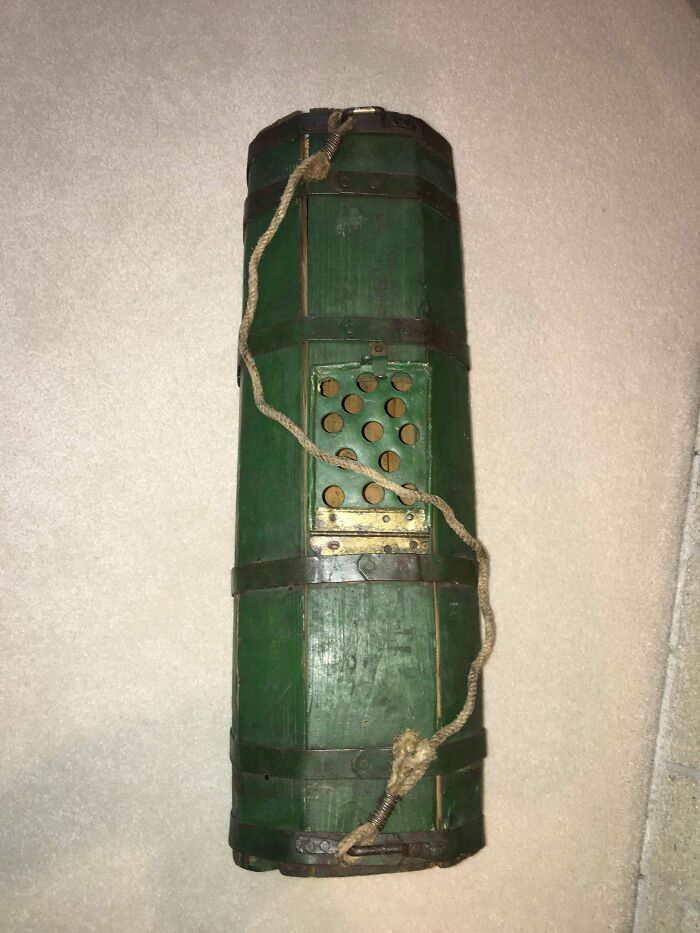
Image credits: Valuable-Camera-7107
#36 Found On Charmouth Beach, Dorset. Screw Cap And Has Bright Green Liquid Inside
Answer: It’s a diver rescue marker, for ocean rescue. You release it to dye the water around you and even at night a blacklight can light it up.
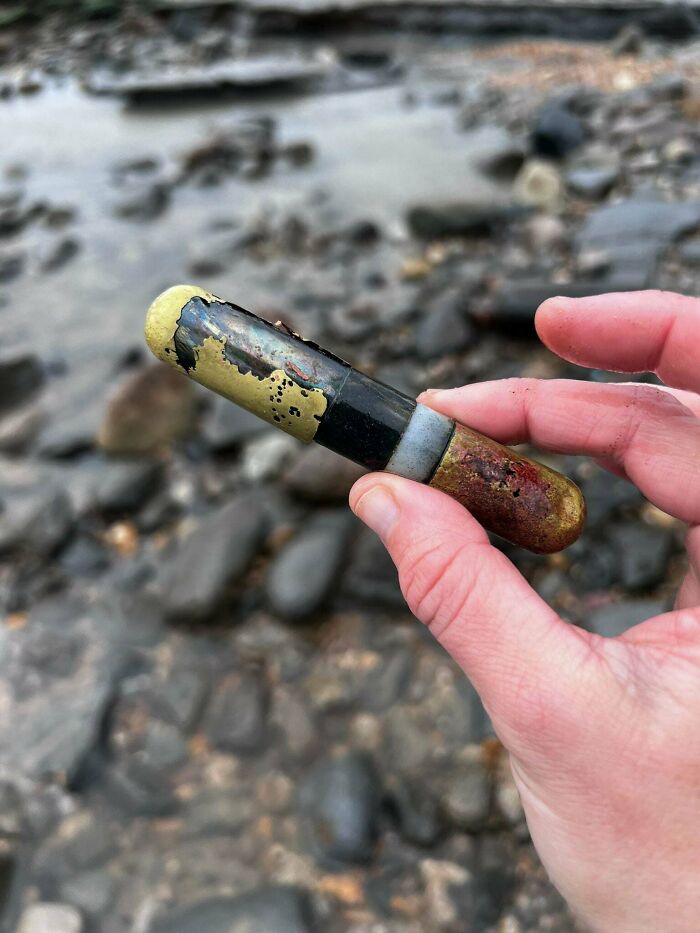
Image credits: howitzer1
#37 What Is This Mechanism? It Is In A Wooden Box And Has A Hand Crank Turns A Chain Inside Possibly Generating Electricity?
Answer: Part of an old telephone. The bell is for incoming calls. The crank is to buzz the operator to connect you to the other party.
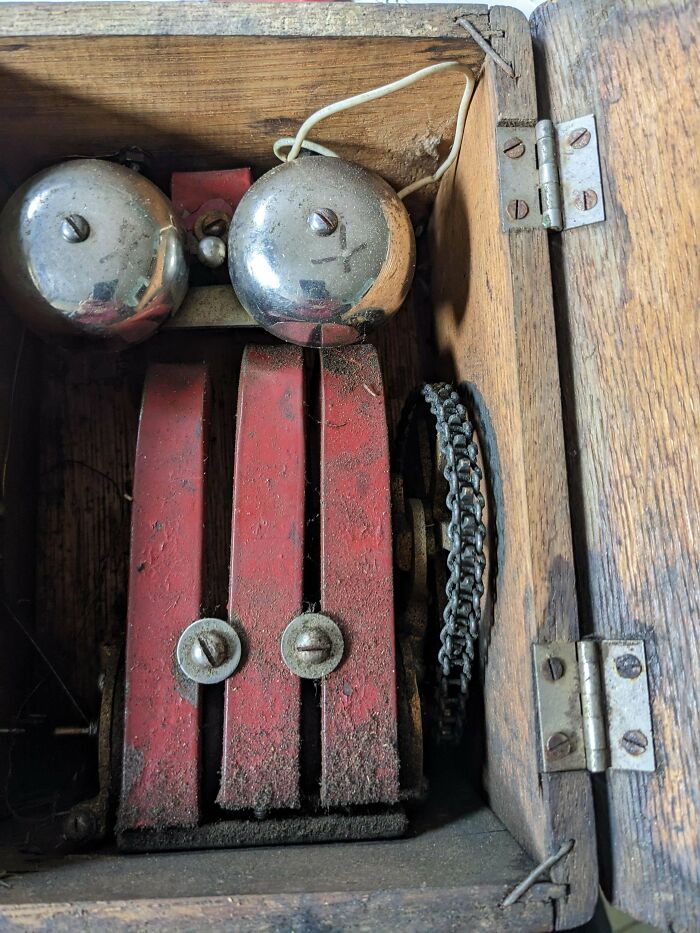
Image credits: Radio-Groundbreaking
#38 Fully Wooden, Too Short To Be A Table, Too Wide To Be A Bench. Found At A Farmers Market
Answer: It's a chair, howdah style.
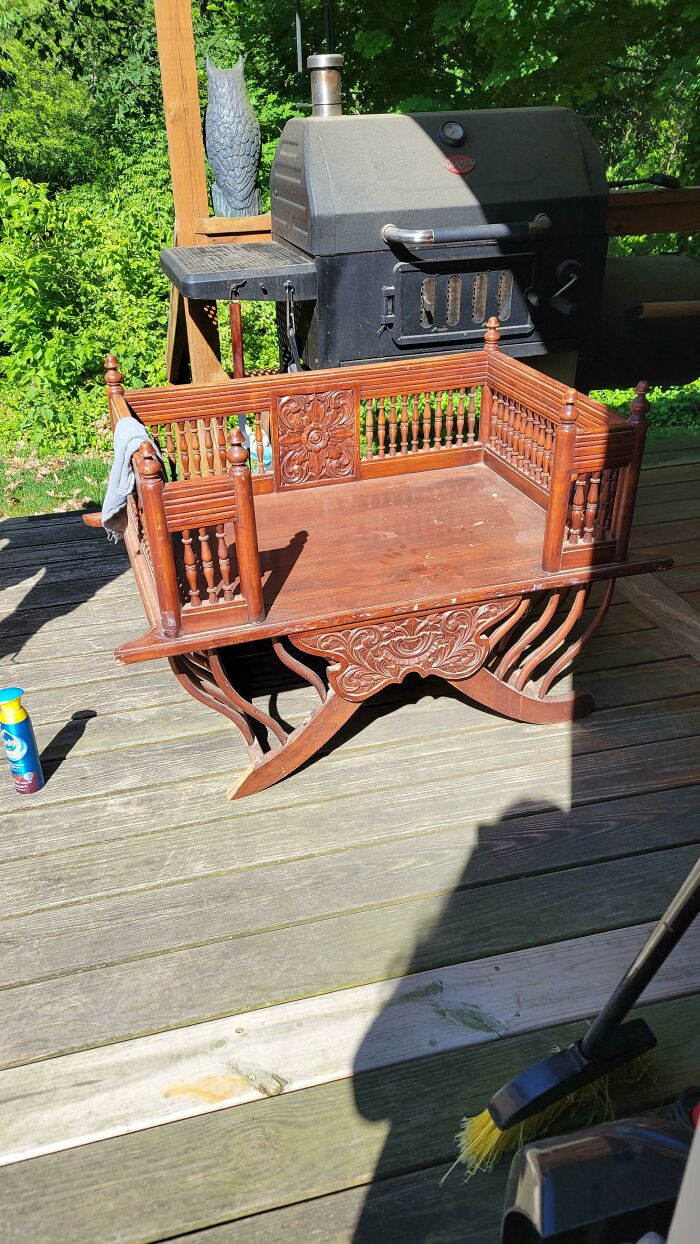
Image credits: ali_cat_
#39 A Short Thick Metal Coil That Can Be Plugged Into An Outlet. Doesn't Seem Very Safe At All. I'm Thinking It's Missing A Larger Piece That Creates It's True Purpose
Answer: Immersion heater. The metal piece goes into a cup of water and heats it.
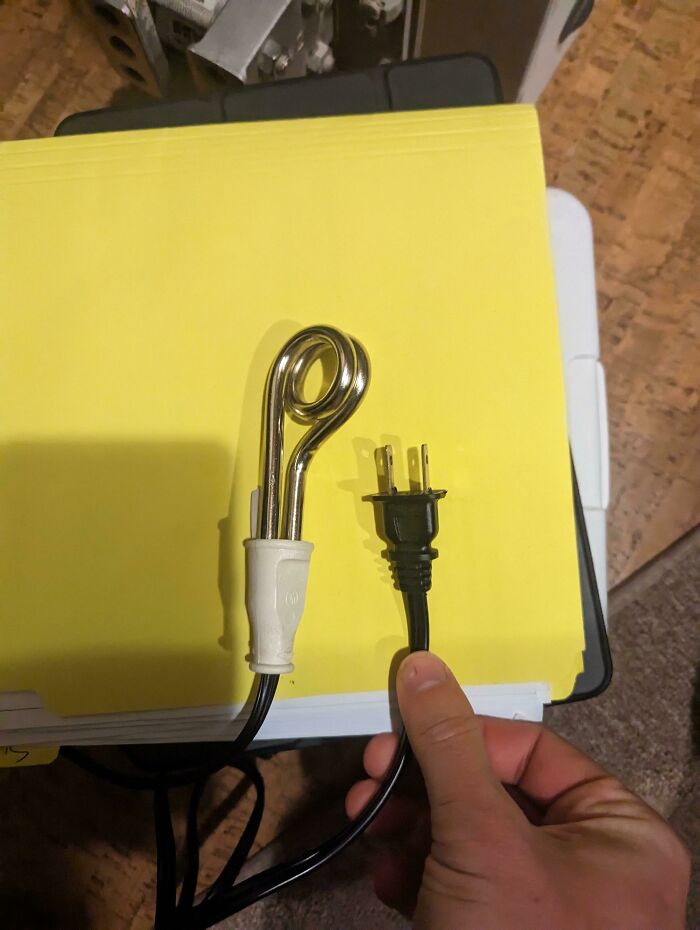
Image credits: Commercial_Wasabi_86
#40 A Foam Rubber Promo Item From The Local Water Authority. What Is It For?
Answer: YVW Water Watchers! Initiative to remind children to conserve water when possible. This is insanely clever. The Hawthorne effect is when people behave differently when they know or feel like they’re being watched—choosing a healthier meal at lunch with your fit friends, or being more productive at work when you sit near the boss’s office.
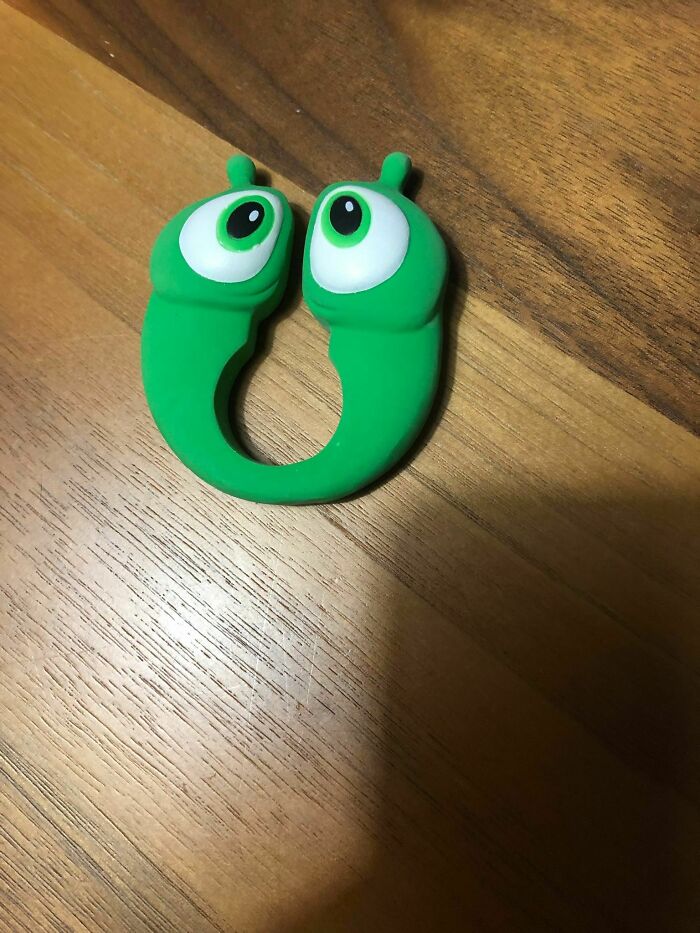
Image credits: Johanso
#41 Plastic Ring With Three Relatively Sharp Metal Claws, Found On Beach In Scotland
Answer: It's a "claw" to help pull in fishing nets.
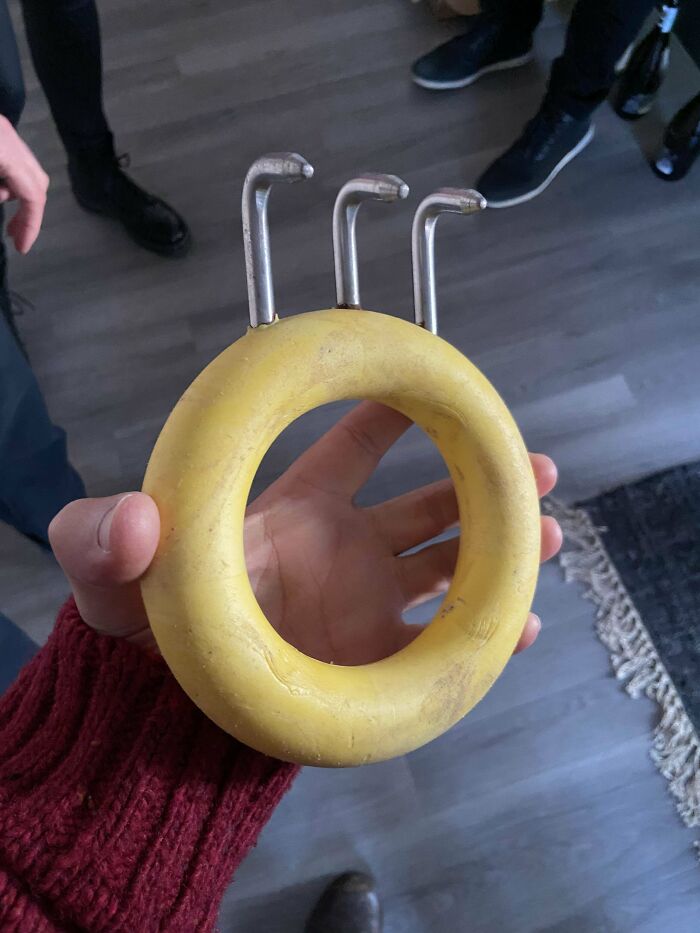
Image credits: machukahn
#42 Found This In Our Donation Bin, We're A Nonprofit, We Recycle Eyeglasses And Hearing Aids. It's A Gold Plated Speaker With A Short Cord With 2 Prongs At The End, It Also Has A Gold Plated Clip With An Opal-Like Material Of A Horse On It
Answer: An old Beltone type hearing aid. There's a transistor in the tie clip, and it plugs into a cord for the hearing aid.
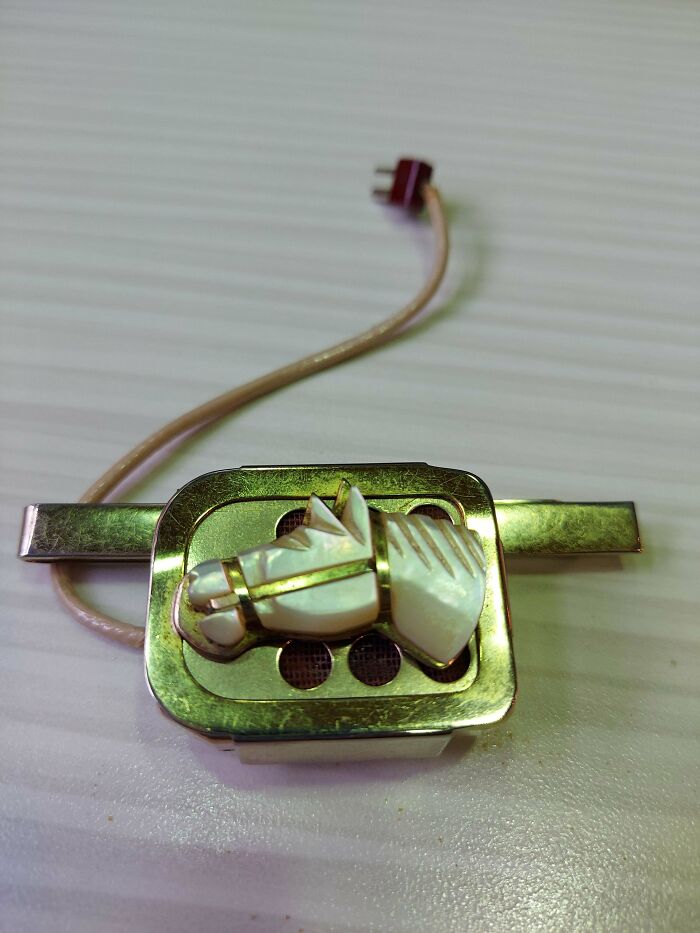
Image credits: badluckninja13
#43 Several Of These Went Up In A County Park Near Me; Small Wooden Boxes, Some Of Them Have Jars Underneath
Answer: Carpenter Bee traps.
Image credits: redscarfdemon
#44 Municipal Pickup Trucks Blowing Gas Through The Streets
Answer: This is a ULV mosquito adulticiding fogger.

Image credits: LibyanKing
#45 My Neighbor Had A Sink Hole In His Yard. It's Been Dug Up And There Are 3 Chambers. There Was A Cement Slab Over All The Chambers And At Least 6 Inch Walls All Around. One Of The Ceiling Slabs Gave Out And Exposed A Dry Empty Hole
Answer: Old septic tank.
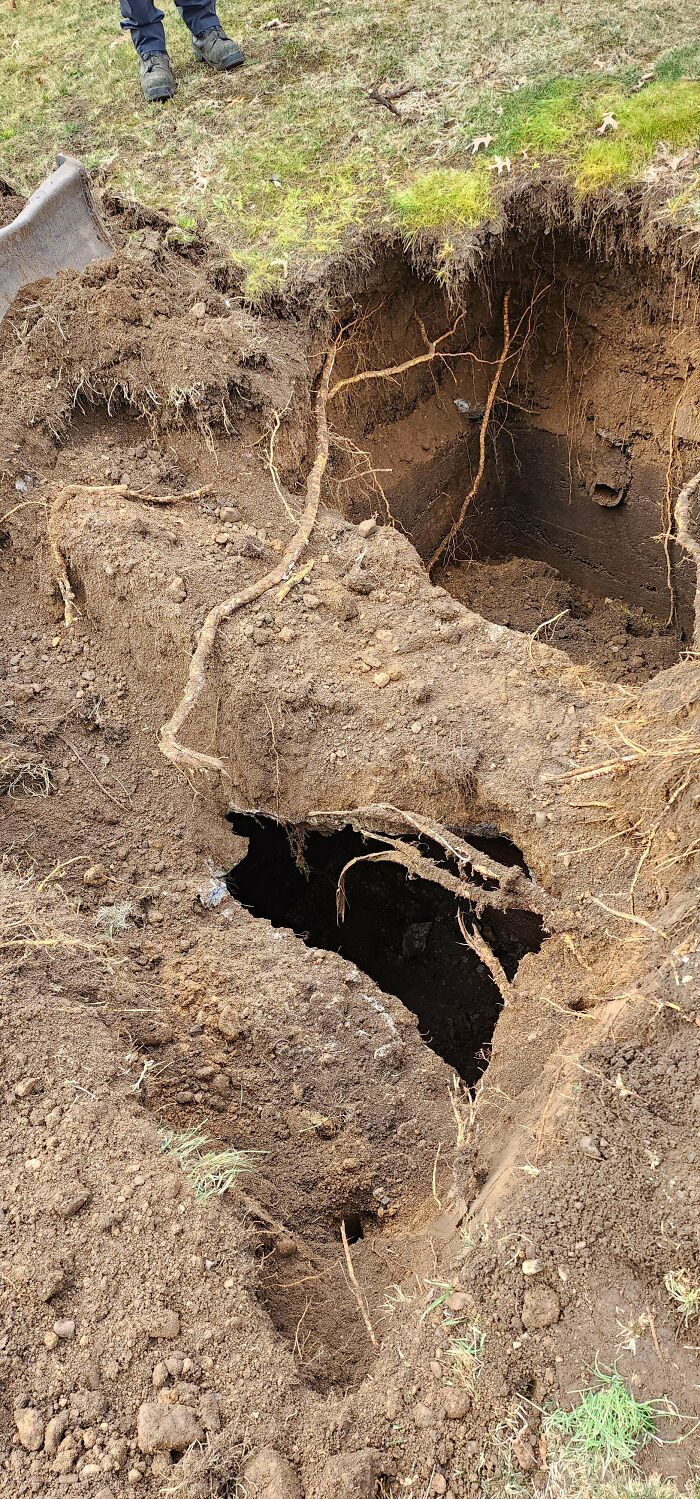
Image credits: bbush721
#46 Anyone Know What This Is? Gold Ring With Thin Plastic. About 1 Cm
Answer: Looks like the membrane from a kazoo.
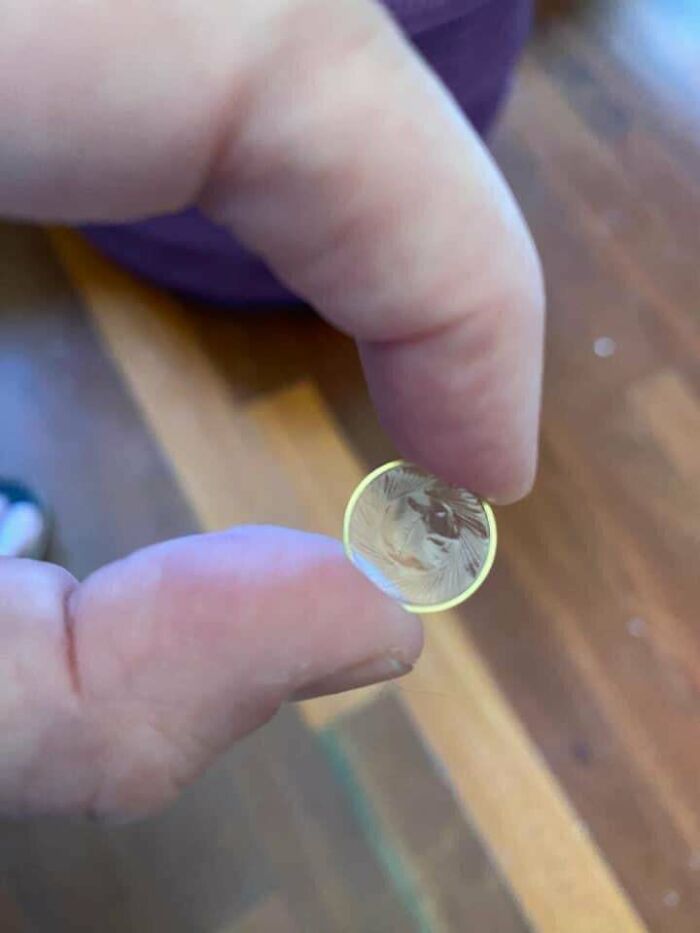
Image credits: isabel_77
#47 Plastic Device With A Blade That Cuts A Chunk Out Of Paper
Answer: Wow, that's a blast from the past. It's for write protecting a 5.25" floppy disk.
It’s for making a single sided disk double sided.
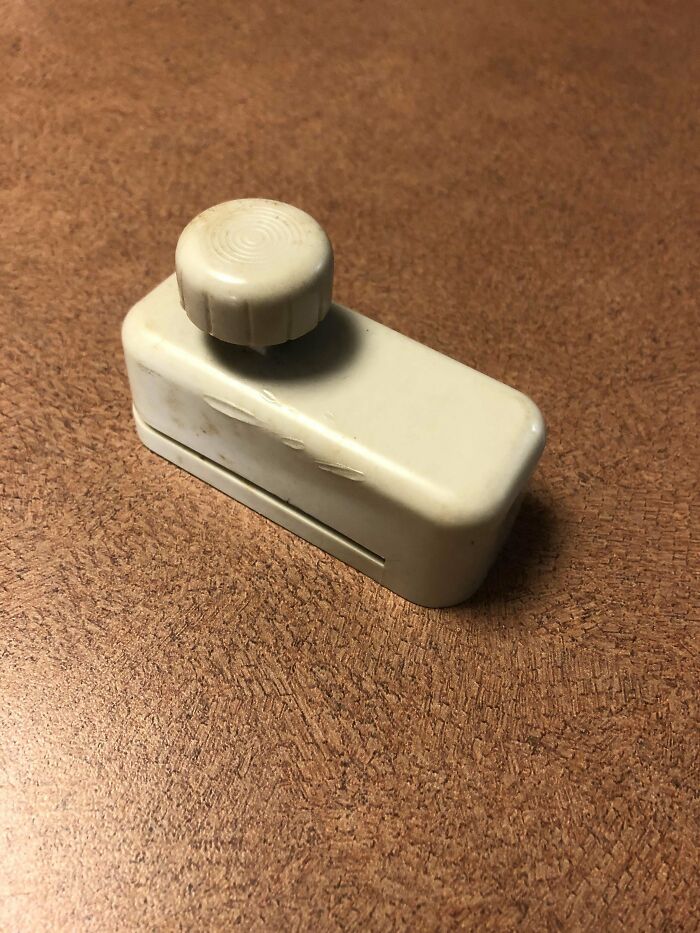
Image credits: R_McN
#48 What Are These Little Dots On Our Hotel Mirror? They Seem To Be Behind The Glass
Answer: Mirror guy here, there are lots of things related to the adhesive that can pull off or degrade the silver backing, including: forceful detachment of the adhesive which pulls off the silver, using an acid curing adhesive instead of a neutral curing adhesive, putting the adhesive onto unpainted Sheetrock which screws up the curing process, or drawing a closed shape with the adhesive so air gets trapped in it when the mirror is pressed against the wall.
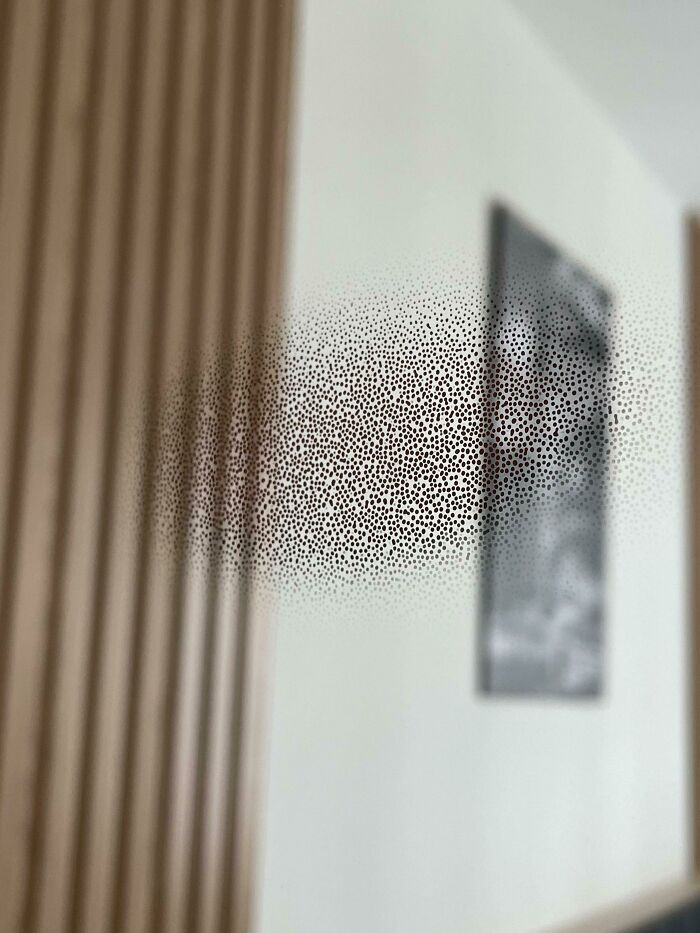
Image credits: AdamCohn
#49 What Is This Wavy Pattern On The Back Of A Piece Of Mail I Received?
Answer: Obfuscation pattern, it's there to hide info or keep people from trying to read through an envelope and look at personal information.
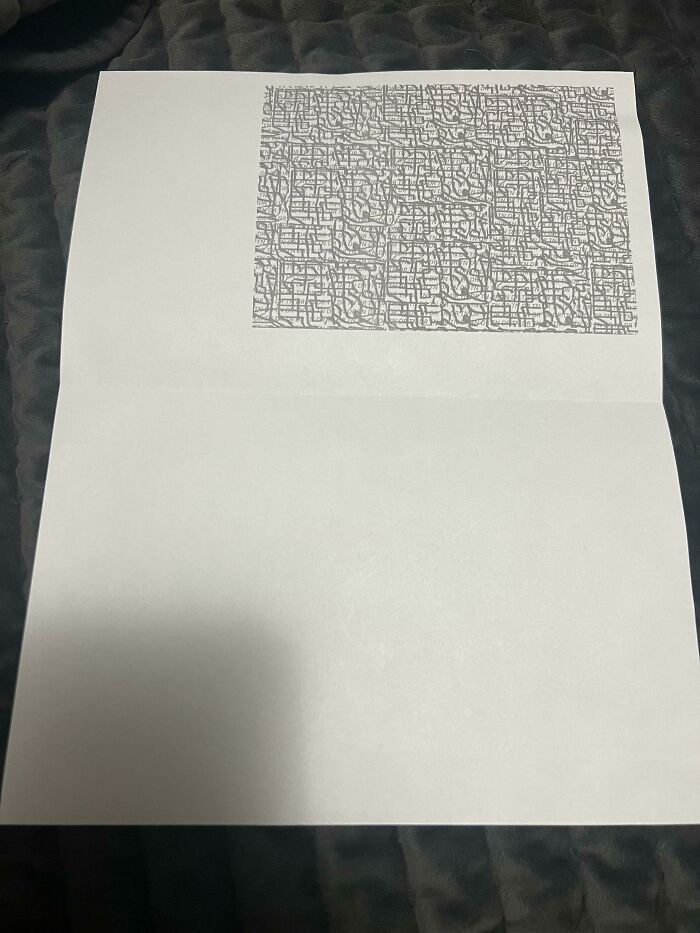
Image credits: 1nesandzer0s
#50 About 2 Feet Long Numbers 1-10 On Both Sides. At A Restaurant (Shari's)
Answer: Worked at a Ponderosa back in my teens as a line cook and we had one of these. When an order was up we would press a button on a box and it would light up a number, so a server would know their order was ready for a table.
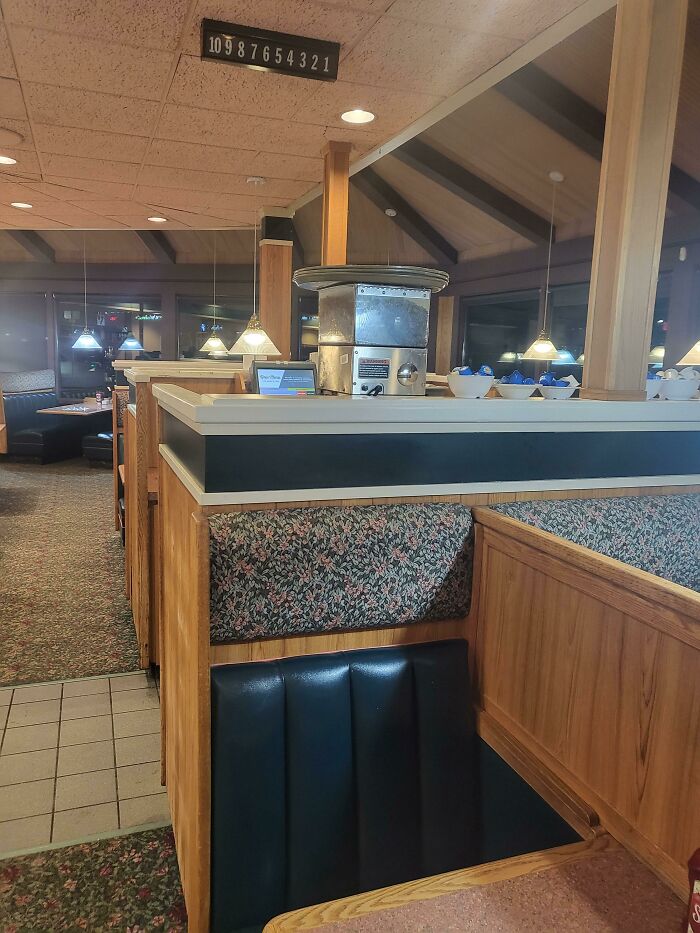
Image credits: Gusto74
#51 This Thing Came With The Perfume Gift Set But I Have No Idea What’s Supposed To Be, It Feels Like It’s Made Of Clay Or Something But There’s No Description In The Box Or Anything. Is It Just A Random Trinket?
Answer: It's a perfume diffuser. You can spray your perfume on it, and it will absorb it and release the smell into the air.
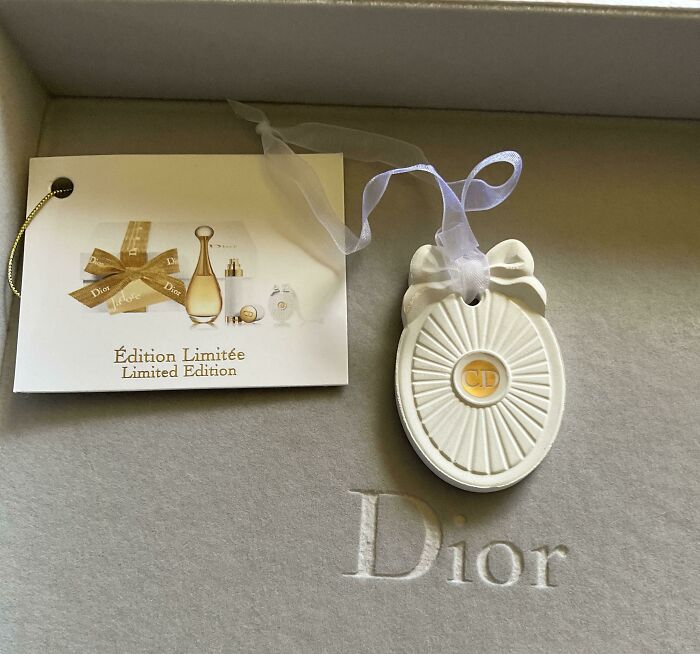
Image credits: Solve-Problems
#52 What Is This Cabinet On Wheels I Got At An Antiques Market? The Drawers Can Be Accessed From The Front As Well As From The Back, There Are Also Two Compartments With Small Key (???) Hooks On Each Side
Answer: This is just a scientific specimen cabinet, which could be used for anything from geology to lepidopterology.
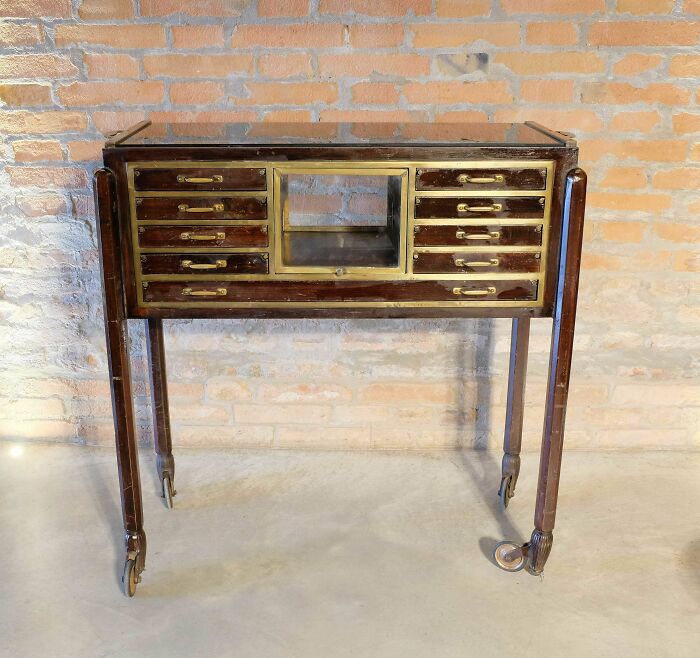
Image credits: IGutenberg
#53 Small Metal Tool With Hook On End. Found With Some Old Keys And Jewelry
Answer: It's a button hook.
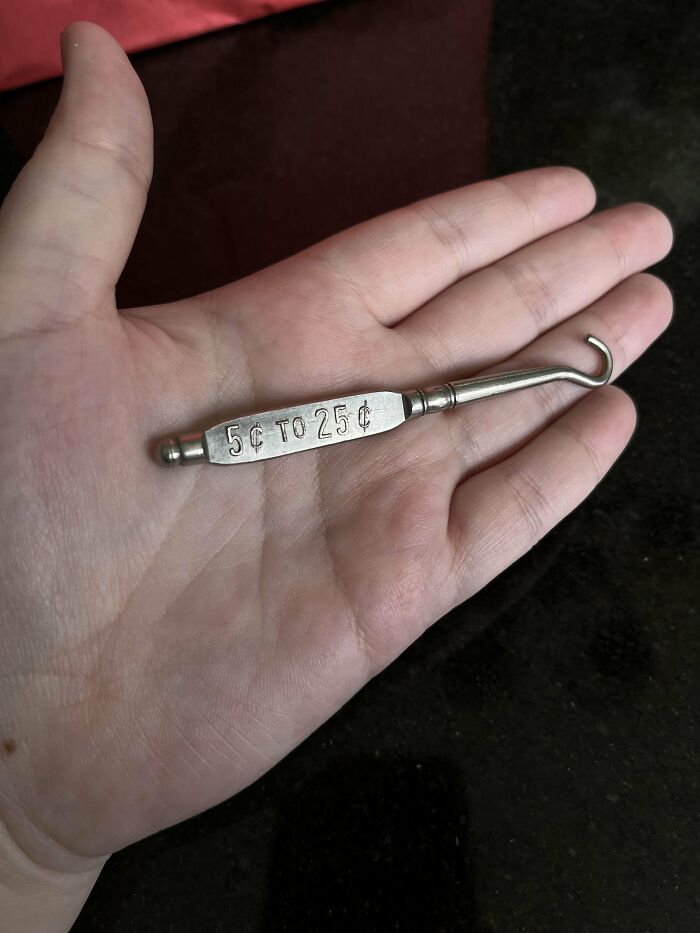
Image credits: MiniRipperton
#54 What Is This Ancient Bronze Pot With Two Spouts That Looks Like A Hanging Lavabo But Whose Necks Are Too Low To Carry Water Without Spilling?
Answer: An oil lamp.
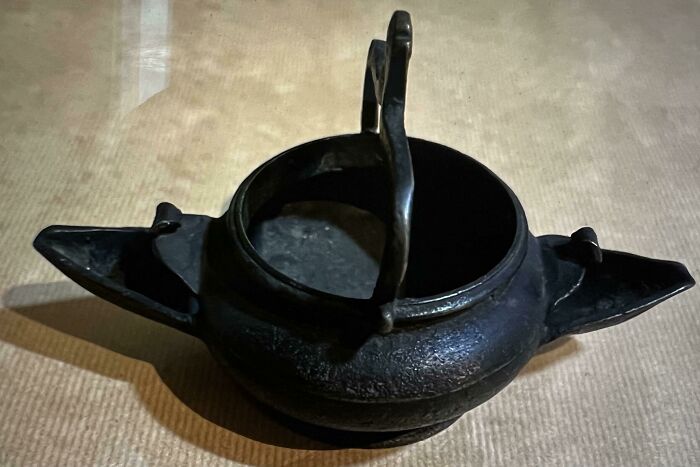
Image credits: watamat
#55 Big Wooden Thing That Kinda Looks Like A Clothes Pin. It's About 4lbs, And 85cm Tall. It's A Dark Wood That's A Bit Worn Down And I'm Guessing It's Over 40 Years Old?
Answer: A wash tamper or "wasstamper" in Dutch.
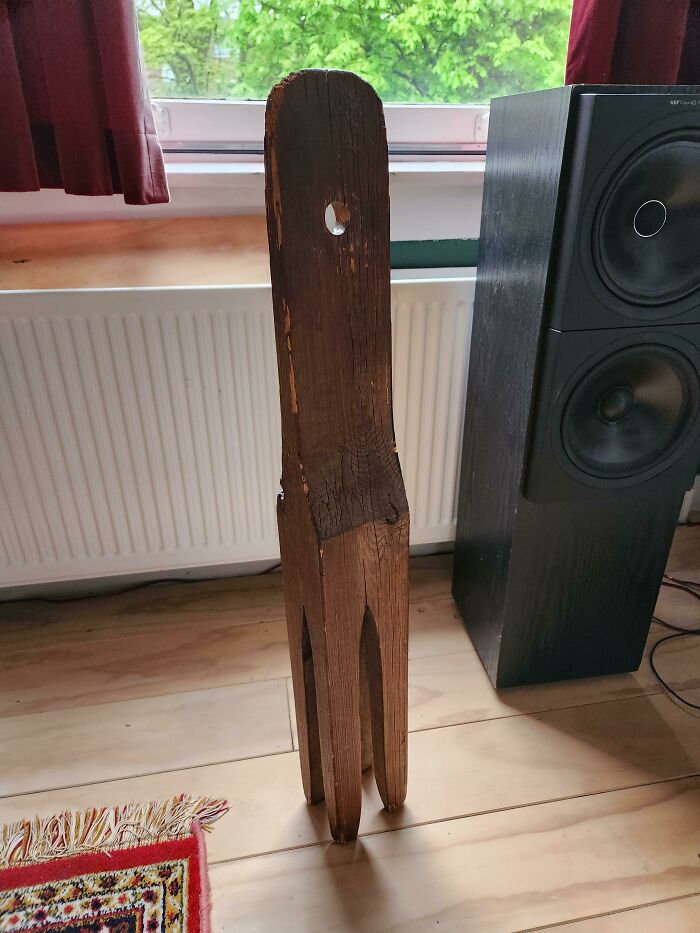
Image credits: solidboom
#56 What Is This Leather Belt Thing With A Cup In The Middle?
Answer: A leather fishing belt. You can put the end of the fishing rod in the hole for support.
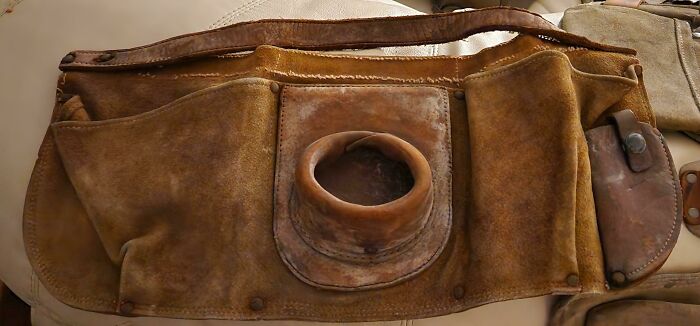
Image credits: nyxfriesian
#57 Small Trailer With Individual Openings. Seen While Driving, No Obvious Marking That Would Indicate What It’s For
Answer: It's for transporting racing pigeons.
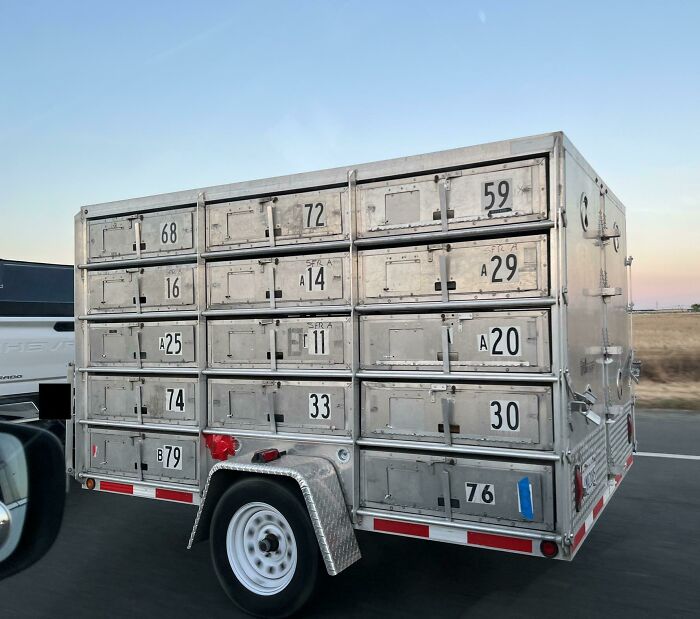
Image credits: Subaru_turtle
#58 This Plastic Hole Filled With A Foam Insert Underneath Nike Sneaker Sole Insert, Only In The Left Shoe
Answer: It is a space for a wireless pod that tracks your running workout called Nike+ sensor.
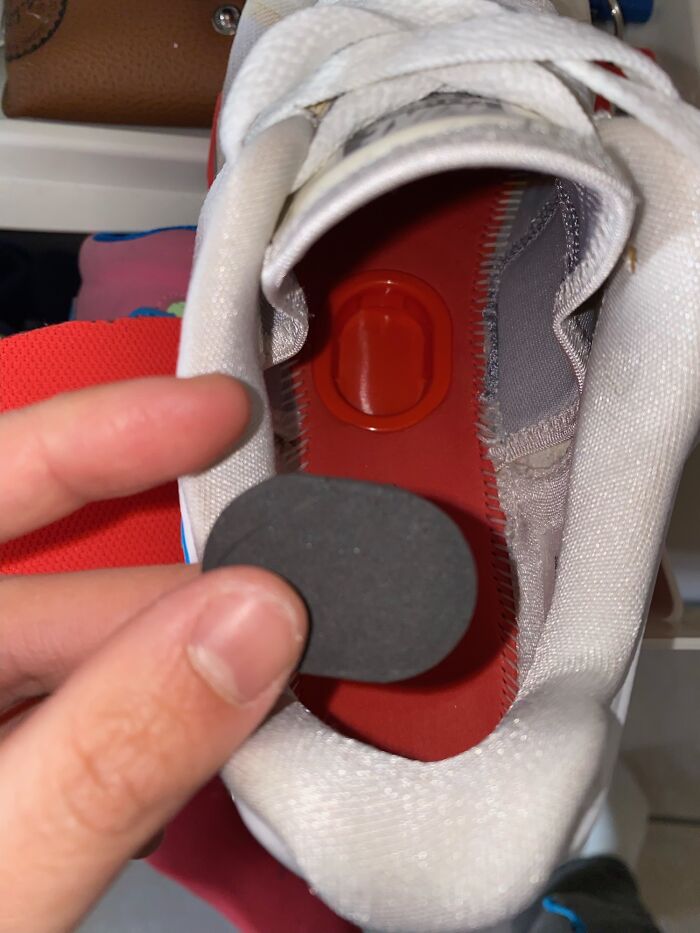
Image credits: Zyloph
#59 Tennisracket With A Hook On The Back, On A Long Chain With Ball At The End. Looks Like Merchandise, But What Is The Hook And The Chain With The Ball For?
Answer: This is used to measure the height of the net in tennis.
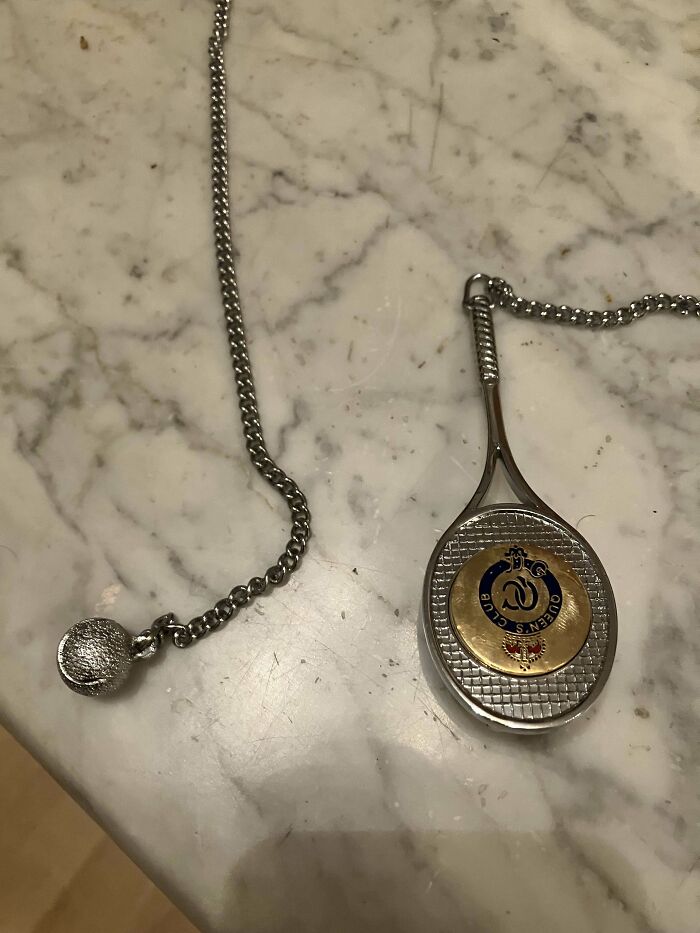
Image credits: Mcmakar
#60 Thin Piece Of Metal With A Group Of Varying Hole Types
Answer: It’s for drafting. It’s an eraser shield.
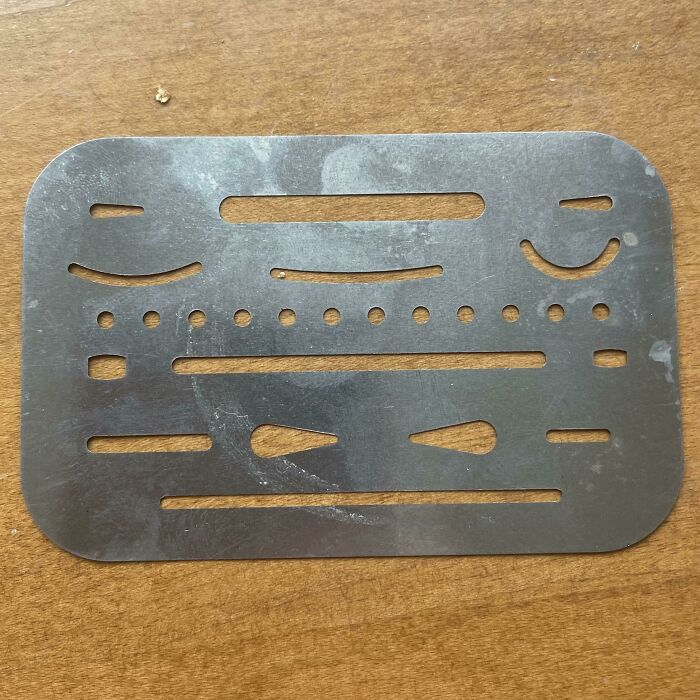
Image credits: bu11fr0g
#61 My Husband Found This While Hunting. It's Made Of Metal And Is A Little Bit Bigger Than A Plow, At Least 10' Wide And 25' Long
Answer: It’s a baler! The metal bands have small metal prongs protitruding, they pick up the hay. The corkscrew in the back moves it into the baling chamber, where a ram compresses it into a bale, after that it’s tied together and pushed out of the machine.
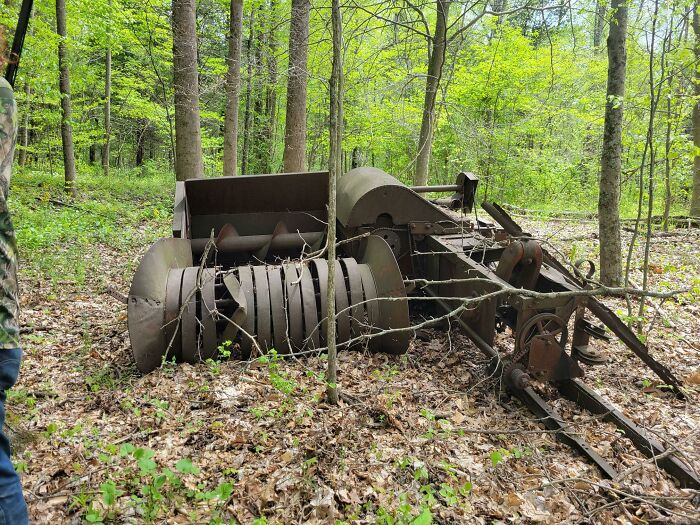
Image credits: only1jellybeanz
#62 What Is This Rooster Basin Looking Things On The Wood Stove Used For?
Answer: Chicken steamer, it's used to add humidity to the house.
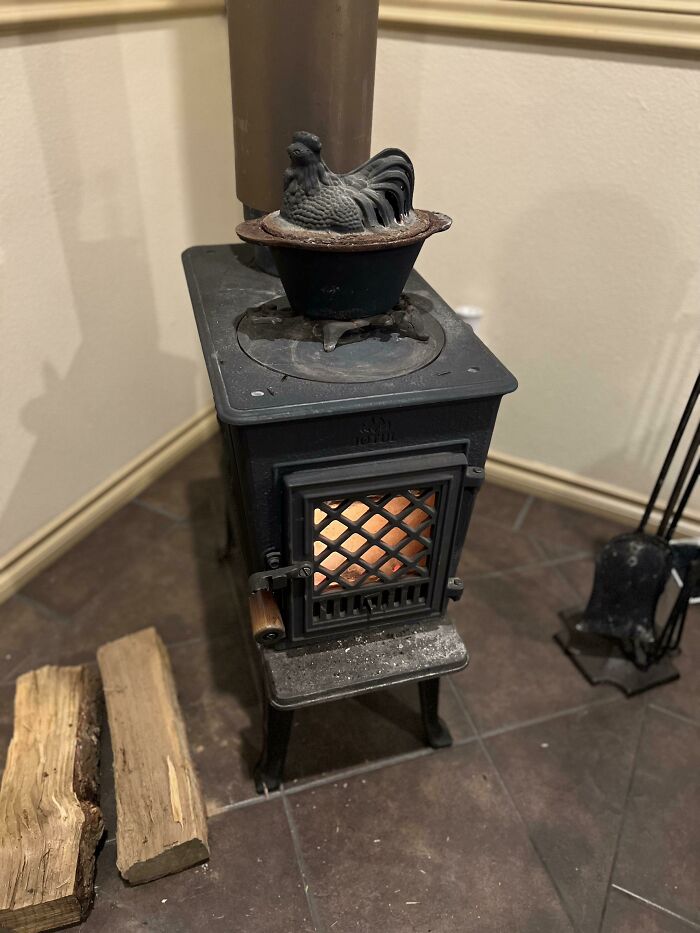
Image credits: uberCalifornia
#63 What Is This Kitchen Utensil? - Cutting (?) Wires Inside A Semi-Oval Shape Thing
Answer: It’s an avocado slicer. You cut the avocado in half and seed it, then scoop out slices.
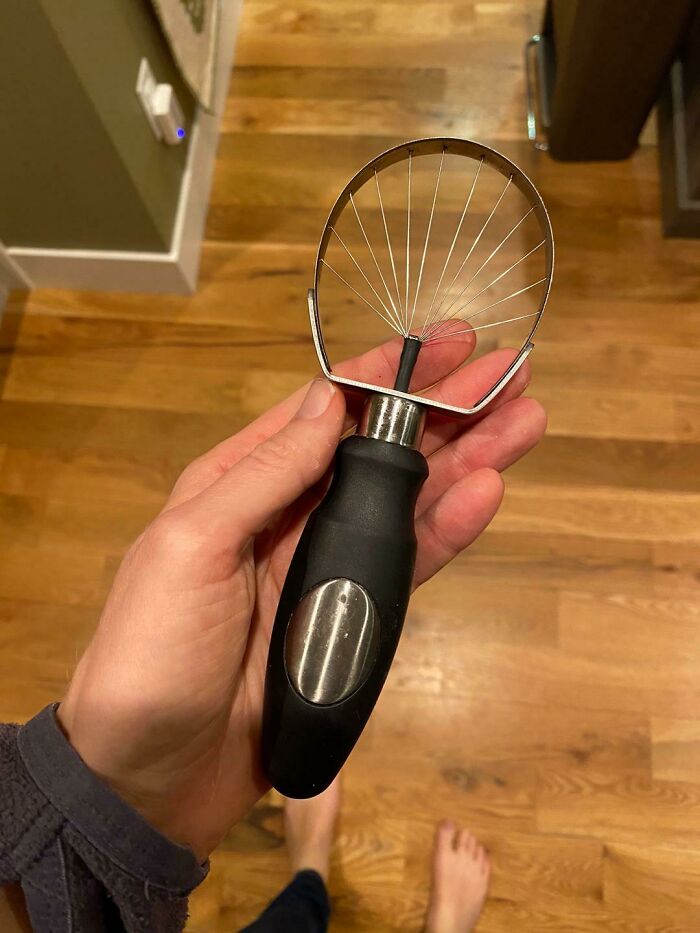
Image credits: Whatsername868
#64 What Is This Stuff In The (Seawater) Canal Next To My House?
Answer: This happens a lot in seawater. You see it in the beach all the time as a thick brownish foam. Basically, as marine creatures and so on (especially algae) decompose after death their bodies break down into various components. One of the processes is called saponification and basically converts fats into soap (fun fact, the same thing can happen to un-preserved humans). This coats the sand, gravel, rocks etc and then it is stirred up into foam by the water and (usually) high winds. On the beach it’s usually a mix of these animal byproducts, sand and other contaminants, it’s likely similar here but with less sand. In a canal it is likely stirred up by the wake of watercraft.
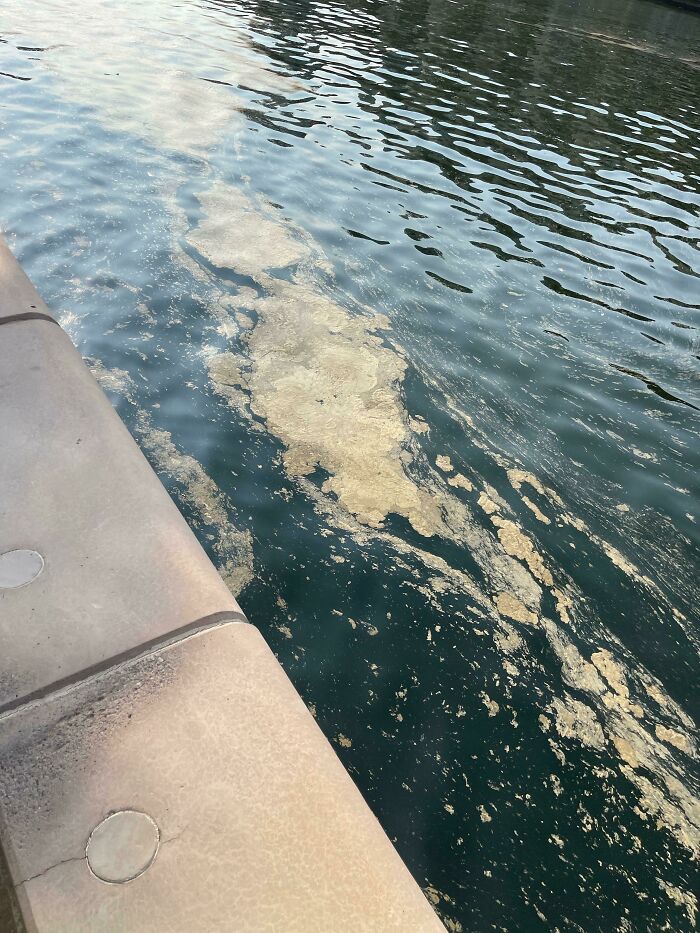
Image credits: hamo804
#65 What Is This Pointy Thing On This Multi Tool Flash Light?
Answer: It's a window breaker for car windows.

Image credits: hardcuts26
#66 What Is This Coiled Sheet Metal Attached To A Piece Of Wood?
Answer: It's for holding books.
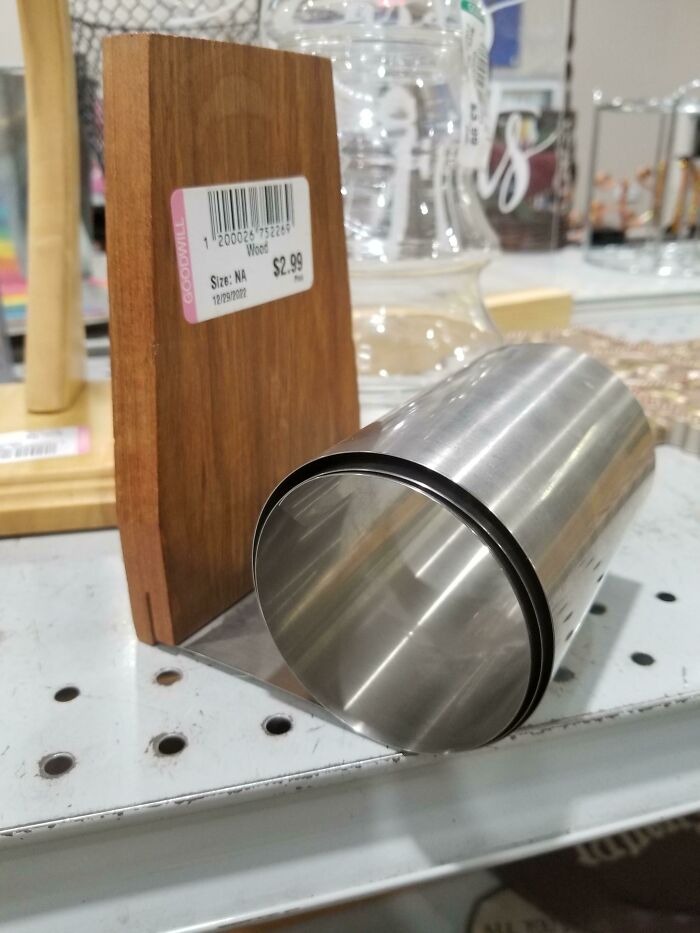
Image credits: el_gato_uno
#67 Hollow Aluminum Sphere 23"5/8 Circumference, Made From Two Hemispheres Welded Together. Has Multiple Ports. Painted Olive Drab Green
Answer: Hydraulic fluid reservoir for a military vehicle, possibly a hercules.
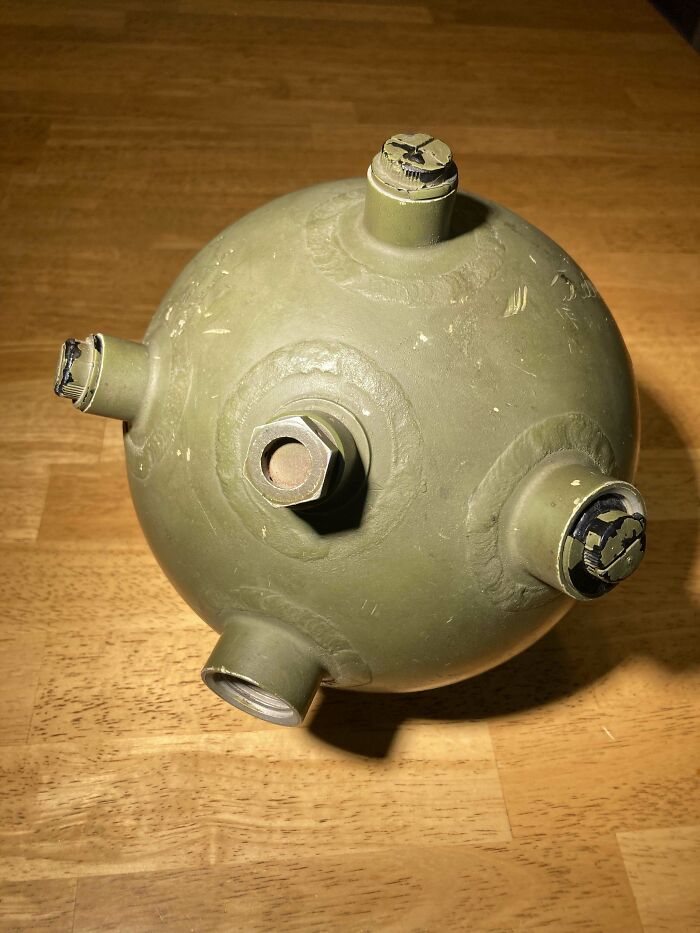
Image credits: FollowTheScript
#68 I’ve Been Walking By This On The North Side Of 10th St (Between 6th And 5th Ave In The West Village) In NYC For Years. It’s The Only One Like It That I Know Of. Made Of Brass, Embedded In The Sidewalk. What Is It?
Answer: It’s a sensor to turn the heated sidewalk on and off.
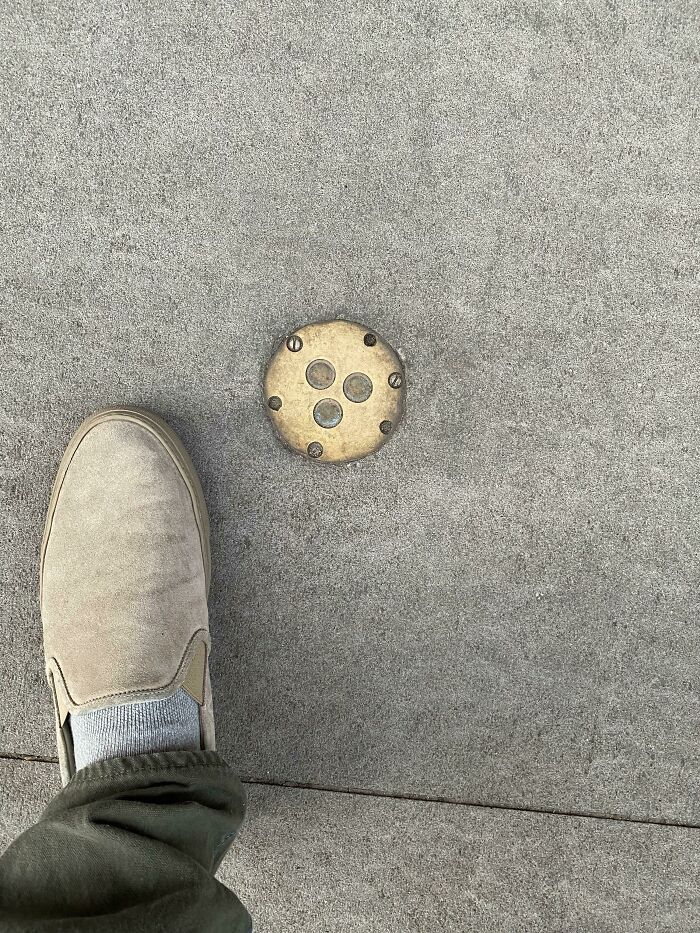
Image credits: littleteethparty
#69 It’s Like A Hammer But One Side Is Like Spiked. The Head Is Iron With A Wooden Handle. Weighs 500-800g Estimated. There Are No Noticeable Markings On It
Answer: It’s a comb hammer for dressing stone.
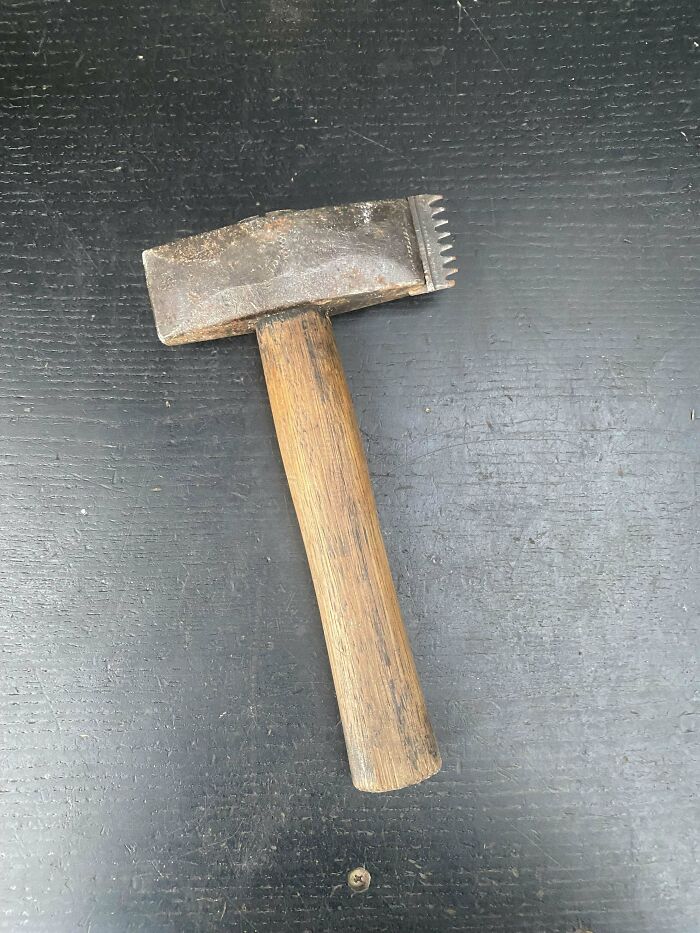
Image credits: CallanSeabs
#70 Recessed Kitchen Enclosure: What Is The Purpose Of This Recessed Enclosure In The Wall Of A 1935 House In Southern California? I Don't Have The Measurements, But I Think That It's About A Foot Or So Tall And Is About Five Feet Up On The Wall. There's A Hinged Door That Opens Upward, As Shown
Answer: I think the dowel was put into a shelf slot after the fact to possibly make this into a paper towel holder. I say breadbox.
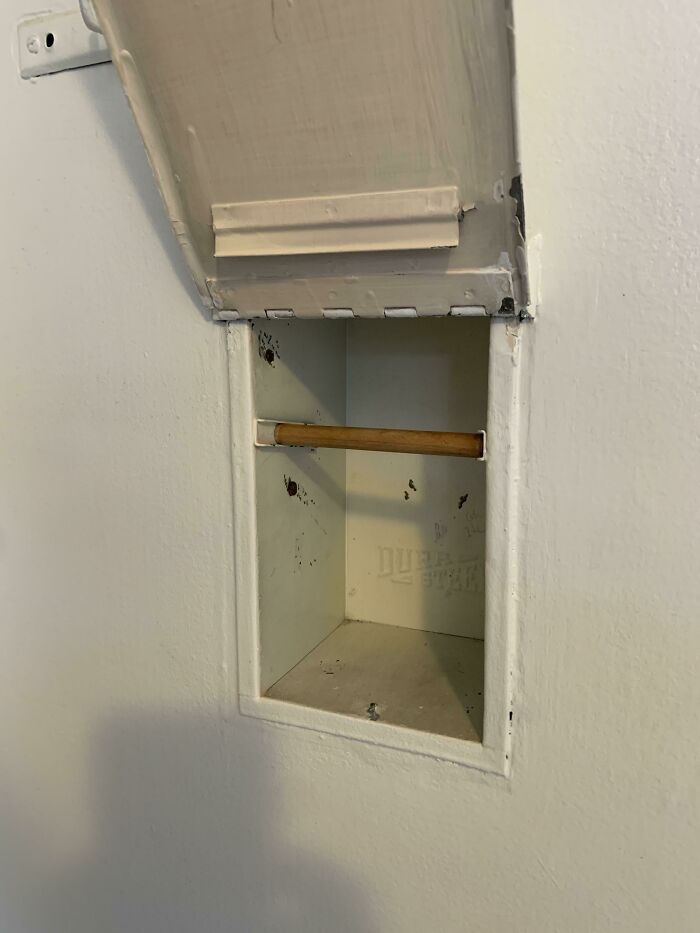
Image credits: DrDirtyJ
#71 What Is This Knee Wrapping Belt I Saw On An Airplane?
Answer: It's a back support.
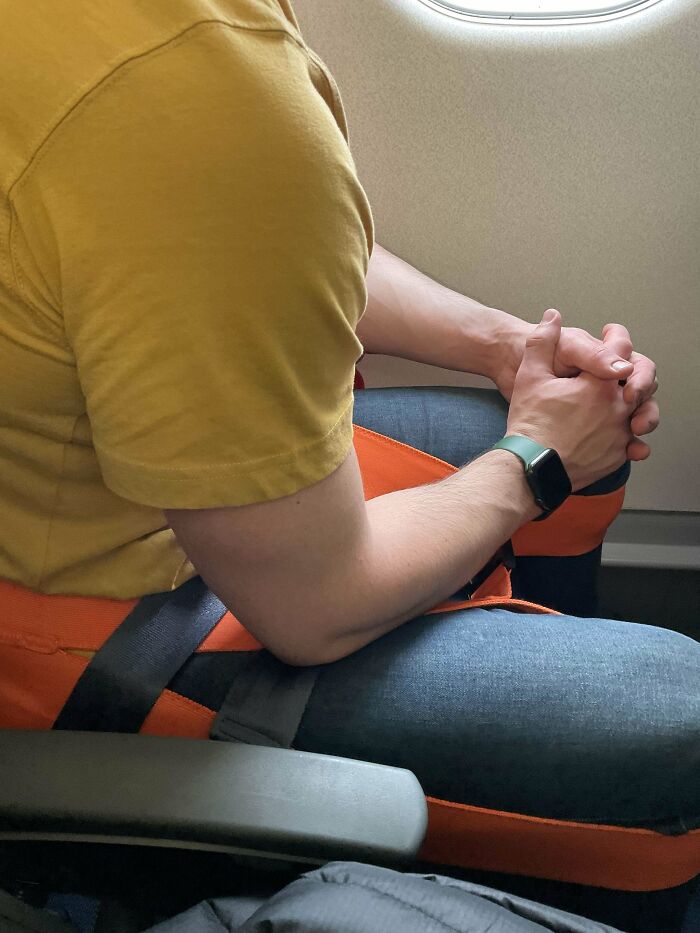
Image credits: cubswin16
#72 Metal Spring Thing With 2 Red Glass Balls. Can Be Separated, The Balls Do Come Out. Little Over 3 Inches. Looks Like A Pair Of Tongs Holding The Red Balls
Answer: An old blade honer/sharpener.
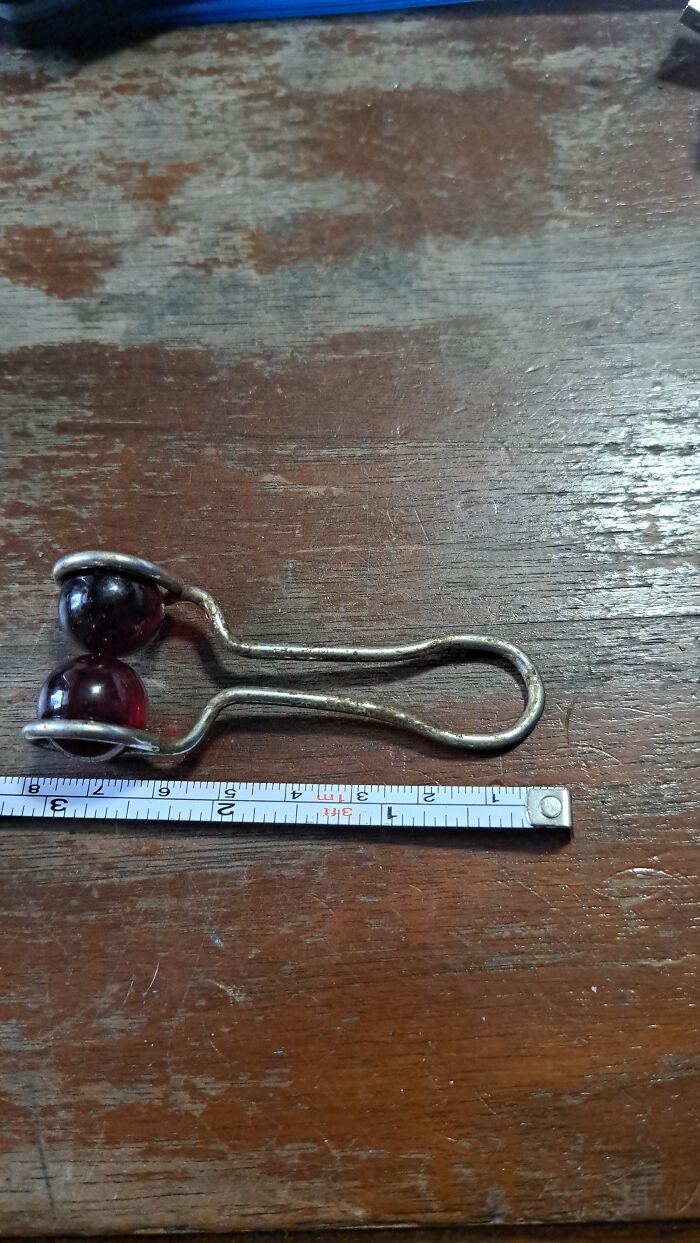
Image credits: perfectlowstorm
#73 Yellow/Orange Plastic, Semi-Circular Object Found In My Coworkers Dog's Stomach, Just Removed During Surgery. Approximately 1"X2" Long. Any Ideas? This Is The Only Photo I Have, No Other Angles Unfortunately
Answer: A rotisserie clamp.
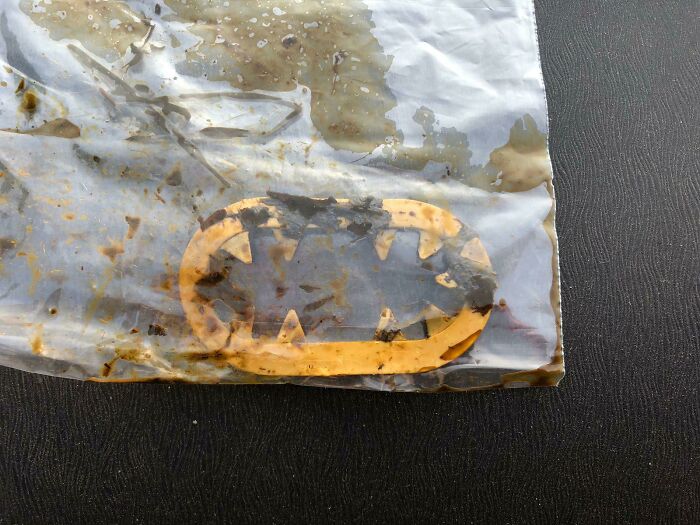
Image credits: Anxious-Kiwi-92
#74 Found At An Estate Sale. Ceramic Bars/Tiles? Roughly 5 In By 1 In. Painted Bottom?
Answer: Knife rests.
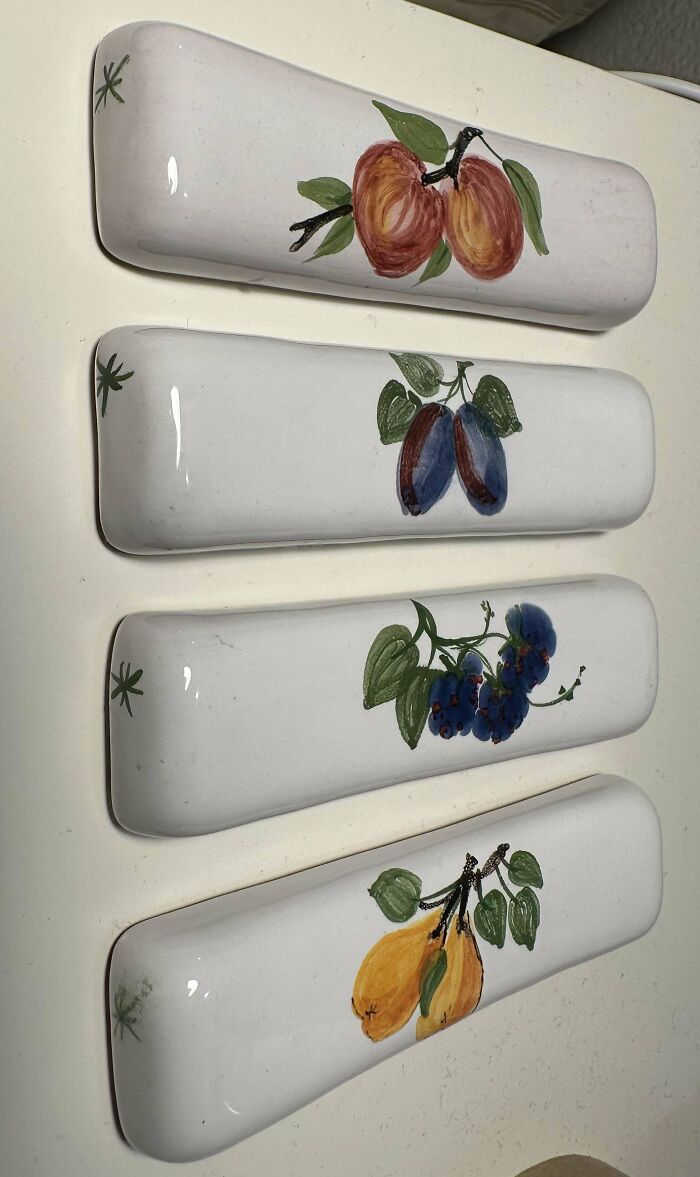
Image credits: Echidnado
#75 Two Plastic Hook Shaped Tools With Double Forks On The End. What Are These And What They Used For?
Answer: A tick removal tool. It's called a "tick twister".
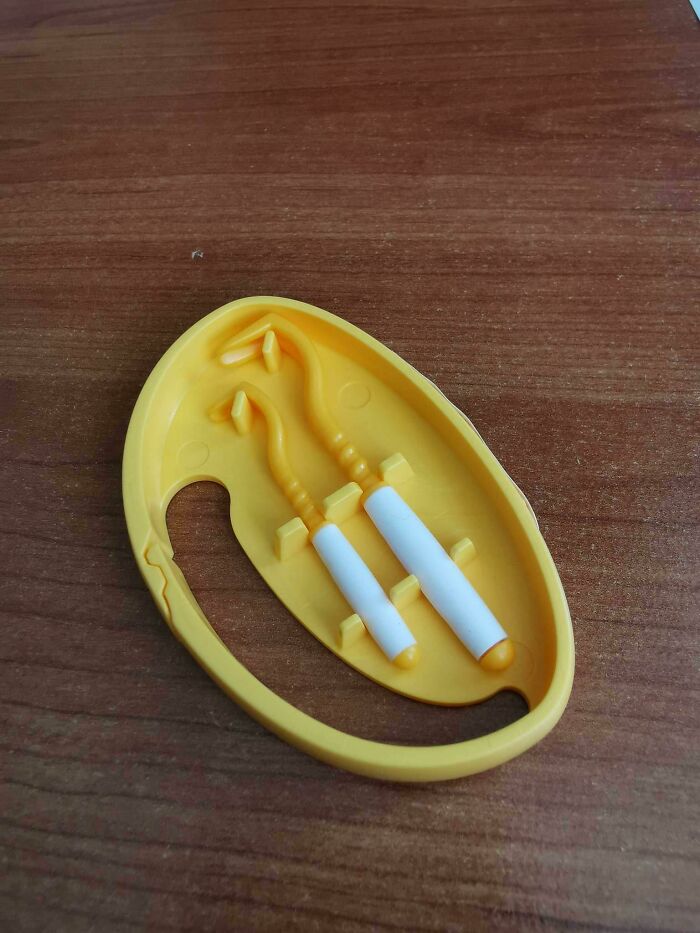
Image credits: Repulsive-Wear8696
#76 Found In A Jewelry Box. 2 1/2” Metal Piece That Unscrews And Has Three Pointy Plastic Pieces Inside
Answer: It's a tooth pick in a design patented in 1881.
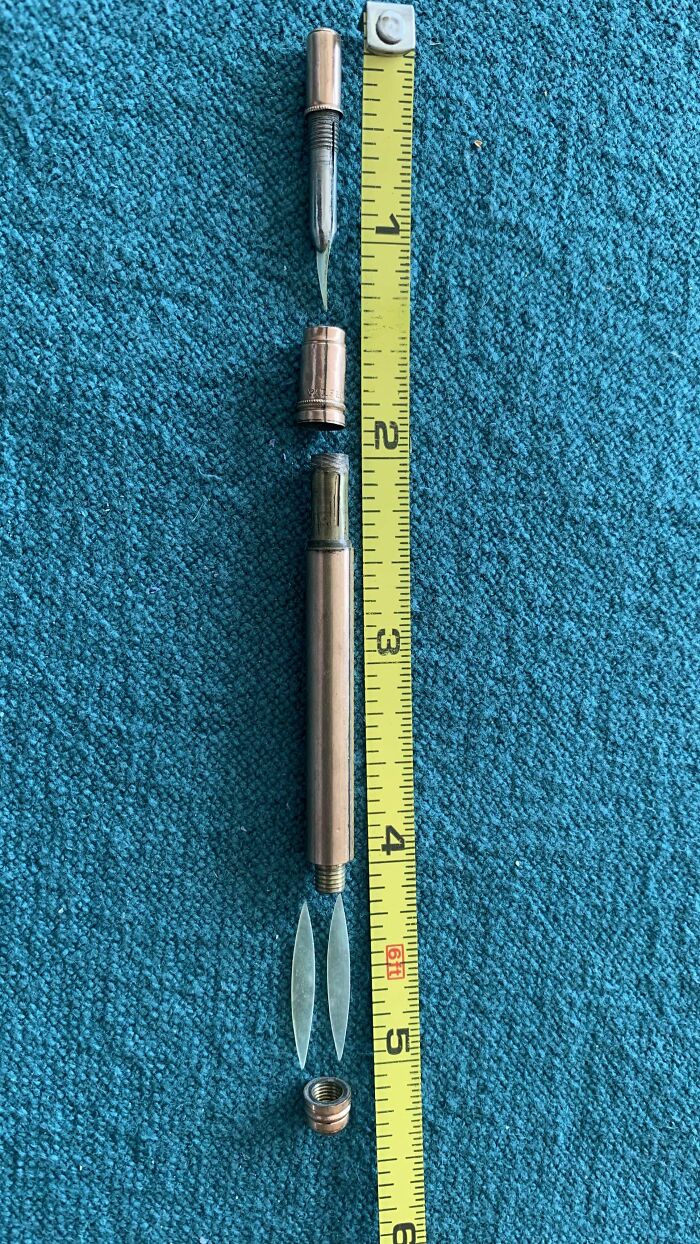
Image credits: ruby_dust17
#77 What Is This Chain With 2 Handles That Fit Together?
Answer: It's a vintage police restraint chain called "chain nipper".
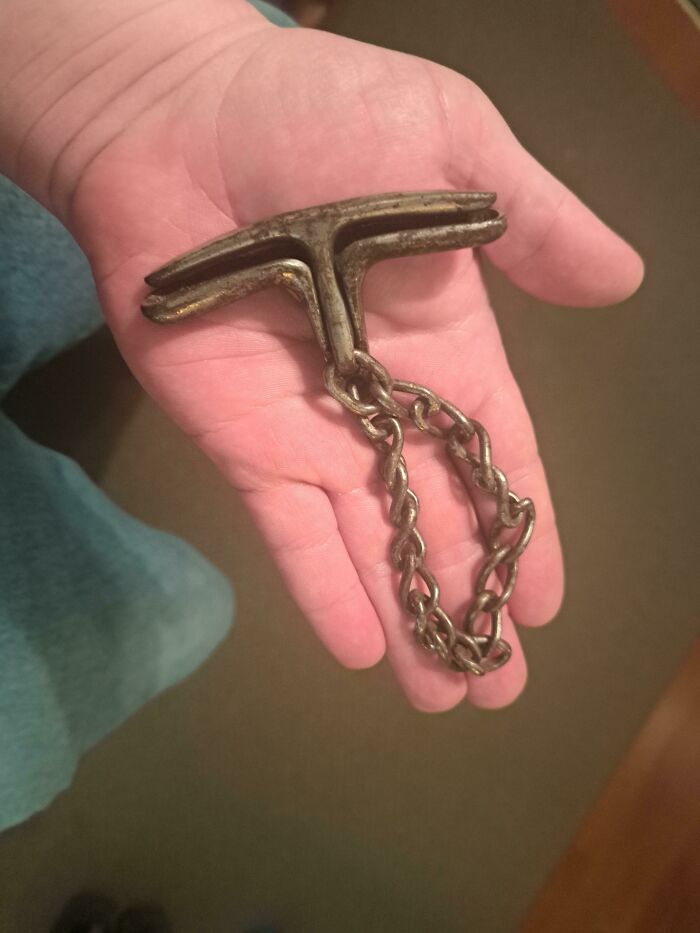
Image credits: Mrandres21
#78 Witt About 2 Foot Wide Indent In The Wall That Has Its Own Overhead Light And Light Switch
Answer: It's a phone “booth.” At one point it likely held a phone (likely a payphone). You could stand it in, have your call, and not be in the middle of the hallway.
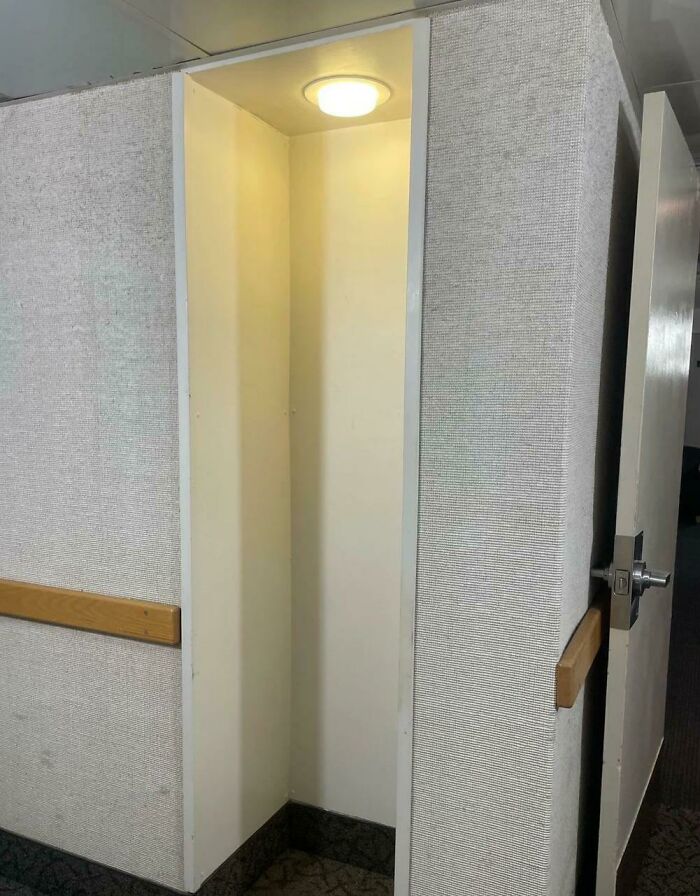
Image credits: Major-tomm
#79 Witt: This Weird Object With A Glass Roof On A Back Of A Truck I Found In Astoria, Oregon On Street View
Answer: It's a dry water massage bed. A person lays inside and water pummels them.
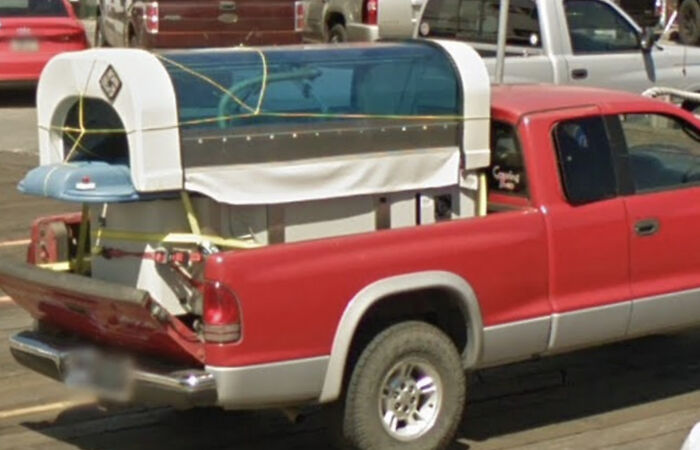
Image credits: Wraldpyk
#80 What Is This Padded Satin Item With Ribbon Ties And A Hole In The Middle? Appears Possibly Handmade, Like A Case For A Beauty Item
Answer: A hanger cover. It's to prevent suits or similar from getting a crease when hanging on a hanger with sharp angles.
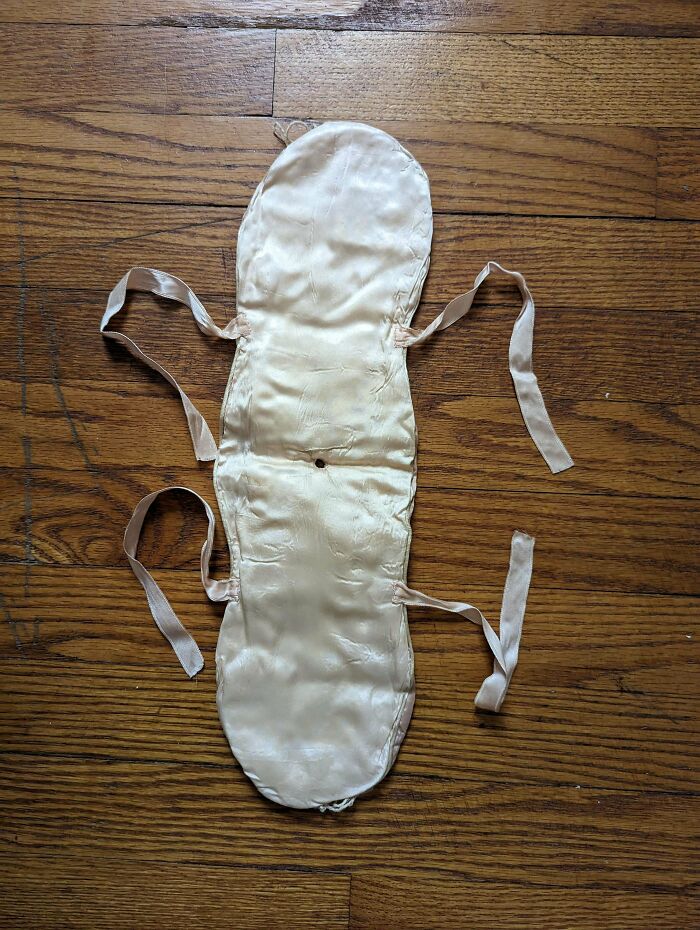
Image credits: ellanaKG
#81 What Are These Rails Between The Main Rails Called And What Is Their Purpose?
Answer: Guide rails for keeping a derailed car from getting too off center.
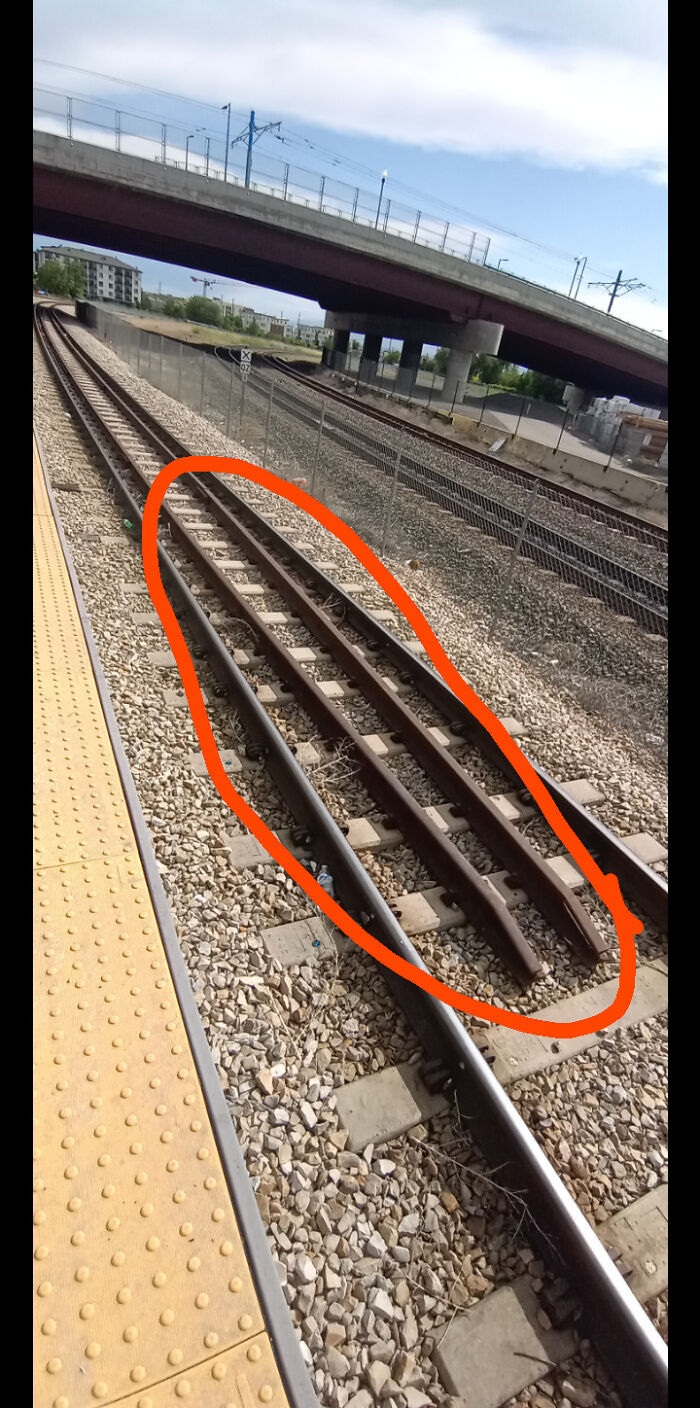
Image credits: marxman28
#82 Renting A House And The Basement Has These Ropes With Some Sort Of Plastic Hooks/Clamps
Answer: A display for hats.
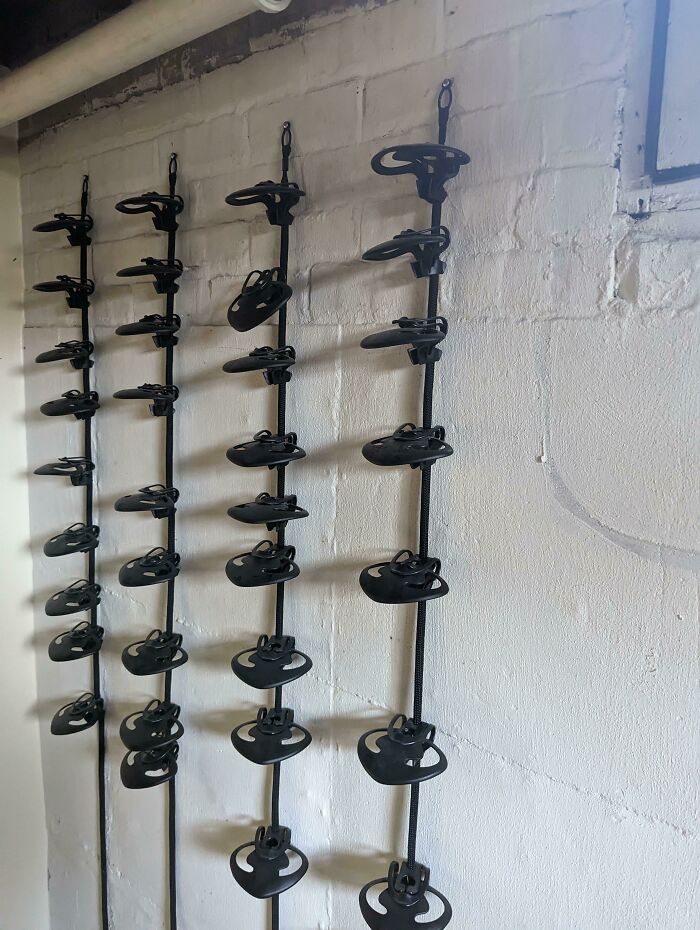
Image credits: rramirezcantu
#83 Weird Plastic Red "Key" That I Found In My Apartment After The Firefighters Left After A Fire
Answer: A pull pin from a fire extinguisher.
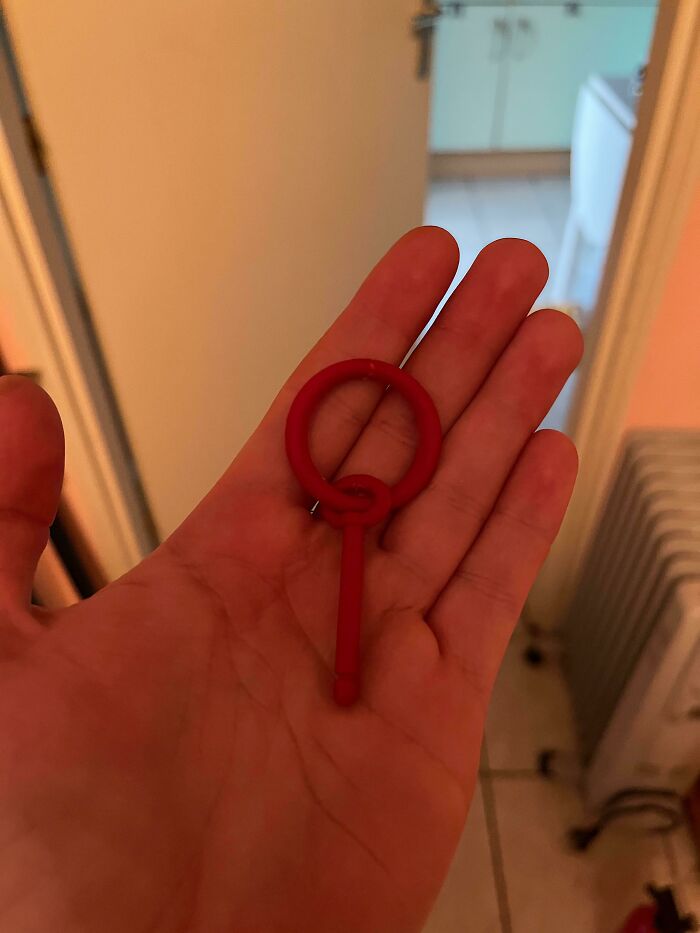
Image credits: LoganSlendy
#84 Laptop With Folding Sensors And Wires Going Into A Backpack. They Seem To Be Measuring Something. Saw Multiple People Walking Around With These Setups At A Major League Baseball Game
Answer: They're measuring wifi strength and saturation as part of MLB's deal with Extreme Networks.
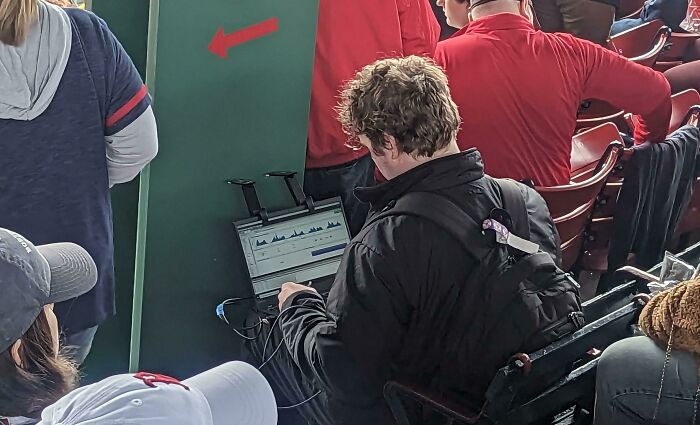
Image credits: paradigmjumper
#85 What Is This White Plastic Looking Thing And The Tan Clay Like Material Sticking To The Siding On My House?
Answer: It's a temperature sensor for a humidifier.
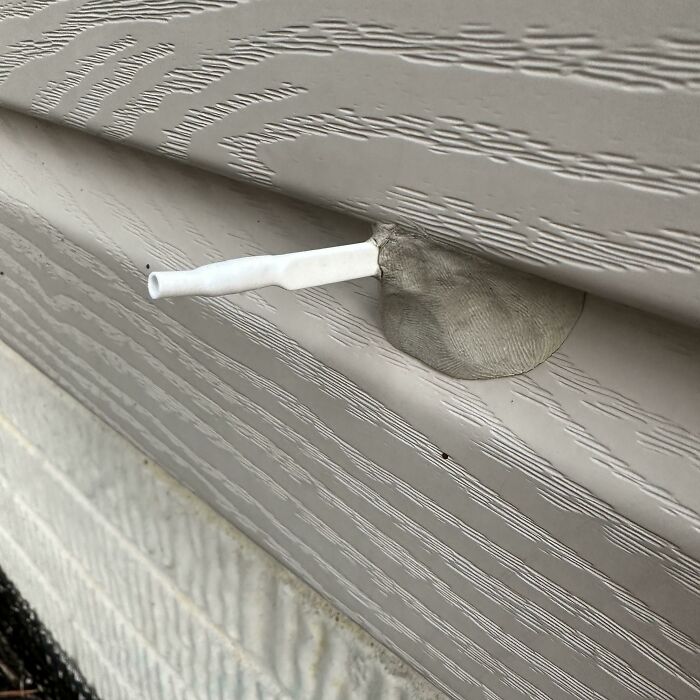
Image credits: hiberniagermania
#86 What Is The Purpose Of The Vertical Slot In Hotel Bedside Table?
Answer: It’s for laptop/tablet storage while charging.
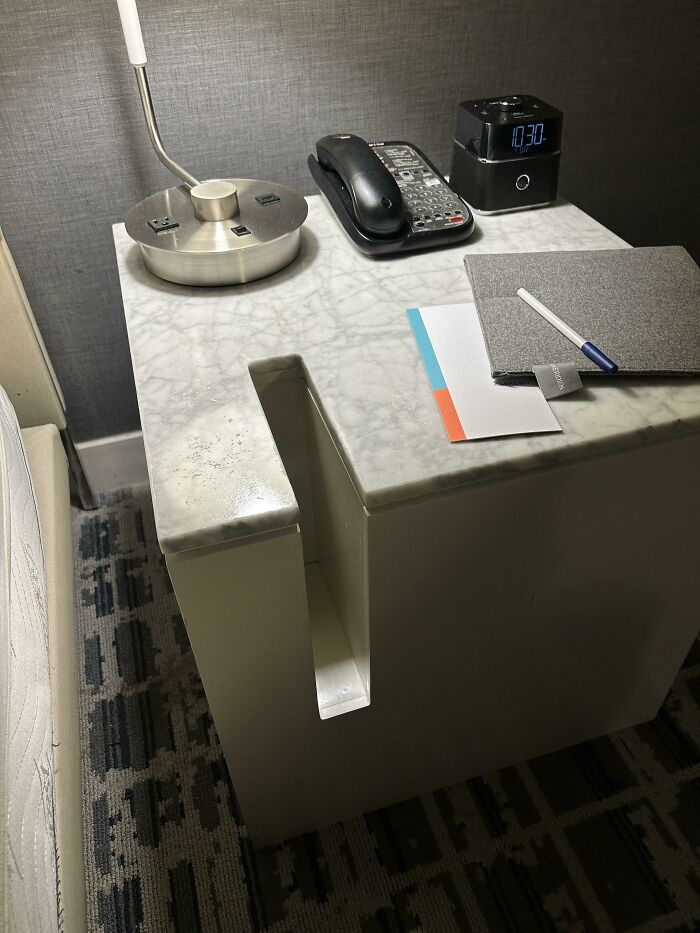
Image credits: fred_lincoln
#87 A Kind Of Wooden Gateway In A Fence In The Woods?
Answer: It’s a badger gate.
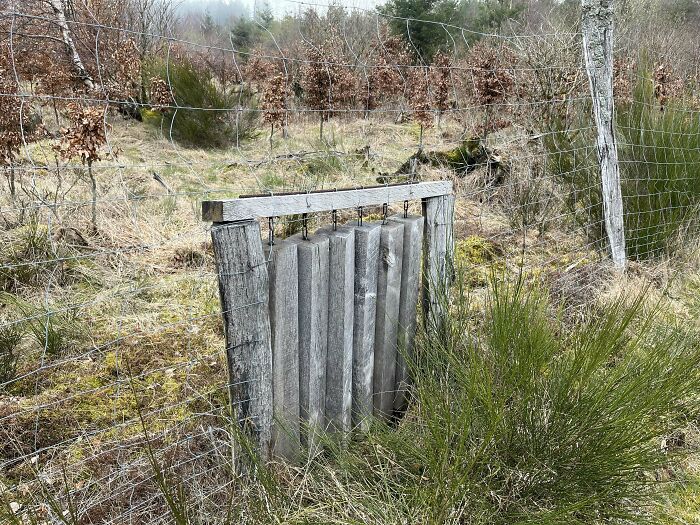
Image credits: 3sponge
#88 What Is This Metal Bowl Shaped Thing With A Hollow Handle/Spout?
Answer: It's part of a cream separator for milk.
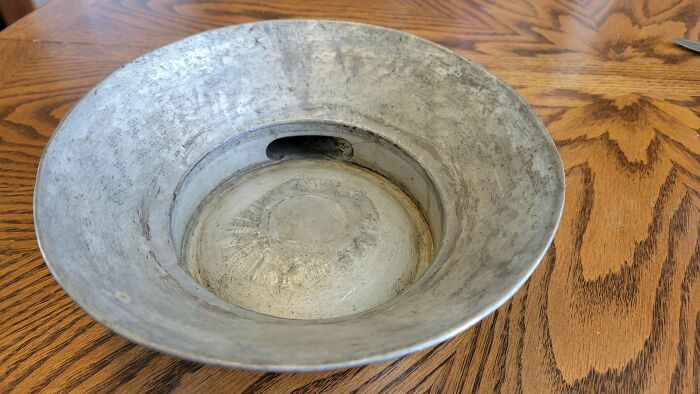
Image credits: Wht-ever
#89 Contraption Found On A Hiking Trail In Utah Made Of Several Flat And Round Pieces Of Metal, Held Together By Screws With A Thicker Hollow Part Running Parallel To The Longest Metal Strip
Answer: A wagon brake.
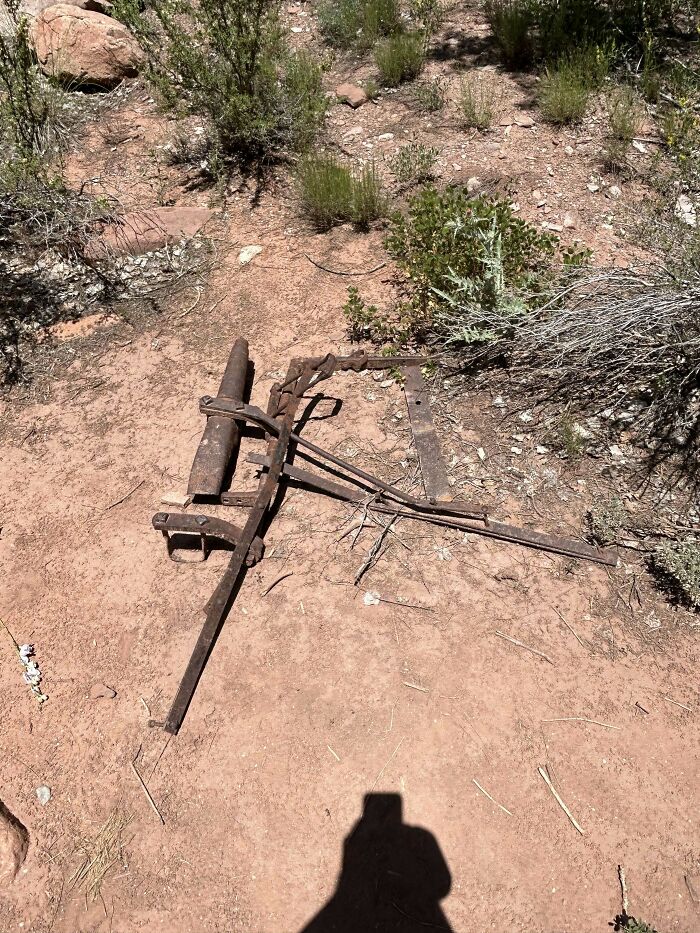
Image credits: WrinkledWatchman
#90 What Is This Tiny Fork For? Dinner Fork For Scale
Answer: This is a seafood or cocktail fork.
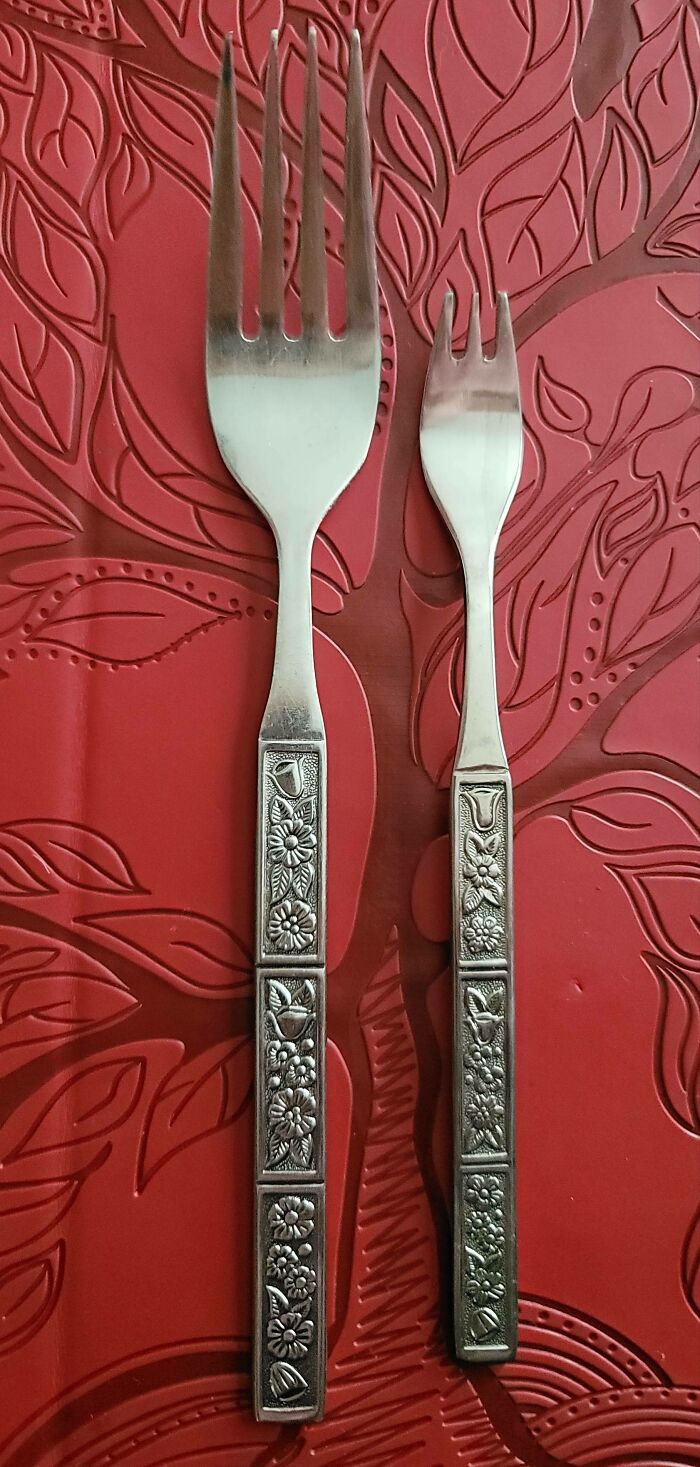
Image credits: GnedTheGnome
#91 What Is This Black Rubber Thing Attached To A Bungee Type Cord Inside My New Ski Jacket?
Answer: It is a phone holder.
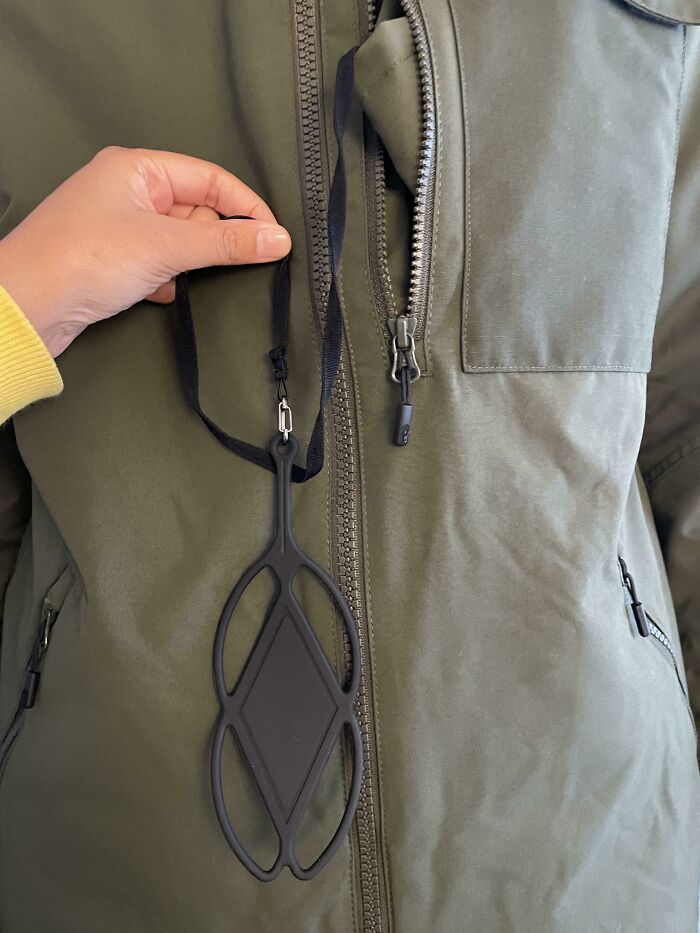
Image credits: Different-Aerie-6508
#92 This “Gate” On The Niagara River, There’s Nothing Behind It. I Assumed It Was Part Of A Dock Or Something, But Can’t Think Of Its Use
Answer: Basically there are huge underground tunnels that take water to the power plants, these gates shut the water to them.
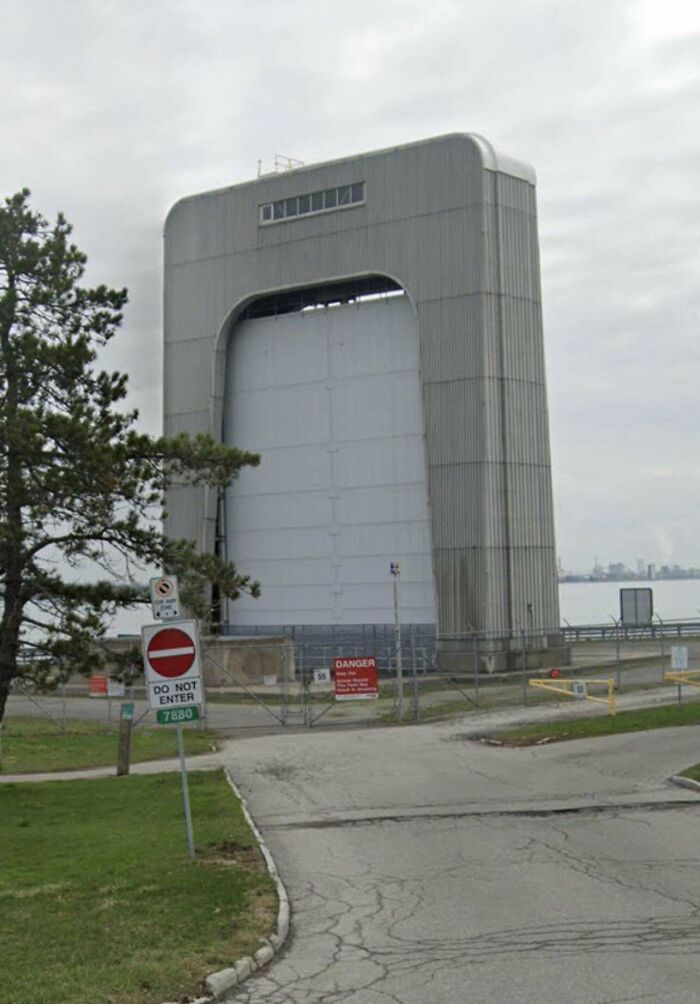
Image credits: Limelight_019283
#93 Strange Circular Huts, Made Of Brick And Metal
Answer: These are old kilns.
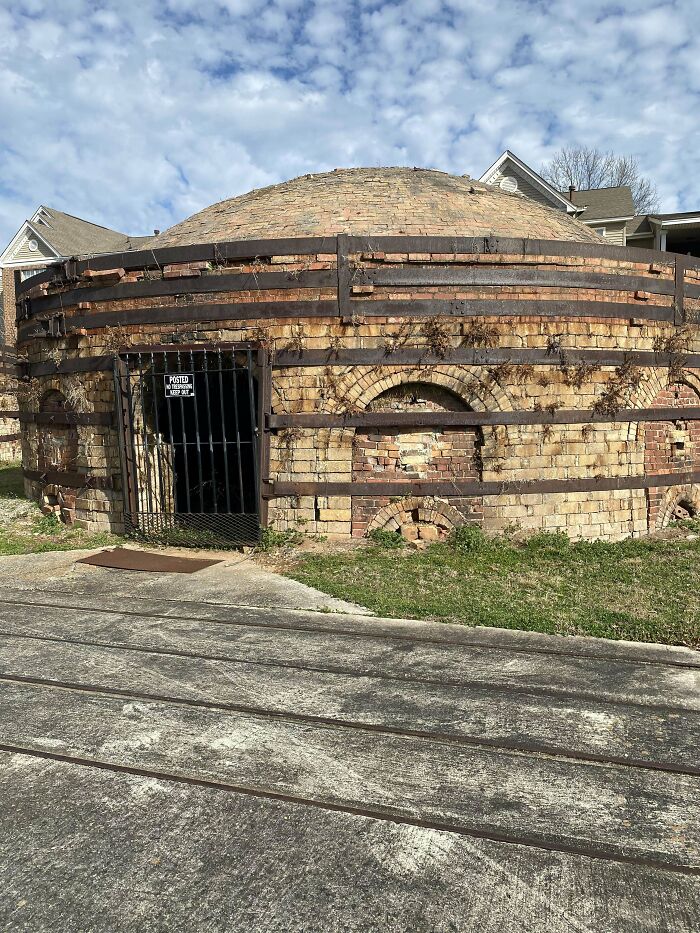
Image credits: Check_M88
#94 Brass Spear Shaped Item With Twisted Copper Handle Or Attachment
Answer: Looks like a it’s maybe a flagpole finial, possibly 19th century or early twentieth.
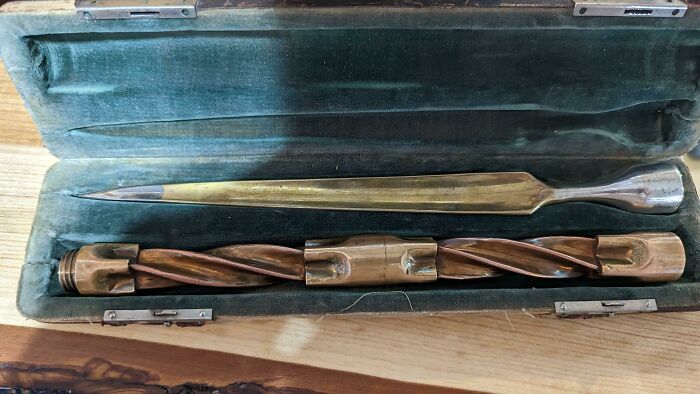
Image credits: nate8334
#95 This Christmas Cookie Shape Has Been Confounding My Boyfriend's Family For Over Two Decades. They Call It "The Bomb Cookie"
Answer: Chef's hat.
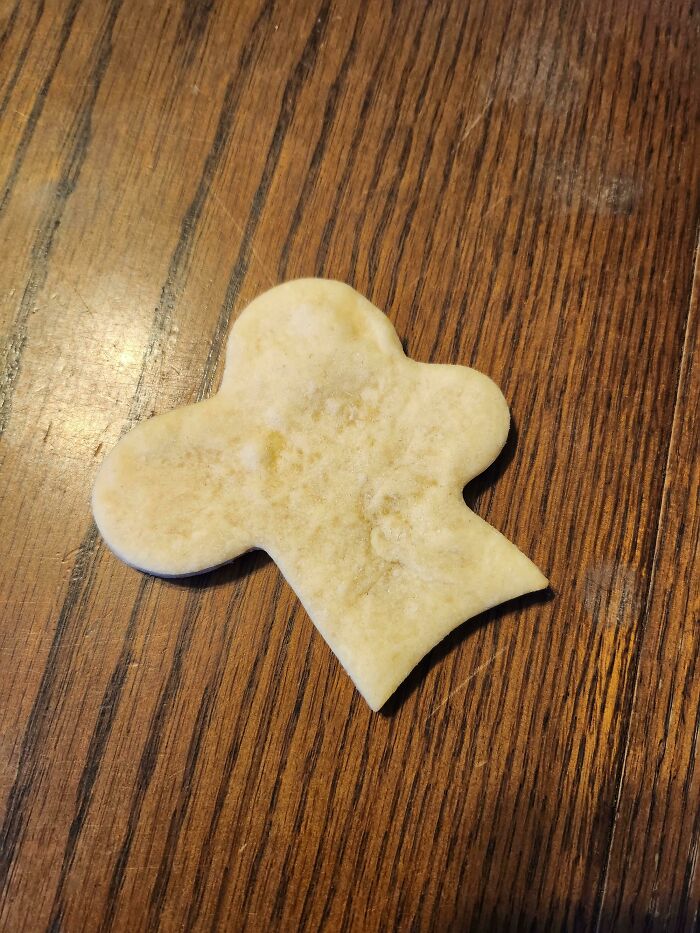
Image credits: reddit.com
#96 What Are These Giant Bowls With Straw "Hats" In The Beginning Of The Magnificent Seven?
Answer: They are granaries, for corn and grain.

Image credits: ProperNomenclature
#97 What Is This Large White Pod Thing In My Neighbours Garden?
Answer: It’s a home observatory. The telescope inside doesn’t have to be particularly big, but chances are if they spent the money on the dome they have a pretty nice scope.
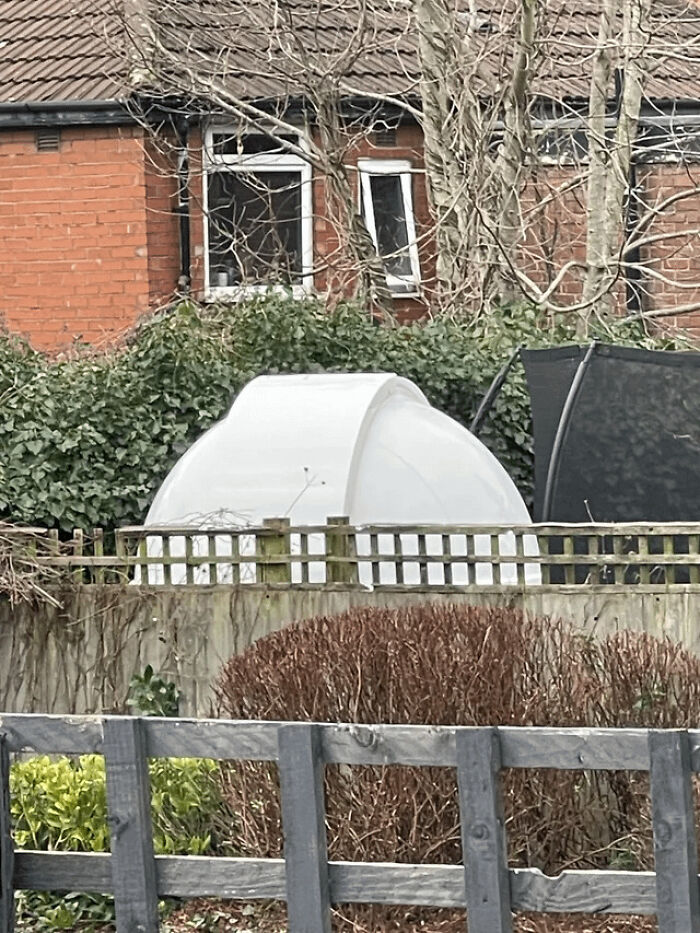
Image credits: jlol8452
#98 What Is This Thing? It’s An Unmanned Ship Of Some Sort About The Same Size As A Big Kayak. Expensive Radar & Solar Panels On It. We Were On A Head Boat & This Was About 15 Miles Off The Coast In North Carolina. Captain Radioed The Nearby Navy Ship Who Claims. It Was Not Theirs
Answer: Saildrone.

Image credits: ShireHorseRider
#99 Construction Device With A Yellow Base. Not Sure If It Goes Into The Ground. Makes Melodic Humming Noises At Regular Intervals And Increases In Pitch
Answer: Sonde device to measure pipe blockage / delineation using acoustic waves.
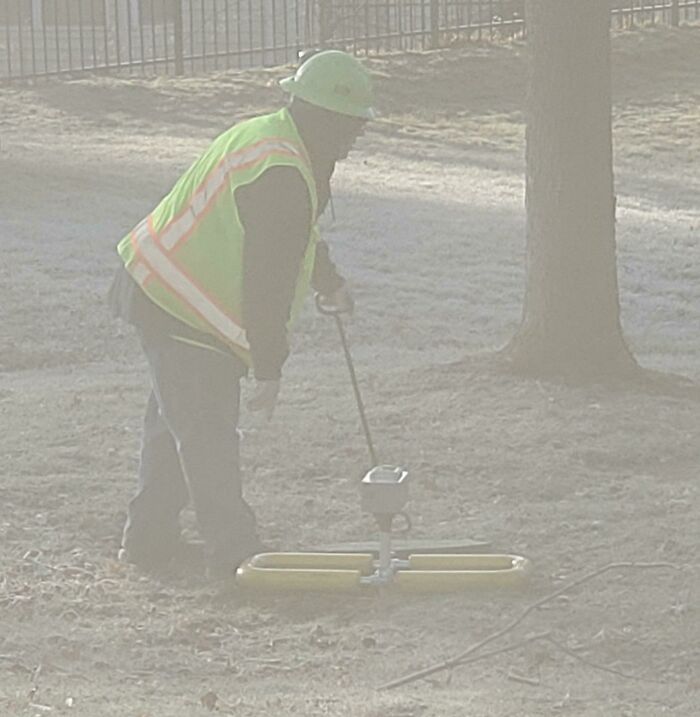
Image credits: PSN_ALadyCat
#100 What Is This Thing? It’s Magnetic, Very Dark Grey, Weighs 22 Grams, I Think It’s Metal. Cold To Touch, But Warms Up In My Hand
Answer: It's one of a pair of "rattlesnake eggs". You hold them separated slightly in your hand, and toss them up in the air, and they make a cool noise when they magnetize together. That's about it.
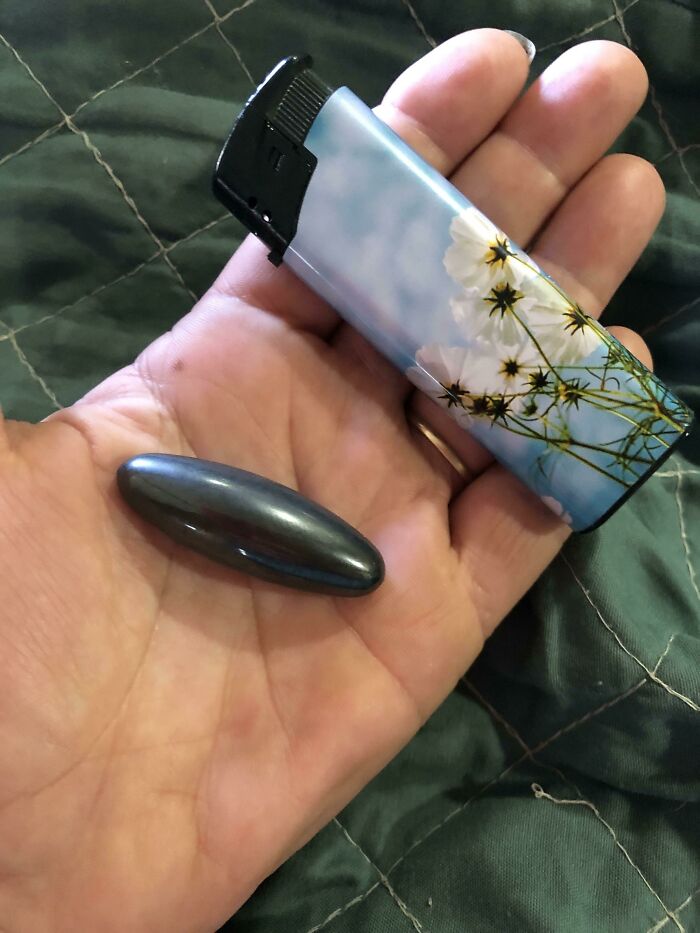
Image credits: MotherOfMagpies23
#101 Cast Iron Chicken, Rescued From The Scrap Heap. Any Idea What They’re Used For?
Answer: These are Japanese folding screen weights.
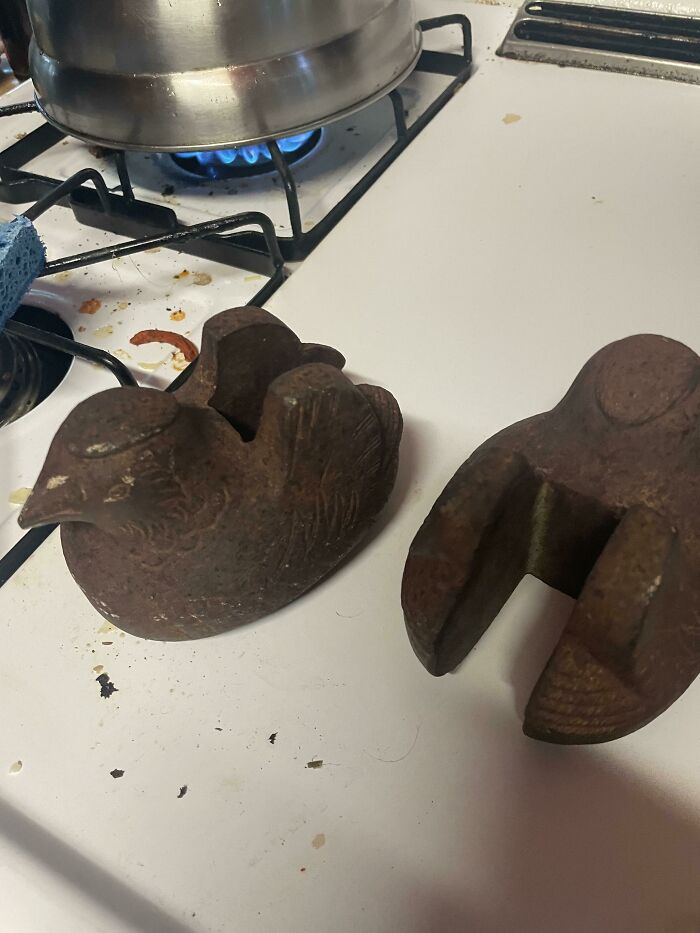
Image credits: RepTheDee
#102 Plastic Trinket Found In A Corporate Swag Bag. Has A Hole Just Big Enough For A Fingertip, And Two Nubs Looking Like It Clips To Something
Answer: It’s a keyboard key remover. It’s to help install custom keys but if it didn’t come with any custom keys, they probably gave it to you to help you remove all the keys to make cleaning easier.
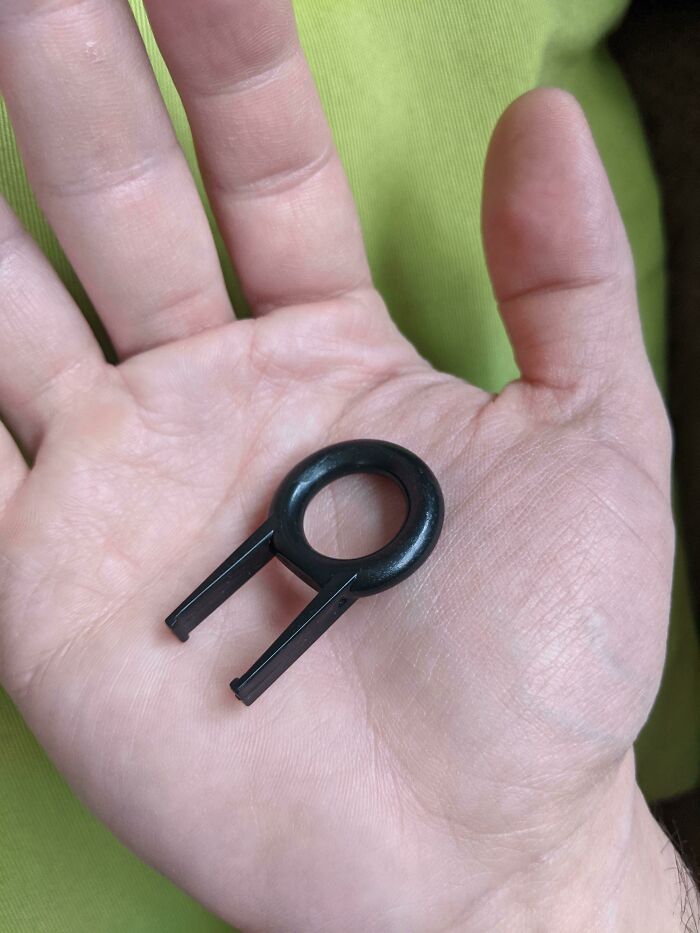
Image credits: NuclearHoagie
#103 I've Seen These Metal (Strings?) Being Taped To Anything From Shampoo Bottles To Face Cream. Some Have Them, Others Don't. What Is It?
Answer: They are anti theft strips and will sound the alarm if you try to pass the detectors at the door when not having paid the item.
Image credits: lucian_blignaut
#104 What Is This Donut Shaped Thing Made Out Of Some Sort Of Recycled Cardboard?
Answer: It’s a core plug for a large roll of paper. You take them out when you load them onto a cutting machine to make smaller rolls like adding machine tapes or toilet paper rolls.
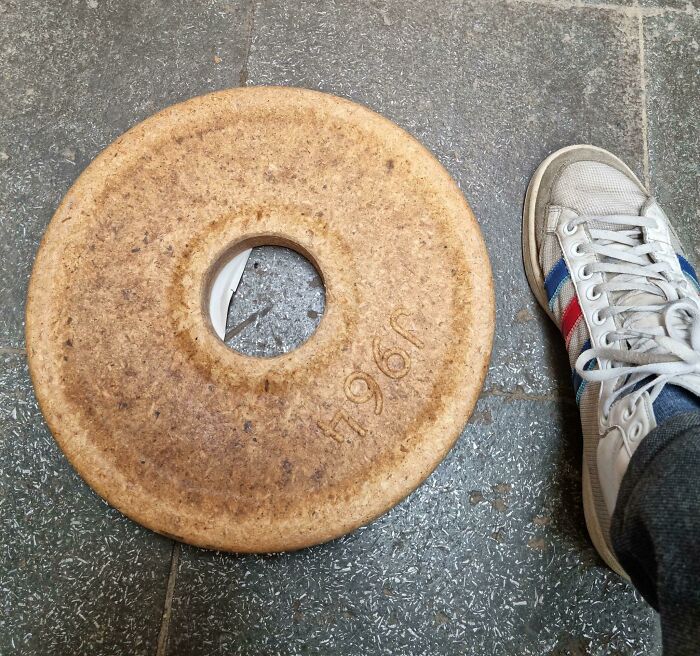
Image credits: Kcnabrev
#105 What Is This Small Wooden Board With Odd Numbers On It
Answer: It’s part of a magic kit where the magician “guesses” someone’s number… should be like 6 of them with various numbers on them…
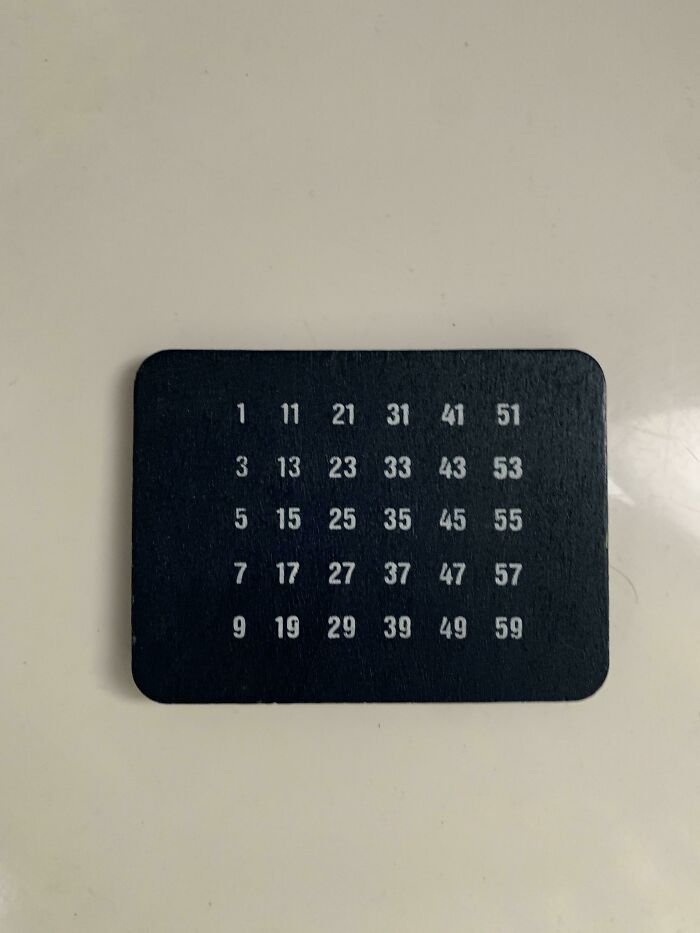
Image credits: Backup-AccountHLS
#106 Floppy Silicone Thing Found At Amazon Bin Store. It Does Not Stick To Bathroom Tile To Hold Toothbrushes
Answer: It’s a spoon rest for cooking so your counter top doesn’t get dirty. Can hold multiple utensils at once. Easy to wash and clean.
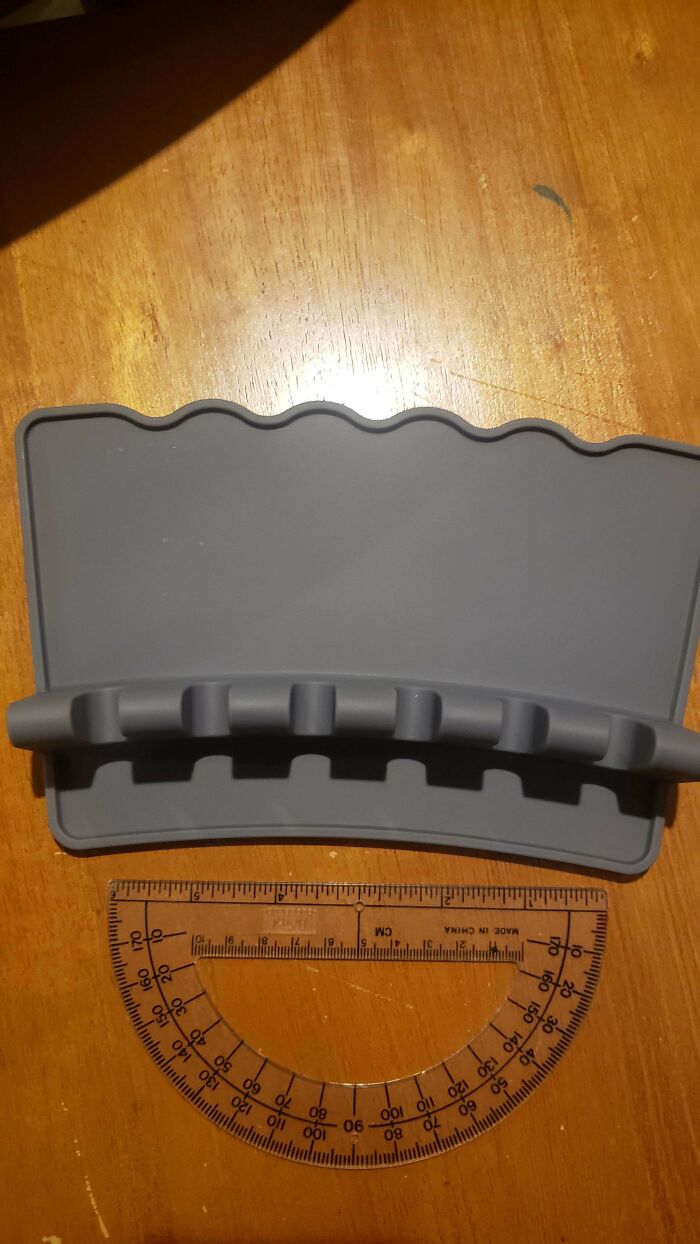
Image credits: PoetryOfLogicalIdeas
#107 What Are These Wooden Tools/Implements Being Used By These Guys On This 1940s Swiss Poster?
Answer: That is a paddle designed to swat back a small ball 'a hornet' in the traditional swiss sport or hornussen.

Image credits: rojothered
#108 This Washed Up On The Beach. Is Very Heavy But Seems To Barely Float. It Is About The 3-4 Feet Long And Looks Like Fiber Glass On The Outside But Not Completely Sure
Answer: It is an outrigger for trolling. you attach a long line to it and this carries it out away from the side of the boat so you can put out two long lines at once. Used for tuna and swordfish in the gulf stream.
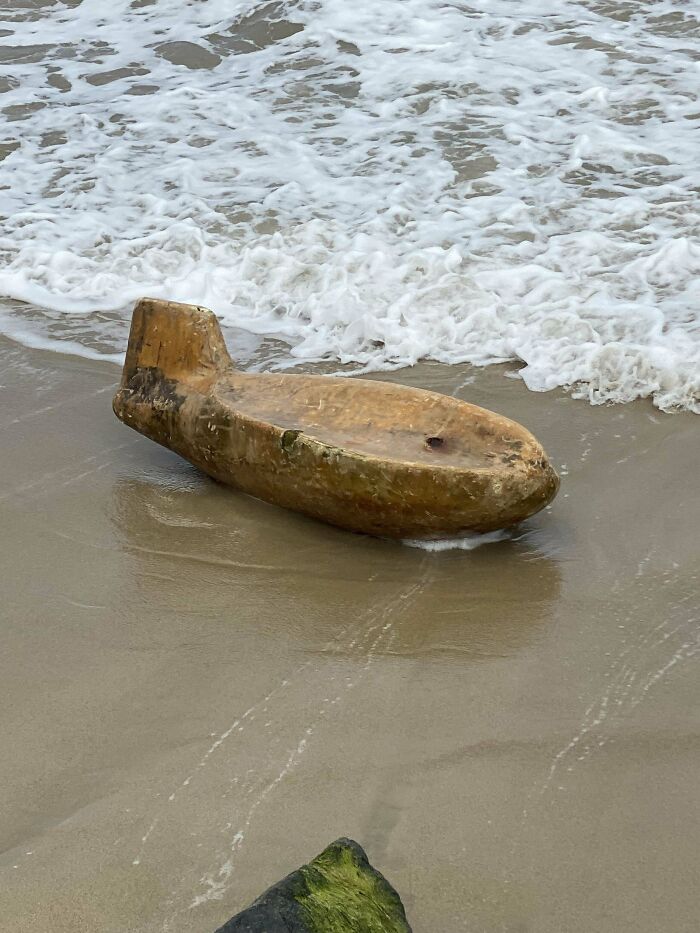
Image credits: avery4206
#109 Aluminum Capsule Found On Beach Of Lake Superior. Has What Looks Like “Manitoba” In Small Letters On One Side. Completely Sealed, But Sounds Like Liquid Inside When Shaken
Answer: It's a fishing net float.
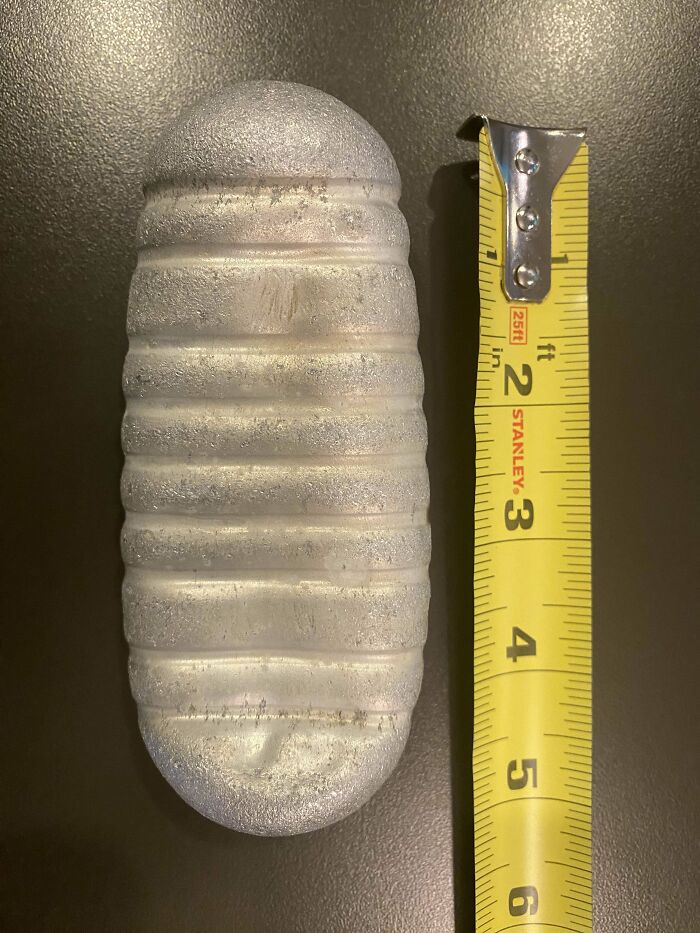
Image credits: redblackrider
#110 What Is This Strange Mirrored Panel Above The Bath In My New UK Apartment?
Answer: A waterproof bathroom mirror TV.
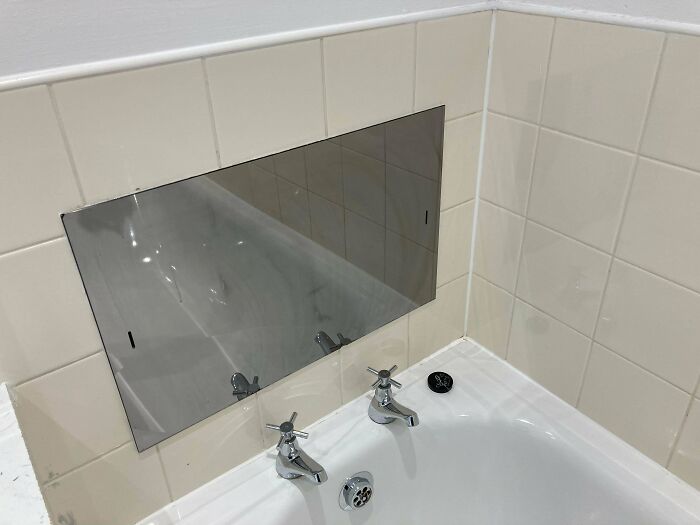
Image credits: natalie_grrr
#111 Wire Suspended Above Freeway Onramps In Chandler And Tempe Arizona
Answer: It is an Eruv.
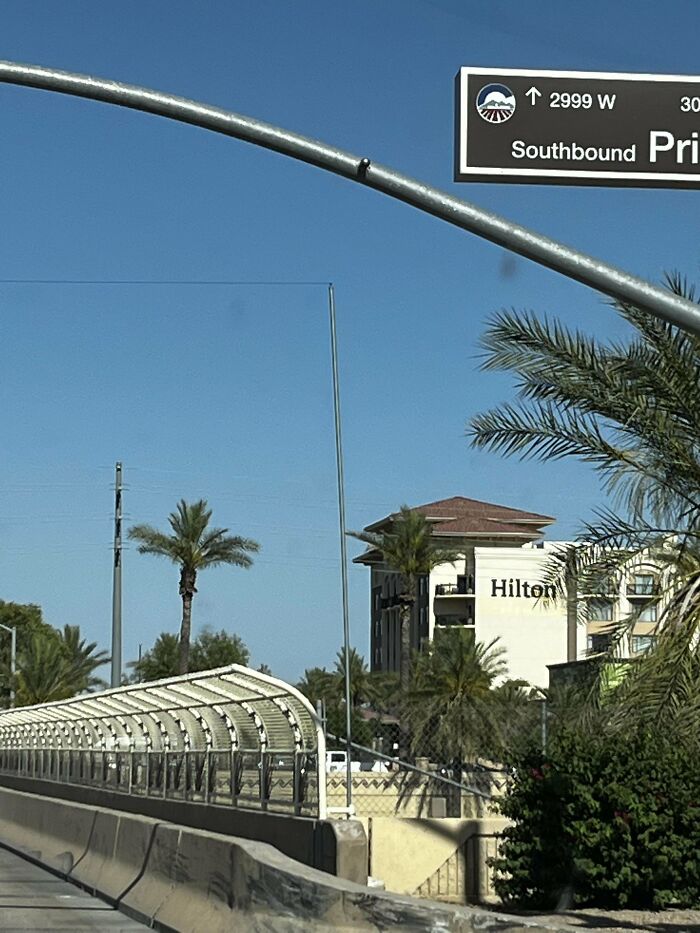
Image credits: fjbruzr
#112 Found On The Side Of The Road. It's Made Of Metal And Says Craftsman On The Front. It Has Some Sort Of Cup With A Nozzle Attached. There's Also A Small Rope. It Looked Heavy. About A Foot An A Half Wide And Not Quite A Foot Tall
Answer: A vintage craftsman wet wheel sharpening stone tool.
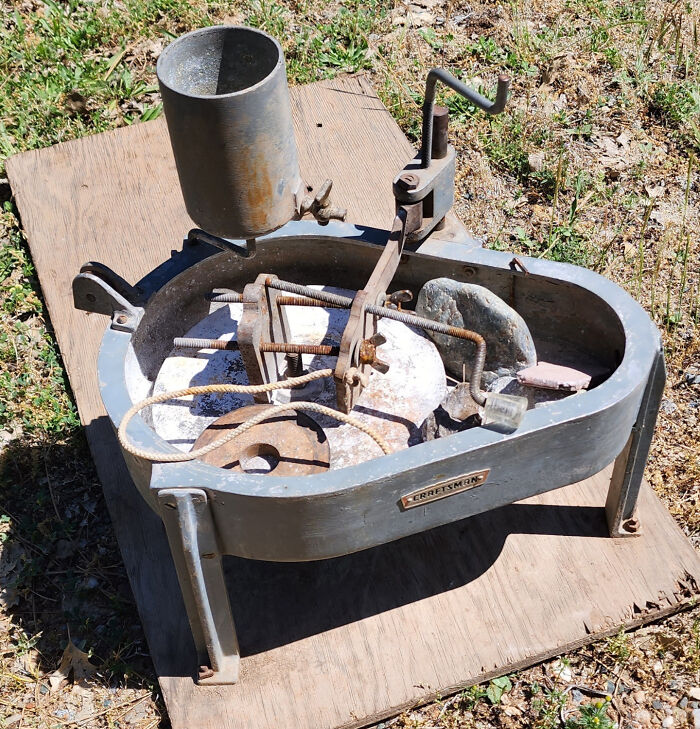
Image credits: DonKiedicRPG
#113 3-4 Inch Metal Barrel With Holes On Top, Bottom, And Sides. Found In Elderly Couples Home While Cleaning Out
Answer: A holder for moth balls, called "mortemoth".
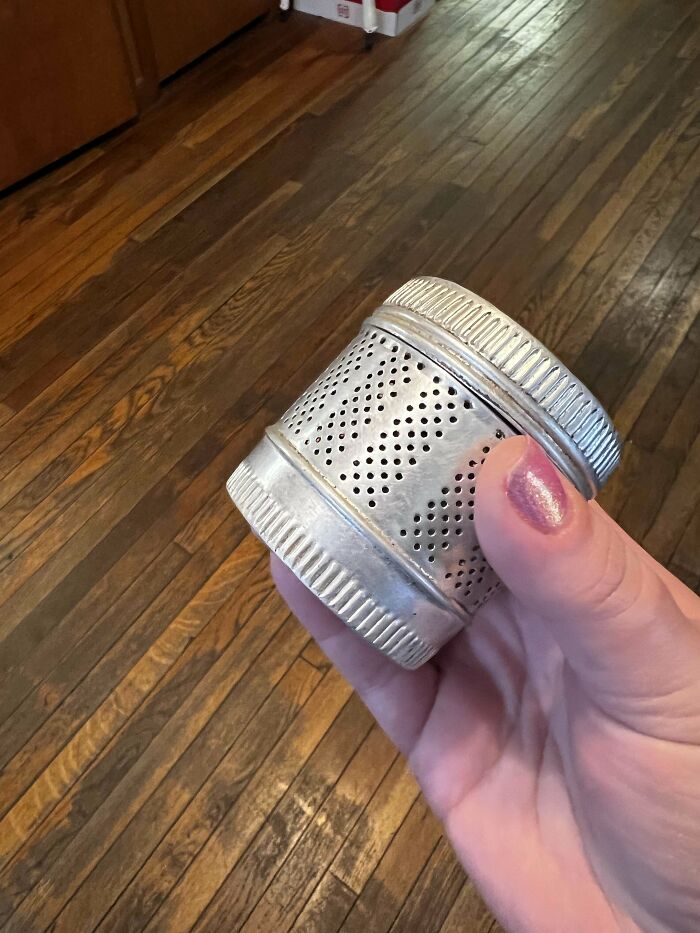
Image credits: pocketfullasunshine1
#114 Fun Plastic Ball Captive In A Strange Plastic Enclosure; Ball Rotates Pretty Freely, Hole In Base Of Enclosure. Found In Garage
Answer: It’s a manual massage roller ball.
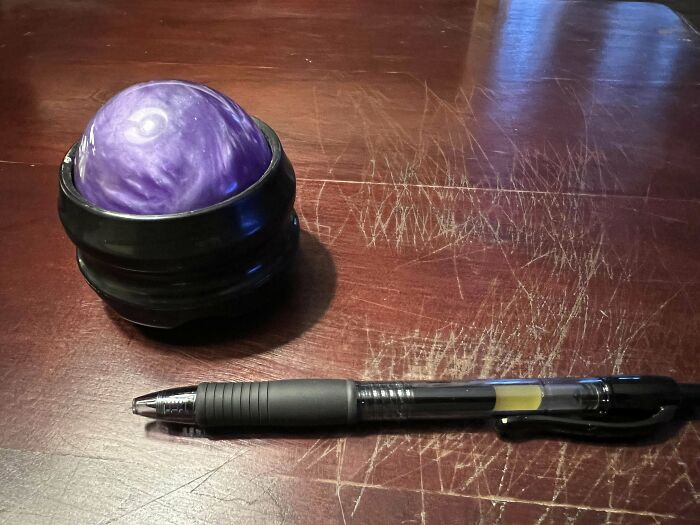
Image credits: doogal580
#115 What Is This Disc Thing I Was Just Handed With My Bagel? About 10 Inches In Diameter. Pouch Is Too Small To Hold A Can. Tag Says “Dist. By Primeline (Alphabroder) Cpsiatracking.com” I Went To The Url, And It Doesn’t Exist. Searched Those Companies’ Products And Found Nothing Relevant
Answer: It's a foldable flying disk.
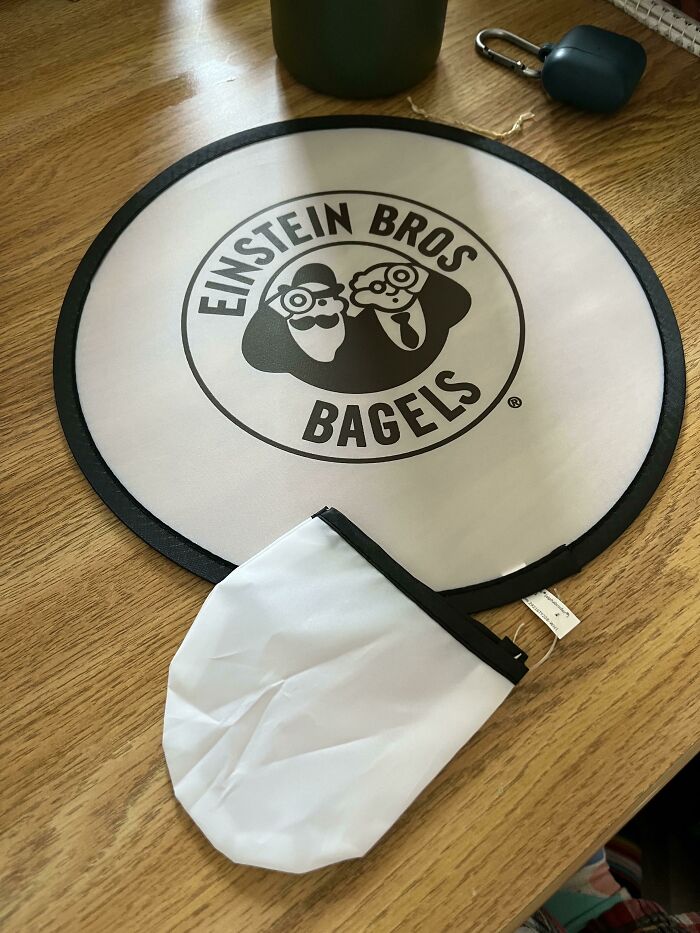
Image credits: ActivityFar178
#116 This Tool Which When Folded Up Is Carried In A Leather Pouch And Ia About 2" Long. Folds Out With Two Telescoping Rods That Extend To About 17"
Answer: It's a vintage “Midget” folding garment hanger.
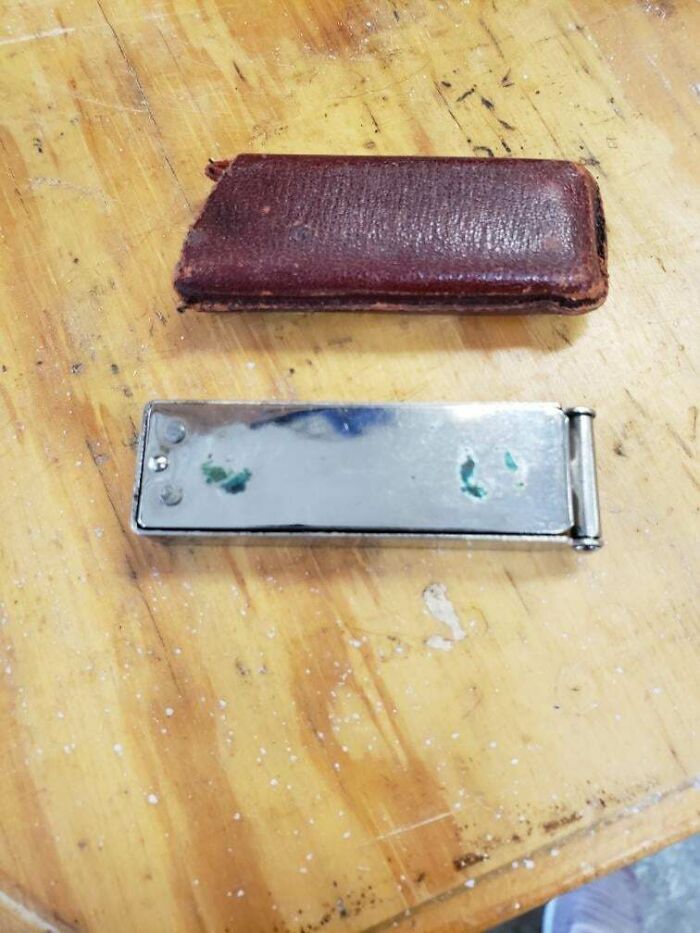
Image credits: MediumSizeMoose
#117 What Is This Table Of Numbers With Dots Found On A Plastic Suzuki Wheel Arch?
Answer: The month and year of manufacture. It’s a permanent dent made in the tool steel of the injection molding tooling, so the most recent dent is the birth date of the wheel arch.
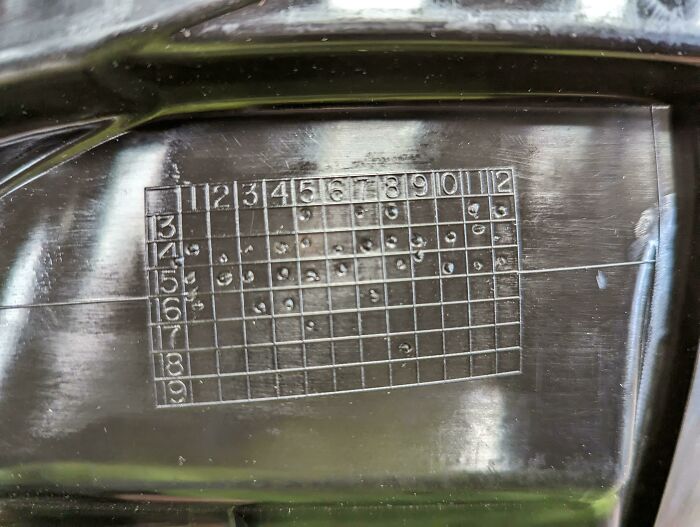
Image credits: xrawmonkey
#118 What Are The Built-In Funnel-Like Things In These Early 20th Century Kitchen Cabinets?
Answer: A Hoosier flour sifter. The flour is contained in a box above or in this case - the conical bag and you crank out what you need below.
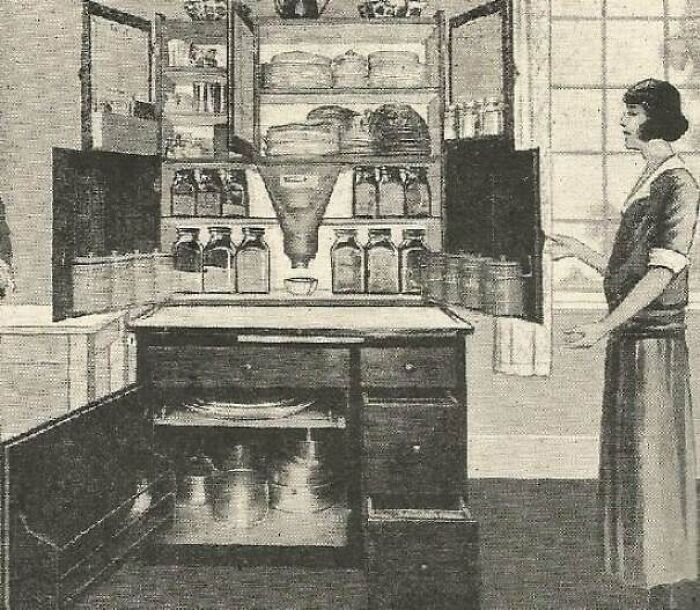
Image credits: 98_percent_angel
#119 Large, Heavy Metal Hexagonal Object Found In Central Wyoming. It Has 3 Hollowed-Out Containers Each Attached To A Central Pipe. The 'Lids' On Top Are Bolted Shut
Answer: A ball mill. Similar in concept to a rock tumbler, but used by industry to powderize or smooth materials.
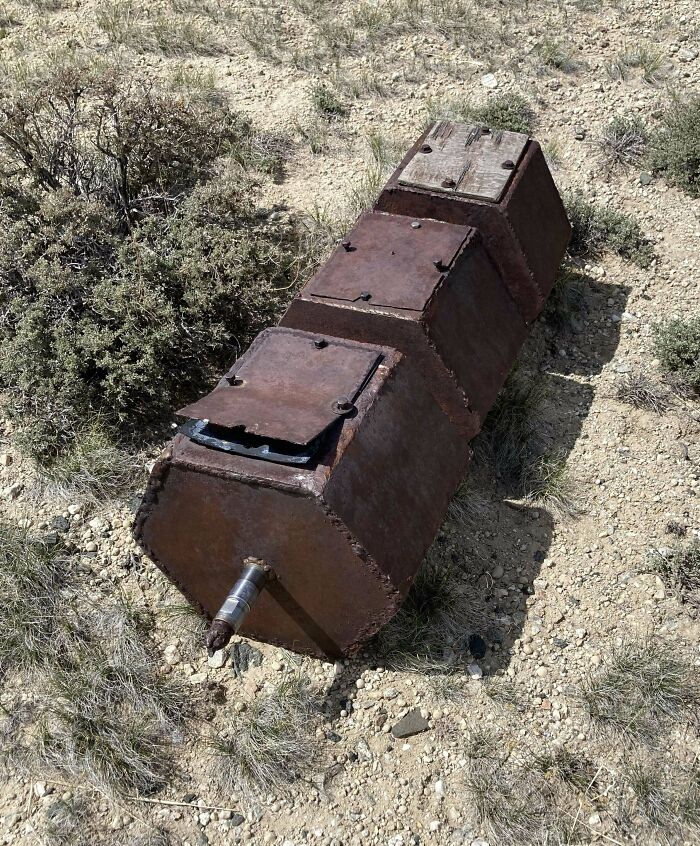
Image credits: BoutelouaGracilis
#120 What Is The Function Of This Row Of Flexible Plastic Tabs On My Fridge Door? It’s Not Removable
Answer: To hold bottles up, so they don't fall out of the door.
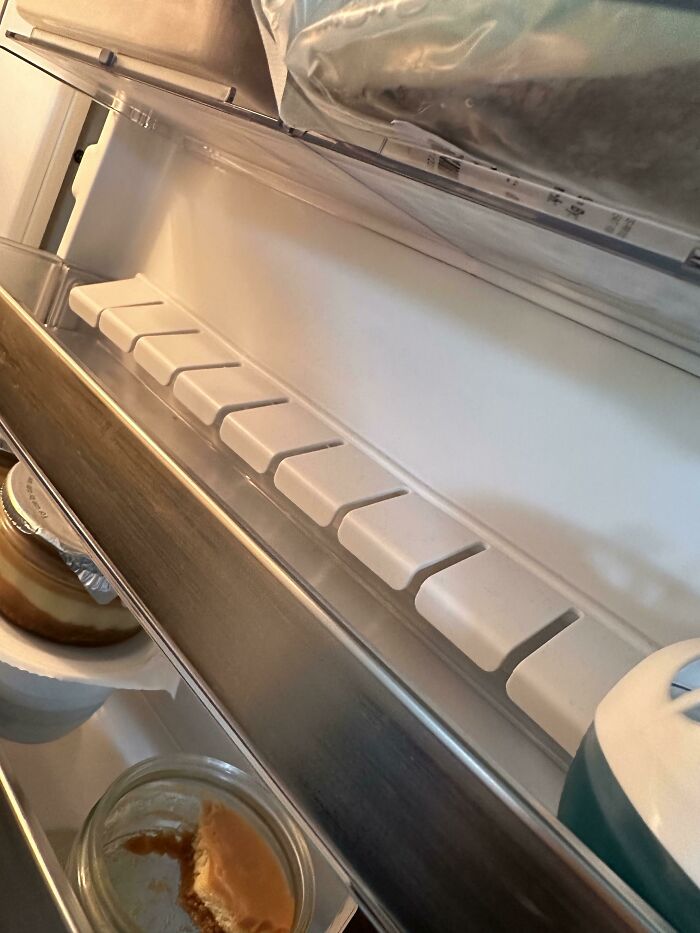
Image credits: perksofbeingcrafty
#121 Small Metal Thing Attached To Pipe. Looks Like A Pressure Valve At The Top?
Answer: A Remfly Perimeter Trip Alarm.
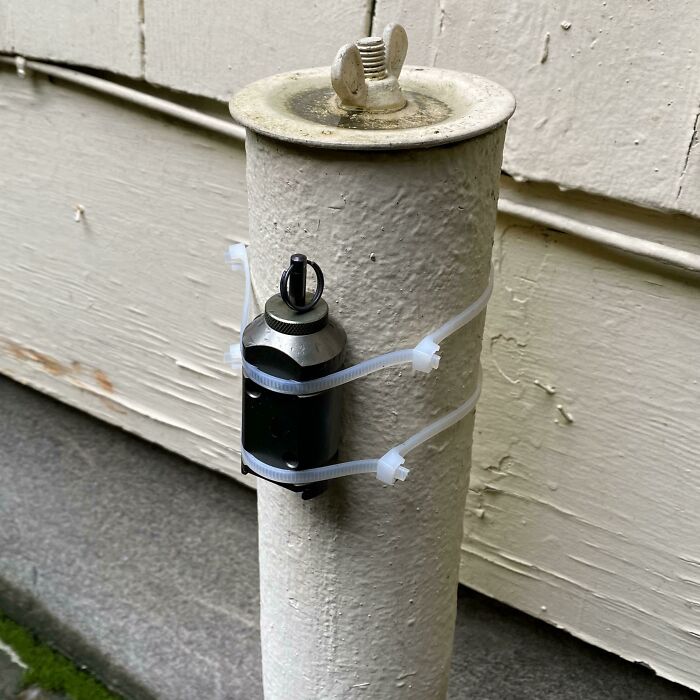
Image credits: johnnycross798
#122 Small Metal Rocket Found At A Yard Sale Years Ago. Seen Only Other Other Similar Item, But It Had No Description As To What It Was
Answer: It's a lazy dog. A small bomb dropped in large numbers. No explosives in it.
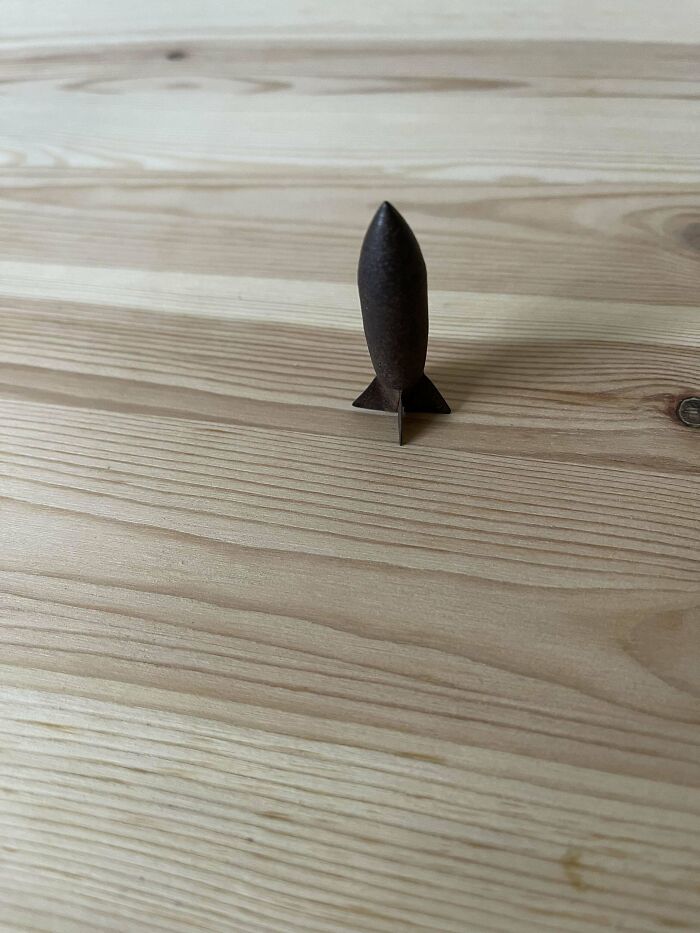
Image credits: maxuhmillion28
#123 Woven Bamboo Object Found In An Antique Shop In Kyoto, Japan. I Believe The Owner Said It Had Something To Do With Tea. Does Anyone Know What This Is?
Answer: These are tiny mock versions of what they used to use on riversides to stop erosion. Now they're mostly just decorations or hashi holders (chopstiick holders, but they have much smaller ones - i have some in my cuppard) so your food-covered hashi doesn't touch the table. They were called Takejakago.
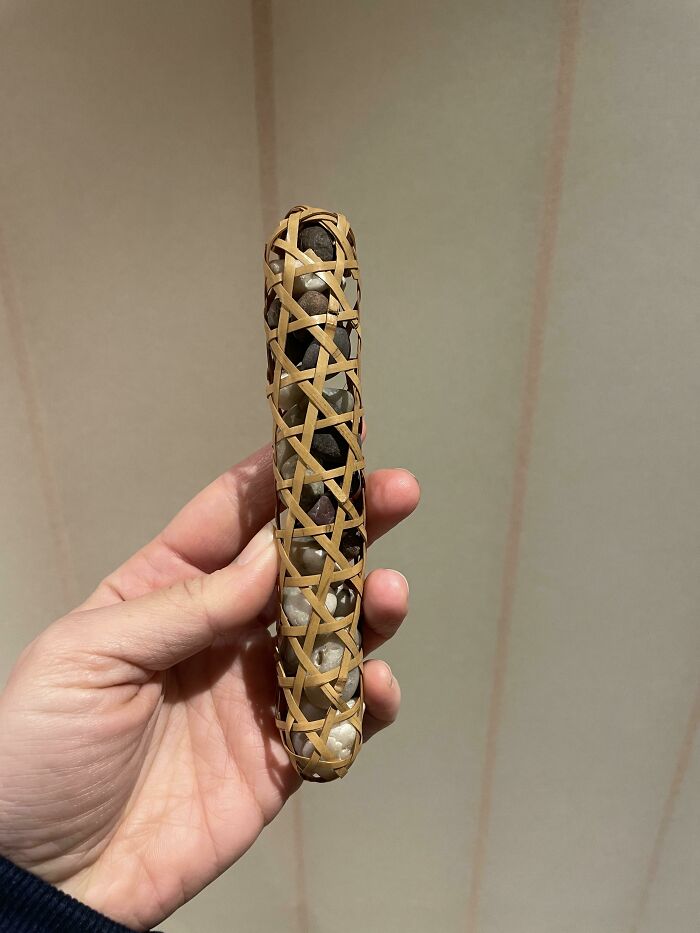
Image credits: Sea_Negotiation_2651
#124 Metal Cylinder Washed Up On Beach, Destroyed By Bomb Squad (Pic Taken From News Site)
Answer: Mk 25 marine location marker.
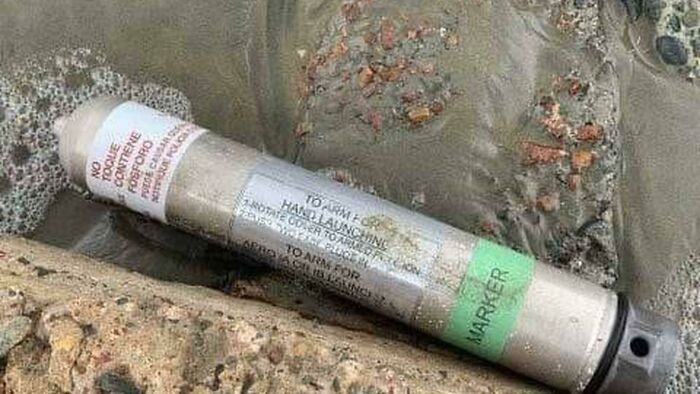
Image credits: JForce1
#125 Lightweight, Metal Object With Chain Connecting Two Pieces. Both Sides Are Identical With No Identifying Marks. Labeled As “Mystery Item”
Answer: It’s a pull chain and hanging bracket for a solid door bell.
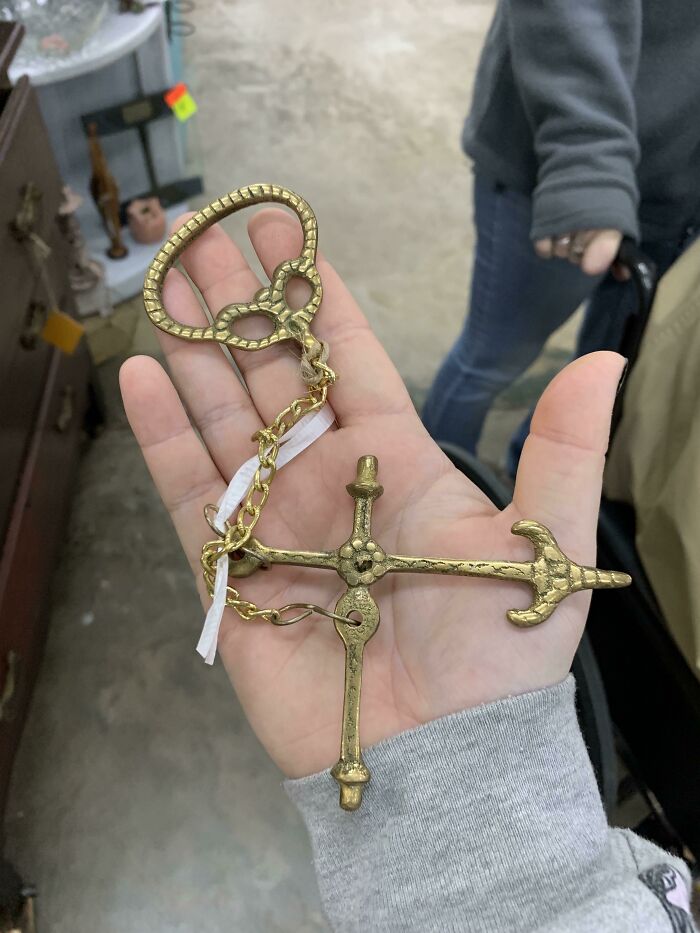
Image credits: tired-until-infinity
#126 Anyone Know What This Is For? It Came With My House From 1948. Measures About 4.5” X 5”. Front Part Lifts Up. The Only Markings Is A Handwritten “50” On The Back. Looks Like It Would Have Originally Been Black
Answer: It's a hose holder that prevents tangling.
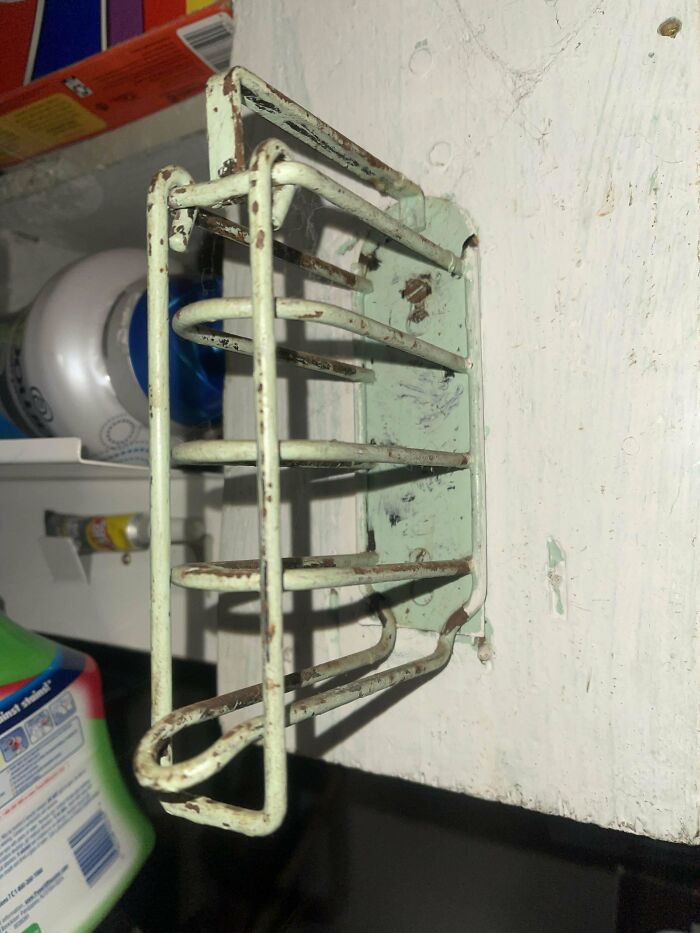
Image credits: No_Maintenance_550
#127 What Is It? I Found This In One Of Our Flowerbeds. It Looks Like Two Chain Links With Four Rubber Bands Around Them. On The Side It Says “Narrow” And “Zsc-Z51”
Answer: Fidget toy.
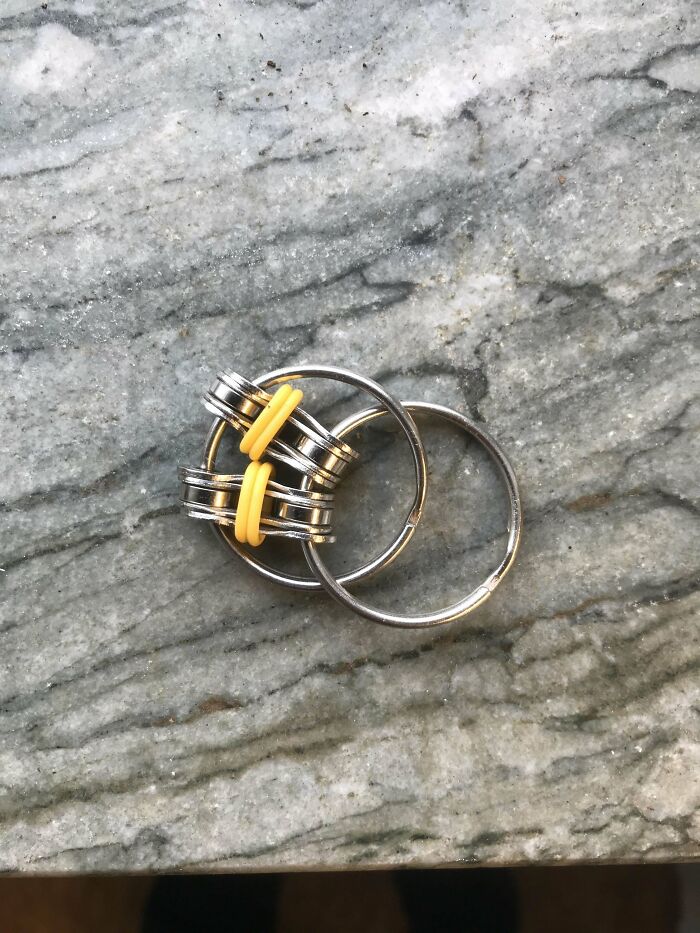
Image credits: Far_Ad8215
#128 Purple/Blue Light In Hotel Only Comes On When Hitting Up Channel
Answer: It's an infrared based occupancy sensor. The TV controller is outputting an infrared signal activating the sensor.
Source: husband who is an electrical engineer.
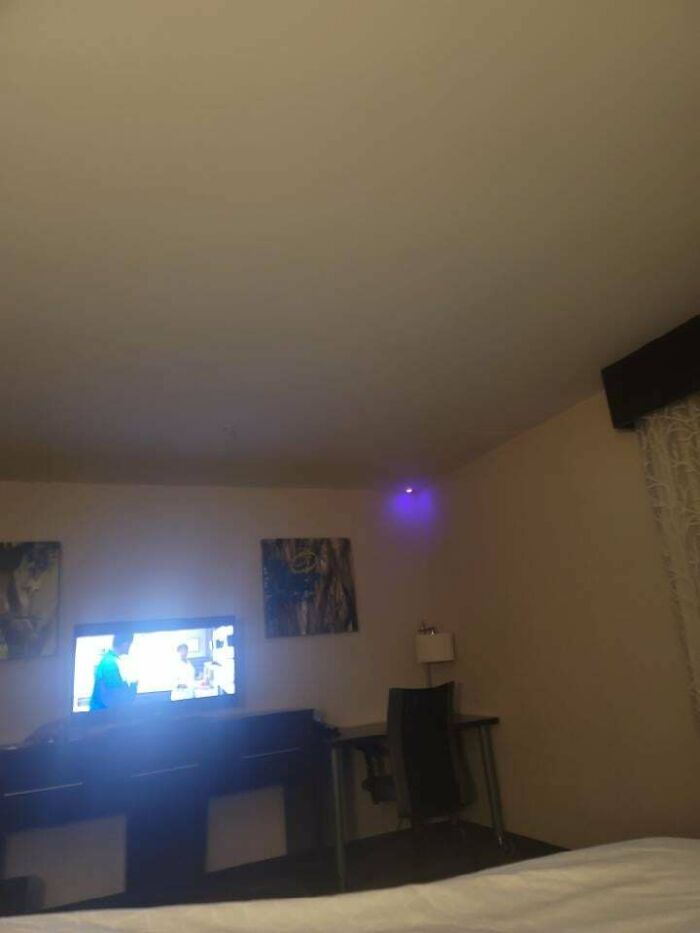
Image credits: Infomaniac63
#129 Anyone Know What This Oval Glass Dish Was Used For? It Has A Raised Circle In The Top Left. The Pen Is Next To It To Indicate Size. Thanks!
Answer: Snack plate. Circle is for a cup to rest in.
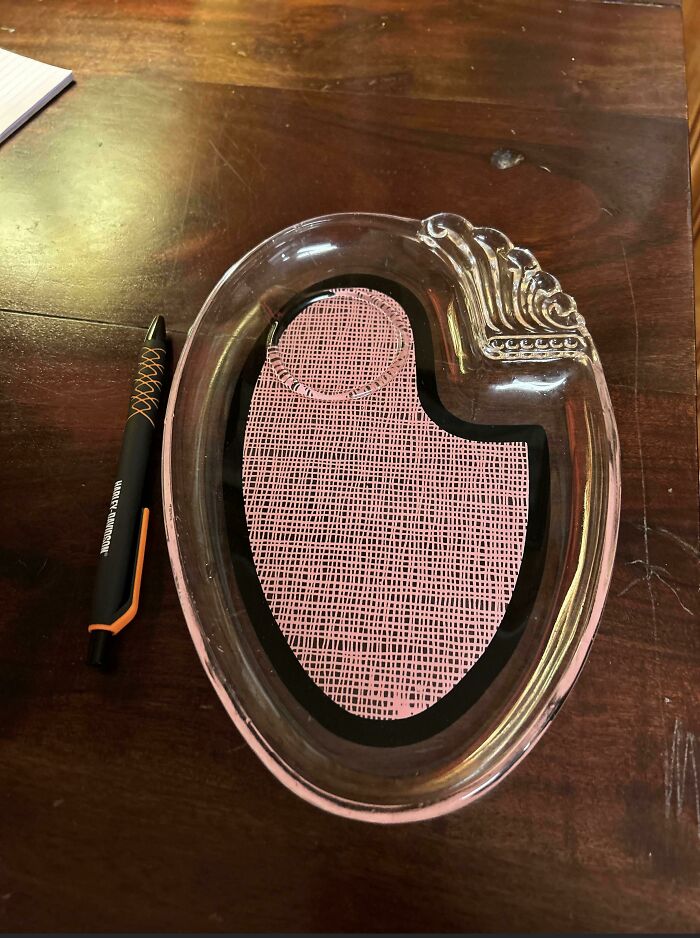
Image credits: aft25
#130 Found Behind A Metal Fabrication Factory. Feels Like Plexiglass. 6-8 Feet Long. Very Light. No Words Or Numbers On It. Studded Metal Around The Plexiglass
Answer: Canopy covers for glider cockpits.
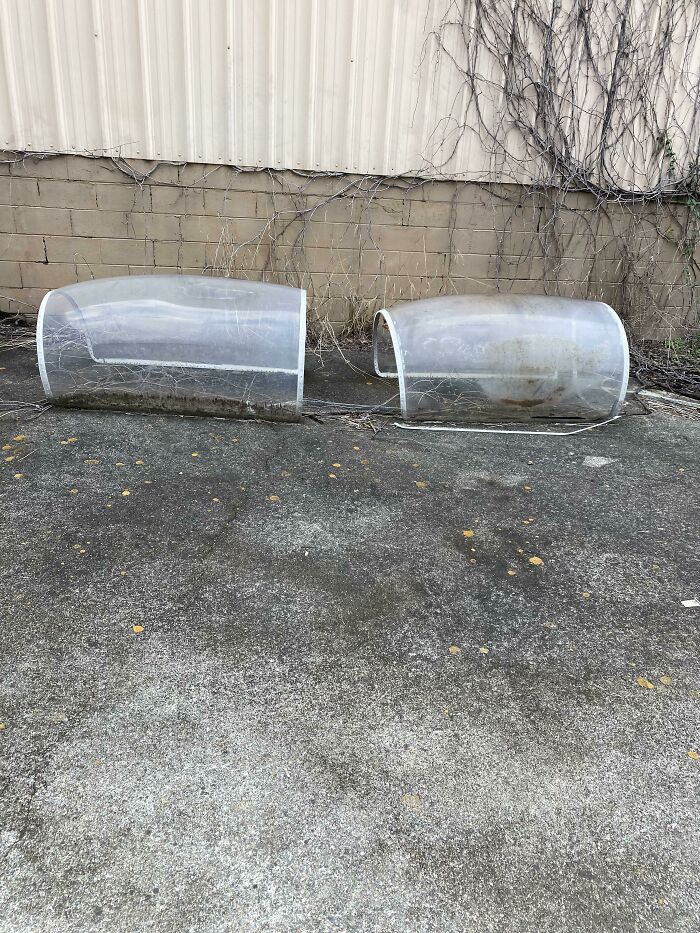
Image credits: No-Adeptness1671
#131 Found In A Garage In The Pnw. Metal, Copper-Colored Disk About 2-3 Inches Across And Over 1 Inch Thick. One Side Has 2 Teardrop Grooves That Almost Looks Like A Pig Nose, The Other Side A Holographic Sticker Of A Rock And Roll Skeleton Skull
Answer: It’s a pog slammer.

Image credits: Tribulus_terrestris
#132 Found A Weird Rolling Shelf In My Wardrobe
Answer: It’s for ties.
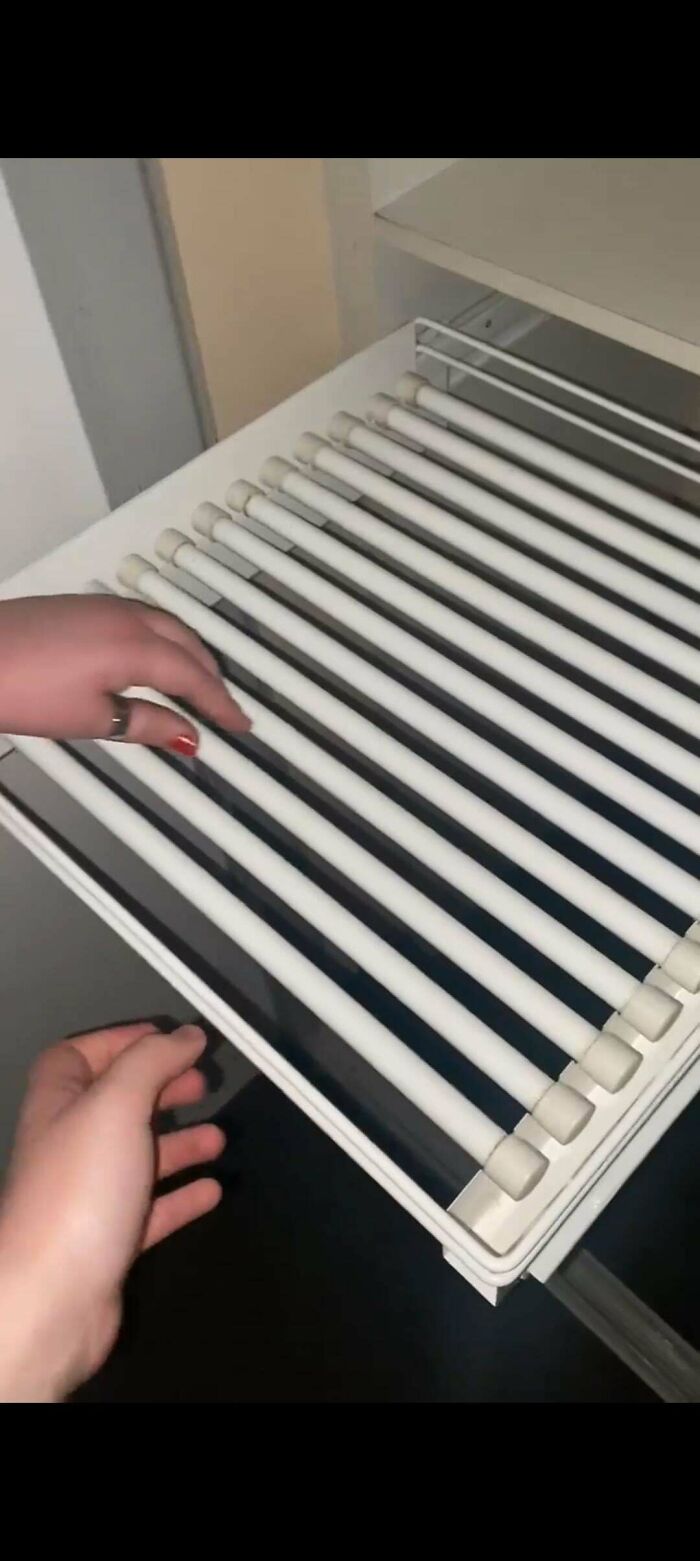
Image credits: elliebelliemk
#133 This Inflatable Pillow-Like Object Was Found In Our Yard After A Windstorm. There Is An Opening To Inflate/Deflate It. There Is No Other Text On The Object
Answer: An inflatable cushion for securing cargo.
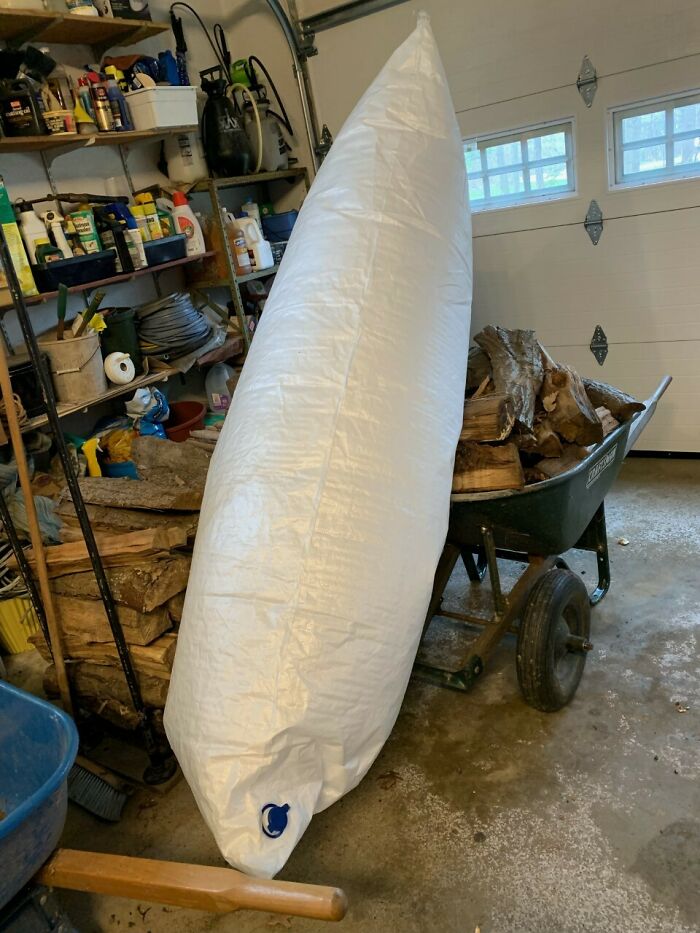
Image credits: SmartGround754
#134 Wooden Stick. Made Of Dark Wood With Wrapped String Detail, Roughly 2 Feet Long, With Big Heavy Lump At One End, And A Small Hole The Other End. Too Short To Be A Walking Stick
Answer: A South African Knobkerrie.
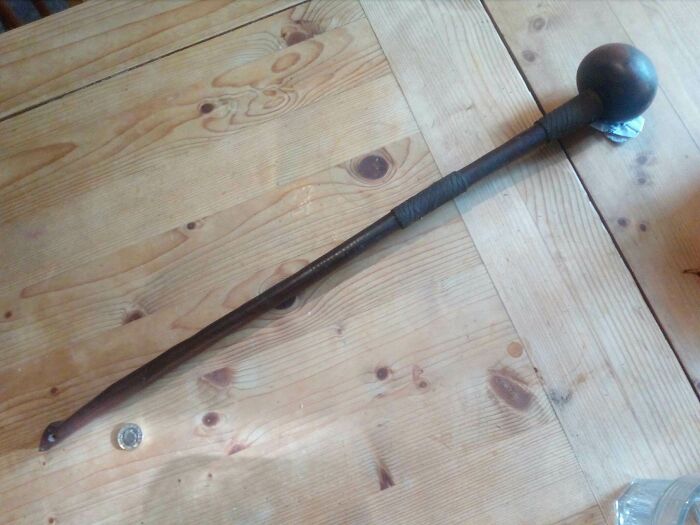
Image credits: Zeeplebooplebrix
#135 What Is This Electrical Outlet Box Plugged In To The Outlets At My Hotel?
Answer: It's a type of WAP for the hotel staff called AT&T Staff Alert.
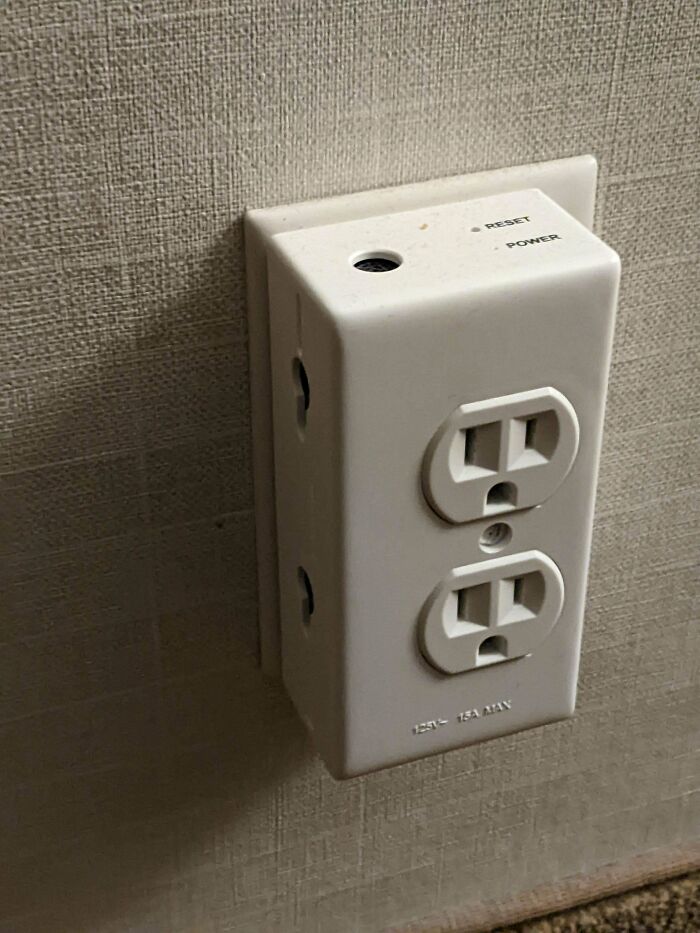
Image credits: S3-000
#136 Found This Weird Mountain Dew Thing. It's Magnetic And That's Pretty Much All I Know About It. I Google Image Searched It But Used Nothing But A Lemon Juicer So... What Is It?
Answer: Cell phone holder for the car vent.
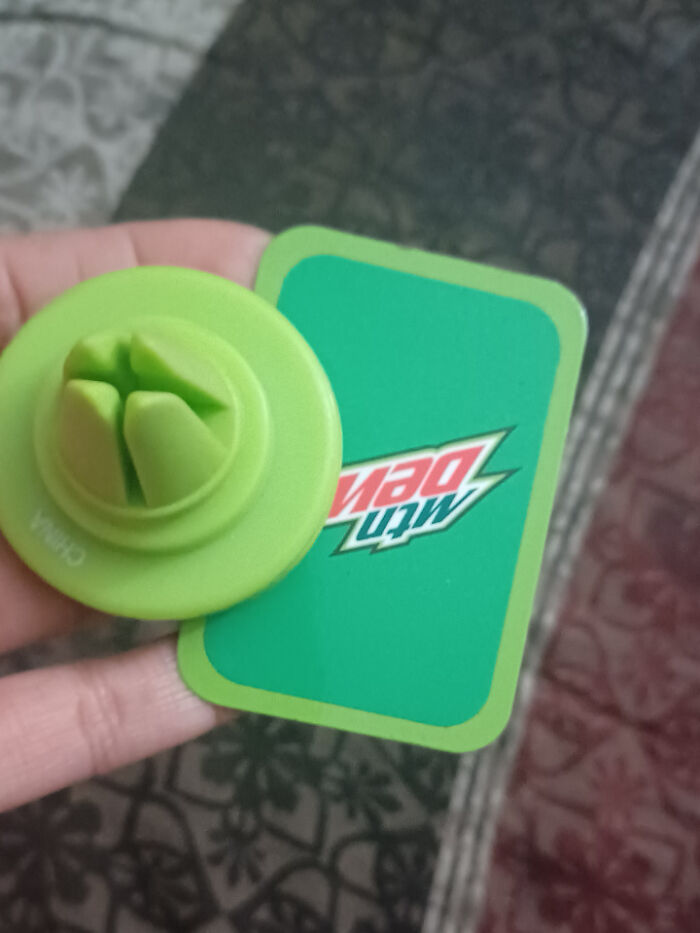
Image credits: aut0asfixiacion
#137 Large Metallic Bar Across The Top Of A Bike Frame, Apparently Collapsible, With A Knob
Answer: It’s an old style attachment for a child seat.
Image credits: AlfajorConFernet
#138 Metal Disk Encased In A Dome Shaped Award From The Atomic Energy Commission
Answer: It's a paperweight.
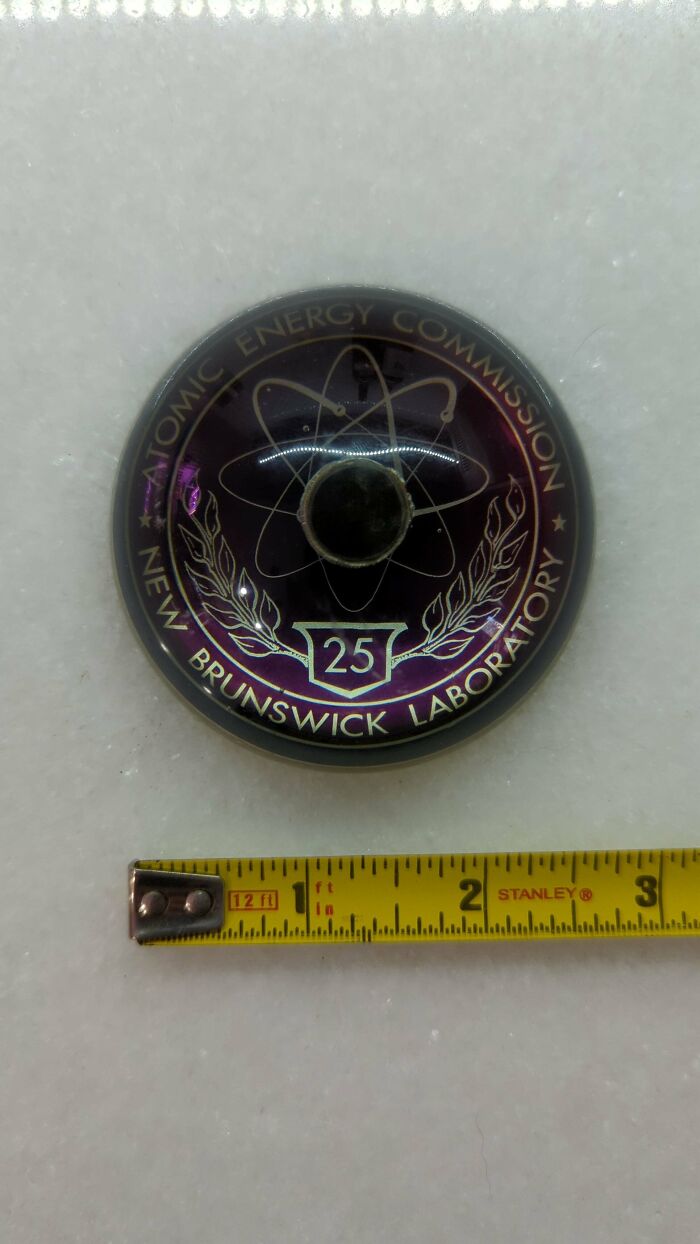
Image credits: iang626
#139 A Black Metal Puck With A Silver Tri-Point Pattern On One Side; Unscrews Into 3 Pieces. About 2in/5cm Wide, 1.5in/4cm Tall, Weighs About 13oz. Listed As "Mystery Item" At A Public Auction In Southern California
Answer: I think it's actually to evenly distribute the coffee rather than tamp it, the tamper would be used after this thing and has a flat bottom.
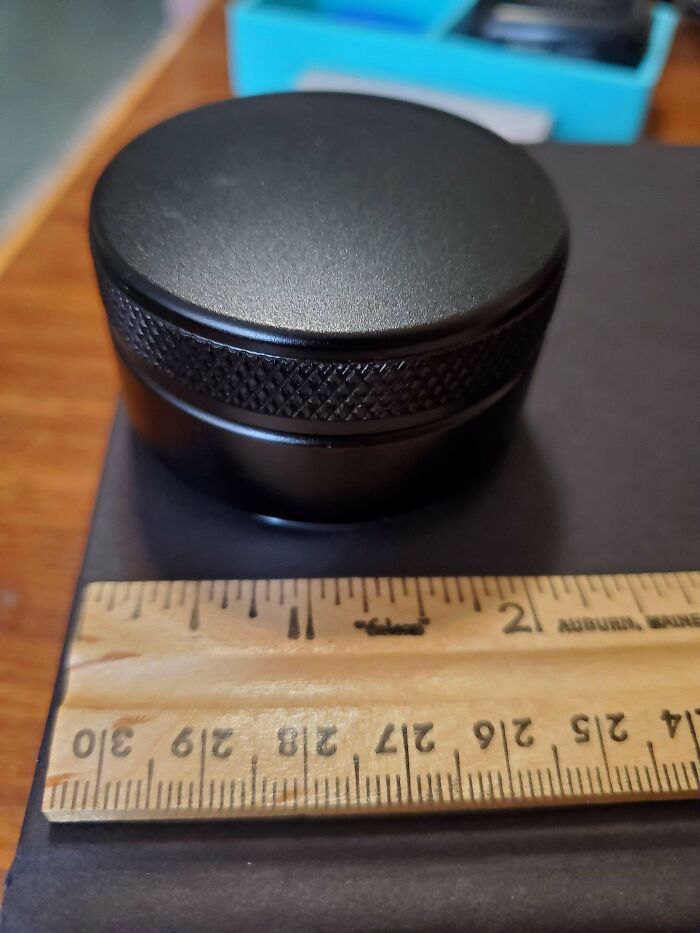
Image credits: motherherbivore_
#140 Large Two Chambered Concrete Object Found In The Rural Woods Of Iowa
#141 Strange Tower Made Out Of Storage Containers On A Construction Site. Has Doors In The Middle And Also A Roof Hatch. The Inside Is Lighted With Lamps
#142 Found In The Middle Of The Woods Near Suburbs. Several Tubes Along The Edge. Obviously Some Kind Of Burn Pit
#143 Weird Plastic Red "Key" That I Found In My Apartment After The Firefighters Left After A Fire
#144 This Object Felt From The Sky Yesterday In The City Of Santos, Brazil, And Hit A Car Parked In The Street. The Car Owner Said It Was Pretty Hot When Found And Had A Rotten Egg Odor
#145 I’ve Ruled Out With Experts It Being Any Type Of Electrical Insulator Which Is The Main Answer I Get. Found In Western Ma River While Artifact Hunting, Village Settled Circa 1750s & In 1845 Boston Rail Line Went In. Def Old Dump Site. Glass & Porcelain. Ornate Swirls, No Makers Mark. Have Videos Too
#146 What Are These Rails Between The Main Rails Called And What Is Their Purpose?
#147 Some Kind Of A Plastic Handle In The Ceiling Of The Bathroom In An Old Apartment. It Has A Metal Rusty Long Rod Attached To It That Can Be Seen While Pulling It Down, And Probably A Spring, Cus It's Jumping Right Back When Letting It Go
#148 Found In The Middle Of The Woods Near Suburbs. Several Tubes Along The Edge. Obviously Some Kind Of Burn Pit
#149 Found This Spiked Metal Collar Hanging In One Of The Upstairs Rooms In The House I Just Bought In Spain
#150 What Is This Tiny Fork For? Dinner Fork For Scale
]]>


 Total Time: 18 to 22 minutes
  Yield: 5 to 6 burgers
  Category: Main Dish
 Method: Grill
 Cuisine: American


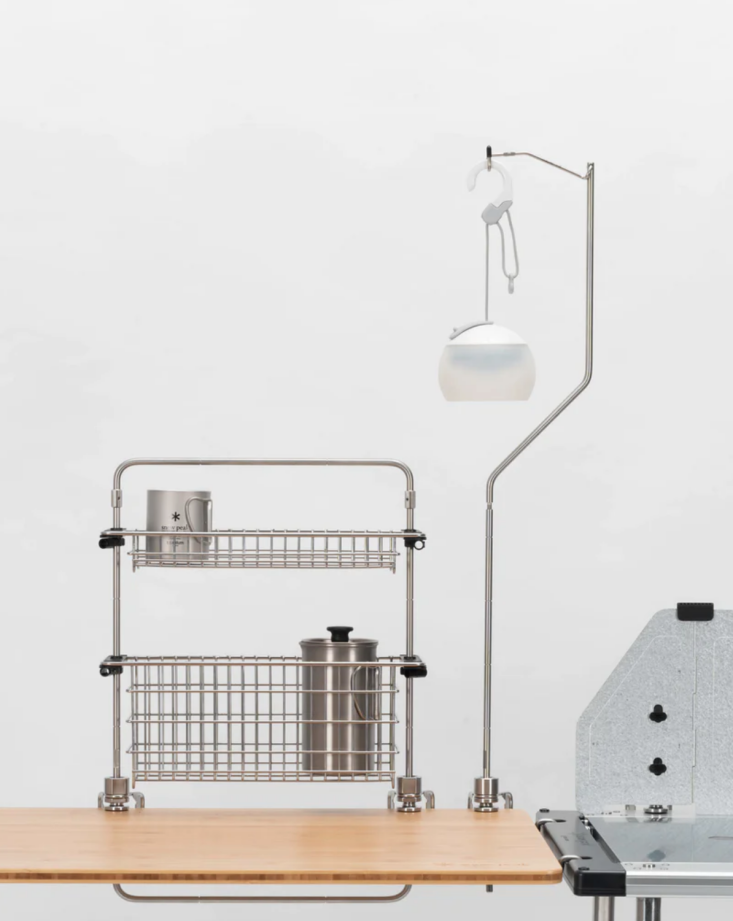

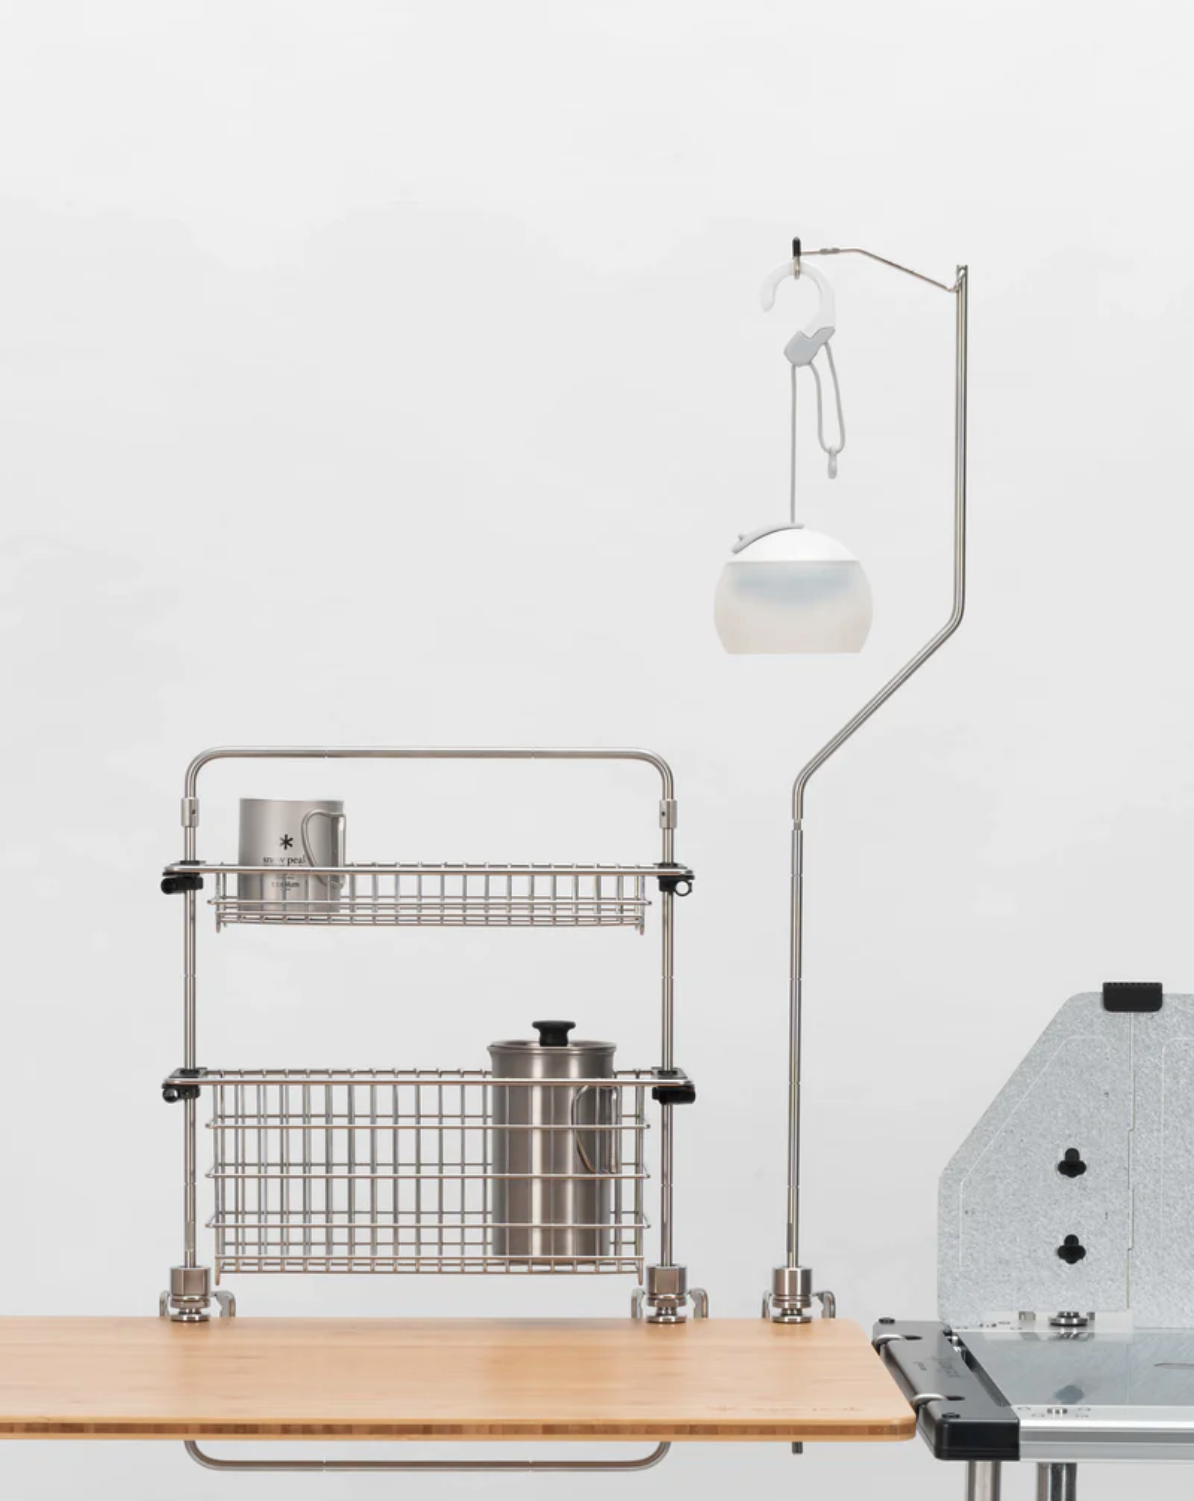 Above: The Tabletop Architect series is made of modular components that are intended to be used with Snow Peak’s IGT Camp Kitchen. But with simple clamps that affix to a tabletop ((The TTA Unit Clamp Tools sold separately), why not use them indoors? The TTA Unit Frame ($44.95) can be used with the Shallow Mesh Tray Shelf Unit ($39.95) or the Deep Mesh Tray Shelf Unit ($54.95) for easy countertop storage.
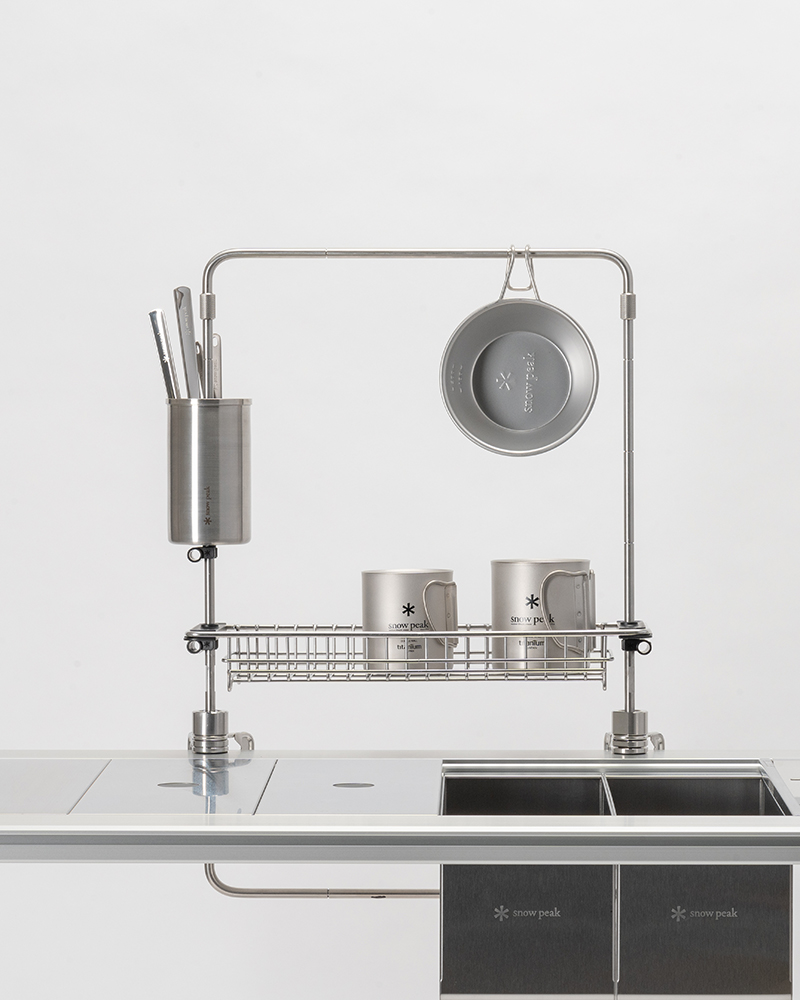 Above: Or hang kitchen tools from the top rail.